
I finally finished my husband’s white shirt that was supposed to have been a Christmas present. I procrastinated on working on this shirt for months, since I was terrified of staining that white fabric. I just don’t live a “white shirt” kind of lifestyle. When I had finished sewing, the shirt had mysterious brown spots that I blame on the cat, my washable marker markings, and a couple of small black oil stains from my buttonholer. Everything but the black oil stains washed out fine, and those are not very noticeable.

The other reason it took me forever to get the shirt done is that I tend to research a project to death, trying to get it right the first time. I hadn’t sewn a men’s shirt before, and I did learn a lot. Actually, about four years ago, I decided to improve my sewing skills until I could sew a shirt for my husband that would pass for ready-to-wear. I think I just achieved that!
Now my new goal is to work on my organizational skills so that I can get more sewing projects done. My list of things to sew has just been getting longer and longer, my wardrobe is looking a bit worn, and I’ve changed size since last year, so there are many things I need and want to sew. I’ve completely lost the desire to buy any ready-to-wear clothes other than socks, so I’ve got to get sewing! Even something as simple as a RTW t-shirt doesn’t fit me well enough to satisfy me now that I know how much better clothes can fit. I don’t normally make New Year’s resolutions, because I never keep them, but I made one this year to get more sewing done.
I have been gradually working my way through the Threads magazine archives, starting with their first issue. Here’s one tip I learned (issue 64, page 45) that came in handy on this shirt:
If you have a pocket with curved edges, you can use silk organza (or tissue paper) to help you turn up the seam allowances over a heavy paper template. Place the organza under the pocket, then pull it up over the edges as you press them over the template.


Here’s an example of how I think everything to death, then rarely get any actual sewing done. I’ve been trying various collar point turning methods, trying to find one I like. The last time I sewed a collar had been on a shirtdress for myself. I used the traditional home sewing method for trimming and turning the collar point, and I ended up with limp collar points with holes at the tip. I was pondering why RTW collar points are so much better, and then I had a slap my self on the forehead moment – if I want RTW results, I have to use RTW methods. And, as it happens, I’ve read about RTW collar point turning methods, but never tried them.
In this Seamwork article, David Page Coffin writes about various point turning methods. On the white shirt, I used the “Third Approach” method from that article. After my bad experience with the shirtdress collar, I went completely the other way on the white shirt. I didn’t trim my interfacing out of the seam allowances and I barely did any trimming on the collar points. Predictably, the collar points were very bulky and difficult to turn. I couldn’t get them quite as sharp as I wanted, because there was simply too much bulk at the points (they still look fine, though).
I tried all sorts of things trying to find the perfect collar point method.
I tried turning a collar with tweezers and a hemostat. I didn’t like it at all. It was hard to do, and although I’m sure it gets easier with practice, the collar does not end up turned out completely, especially if your fabric is thick, so why bother? You might as well just turn the collar by pinching it with your finger and thumb (which I demonstrate below).
Of course I tried using a bamboo point turner. This works OK on thin fabric, but I couldn’t get my points to turn out completely on thicker fabric.
I thought maybe I needed a collar point turner like the “Ms Designer’s Multipurpose Point and Tube Turner” (the thing that looks like tongs) mentioned in the Seamwork article on turning points. This point and tube turner is no longer made, but I saw used ones on ebay and Etsy. I almost bought one, but then I decided to try and make a collar point turner instead. Here’s what I came up with, after looking at two different industrial collar point turners (here and here):
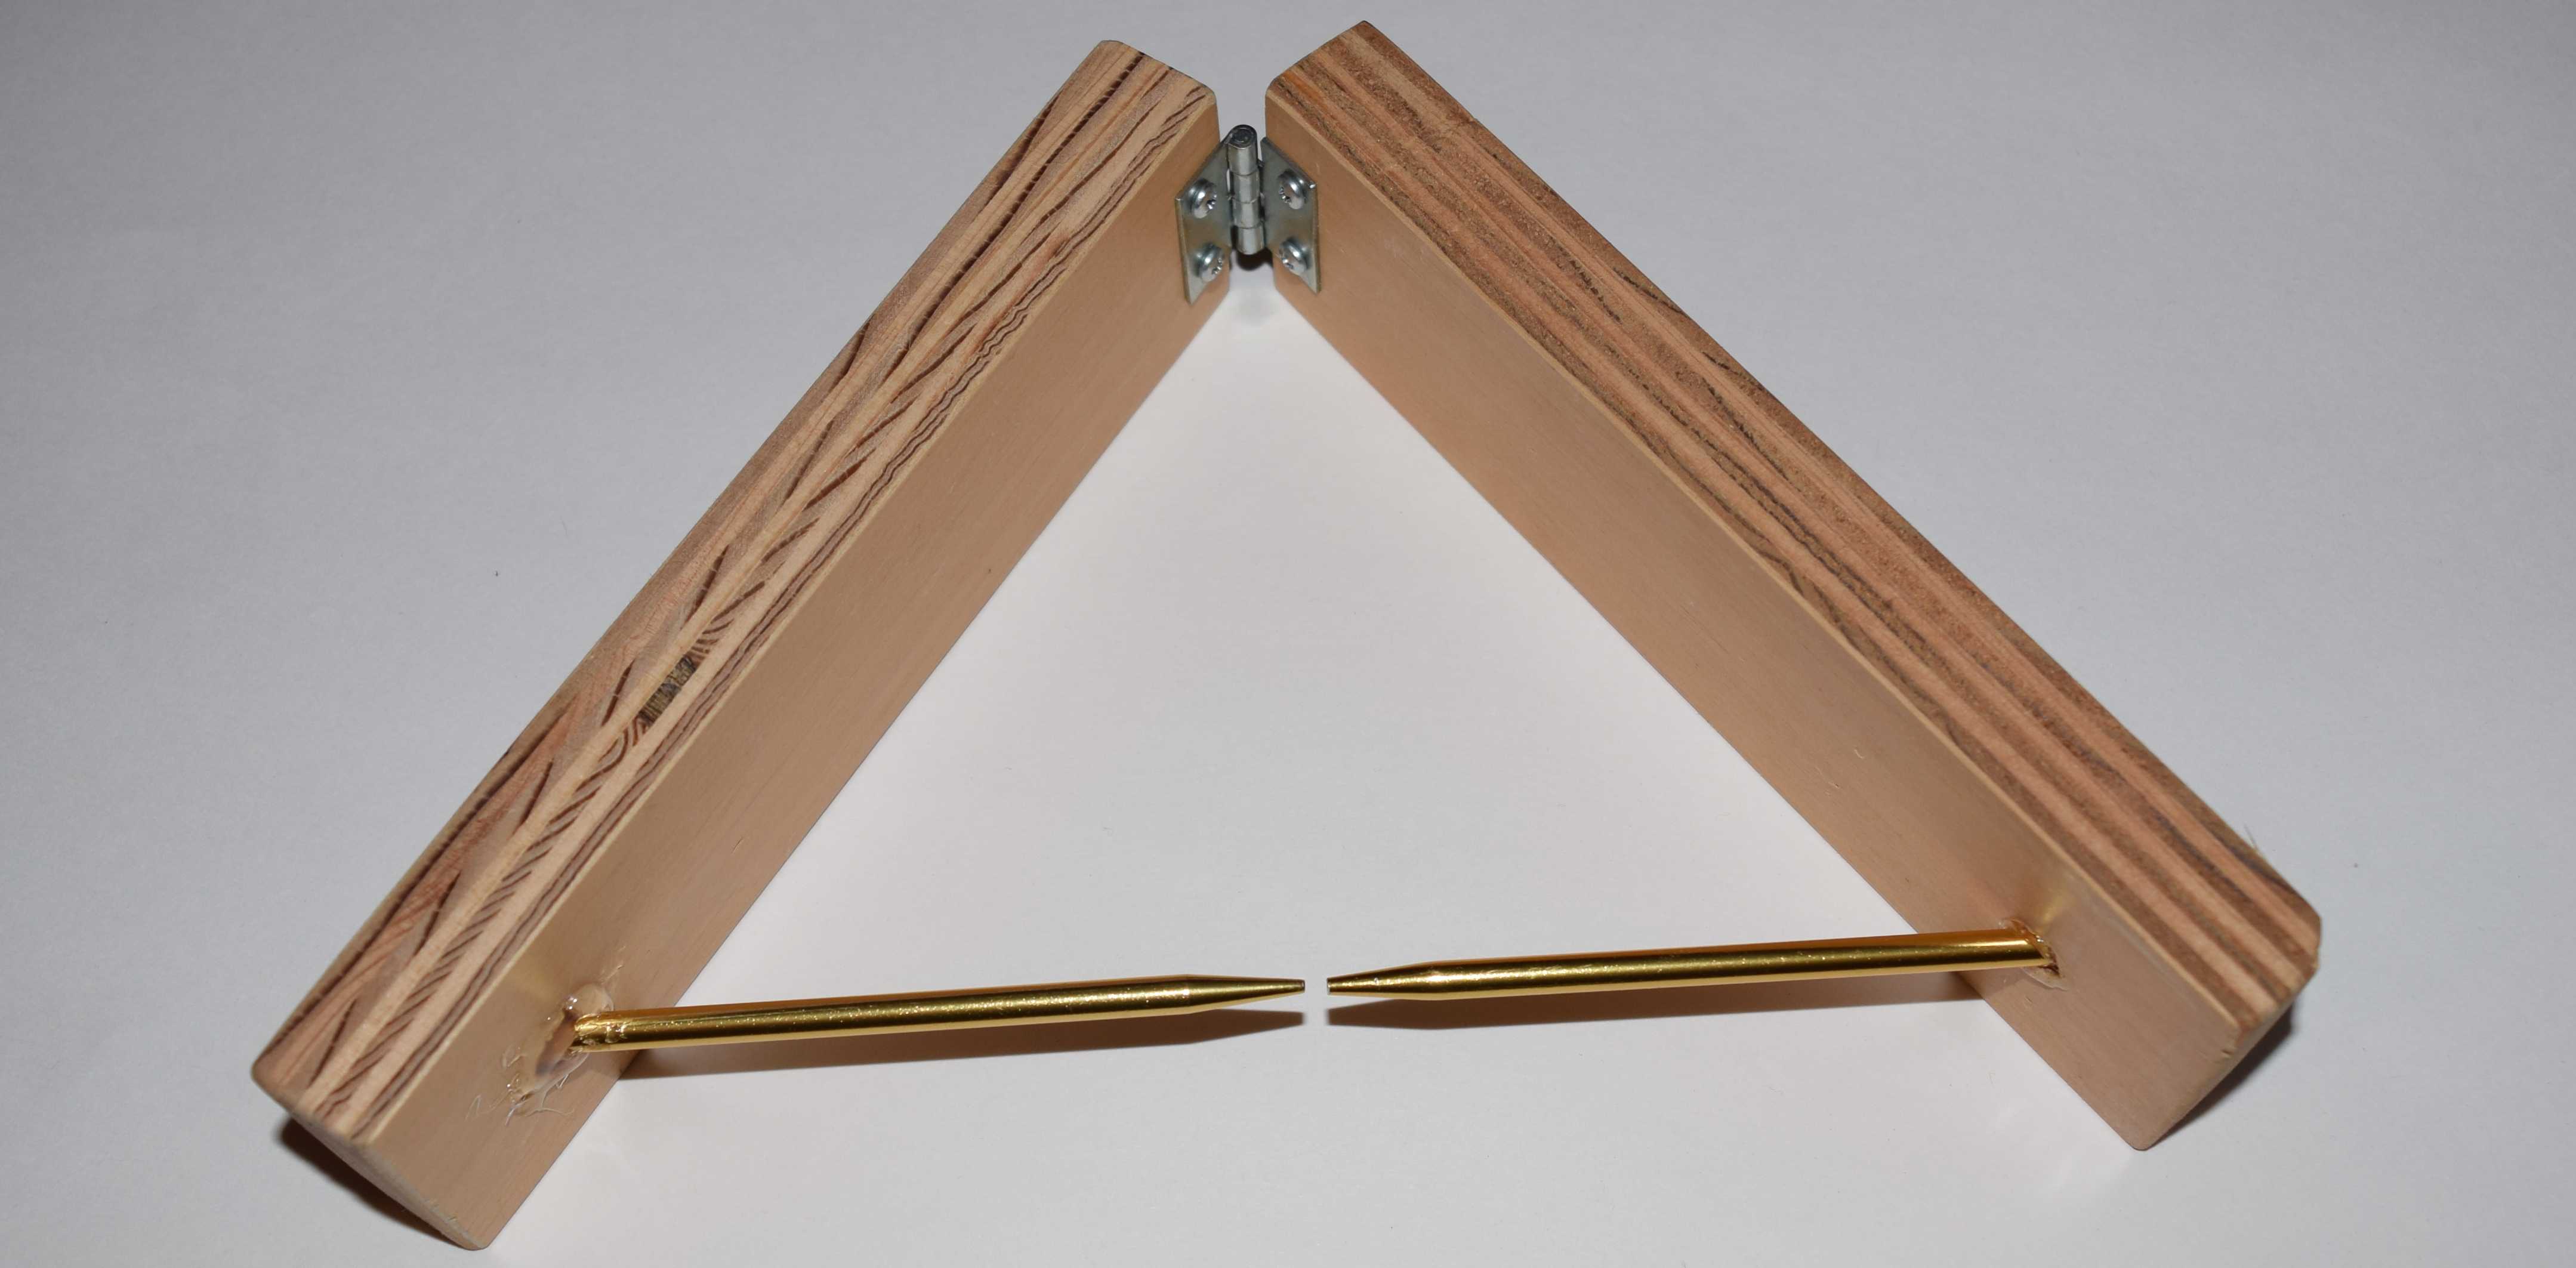
Unfortunately, my point turner is too flimsy to work well. The points tend to slip past each other instead of staying together, even though I filed the tips of the needles flat. I did manage to turn a few points with it, however, and I decided a point turner wasn’t what I needed after all. It didn’t quite turn the point out completely. I imagine that industrial point turners work better, but they are expensive and I don’t have room for one.
Then I tried the thread loop method from Off the Cuff. I was only successful with this method about half the time. My turning thread got sewed through sometimes and would get stuck or break before I had the point turned out. Another method crossed off my list.
I hadn’t tried the thread turning method mentioned at the end of David Page Coffin’s Seamwork article, because it just looked way too risky. It would be way too easy to rip out your stitching at the collar point. After I’d tried just about everything else without success, I decided to modify this method by adding more stitching to secure the thread loop, and I finally found something that worked consistently and safely to get a perfect collar point.
Here’s my collar point sewing and turning method:
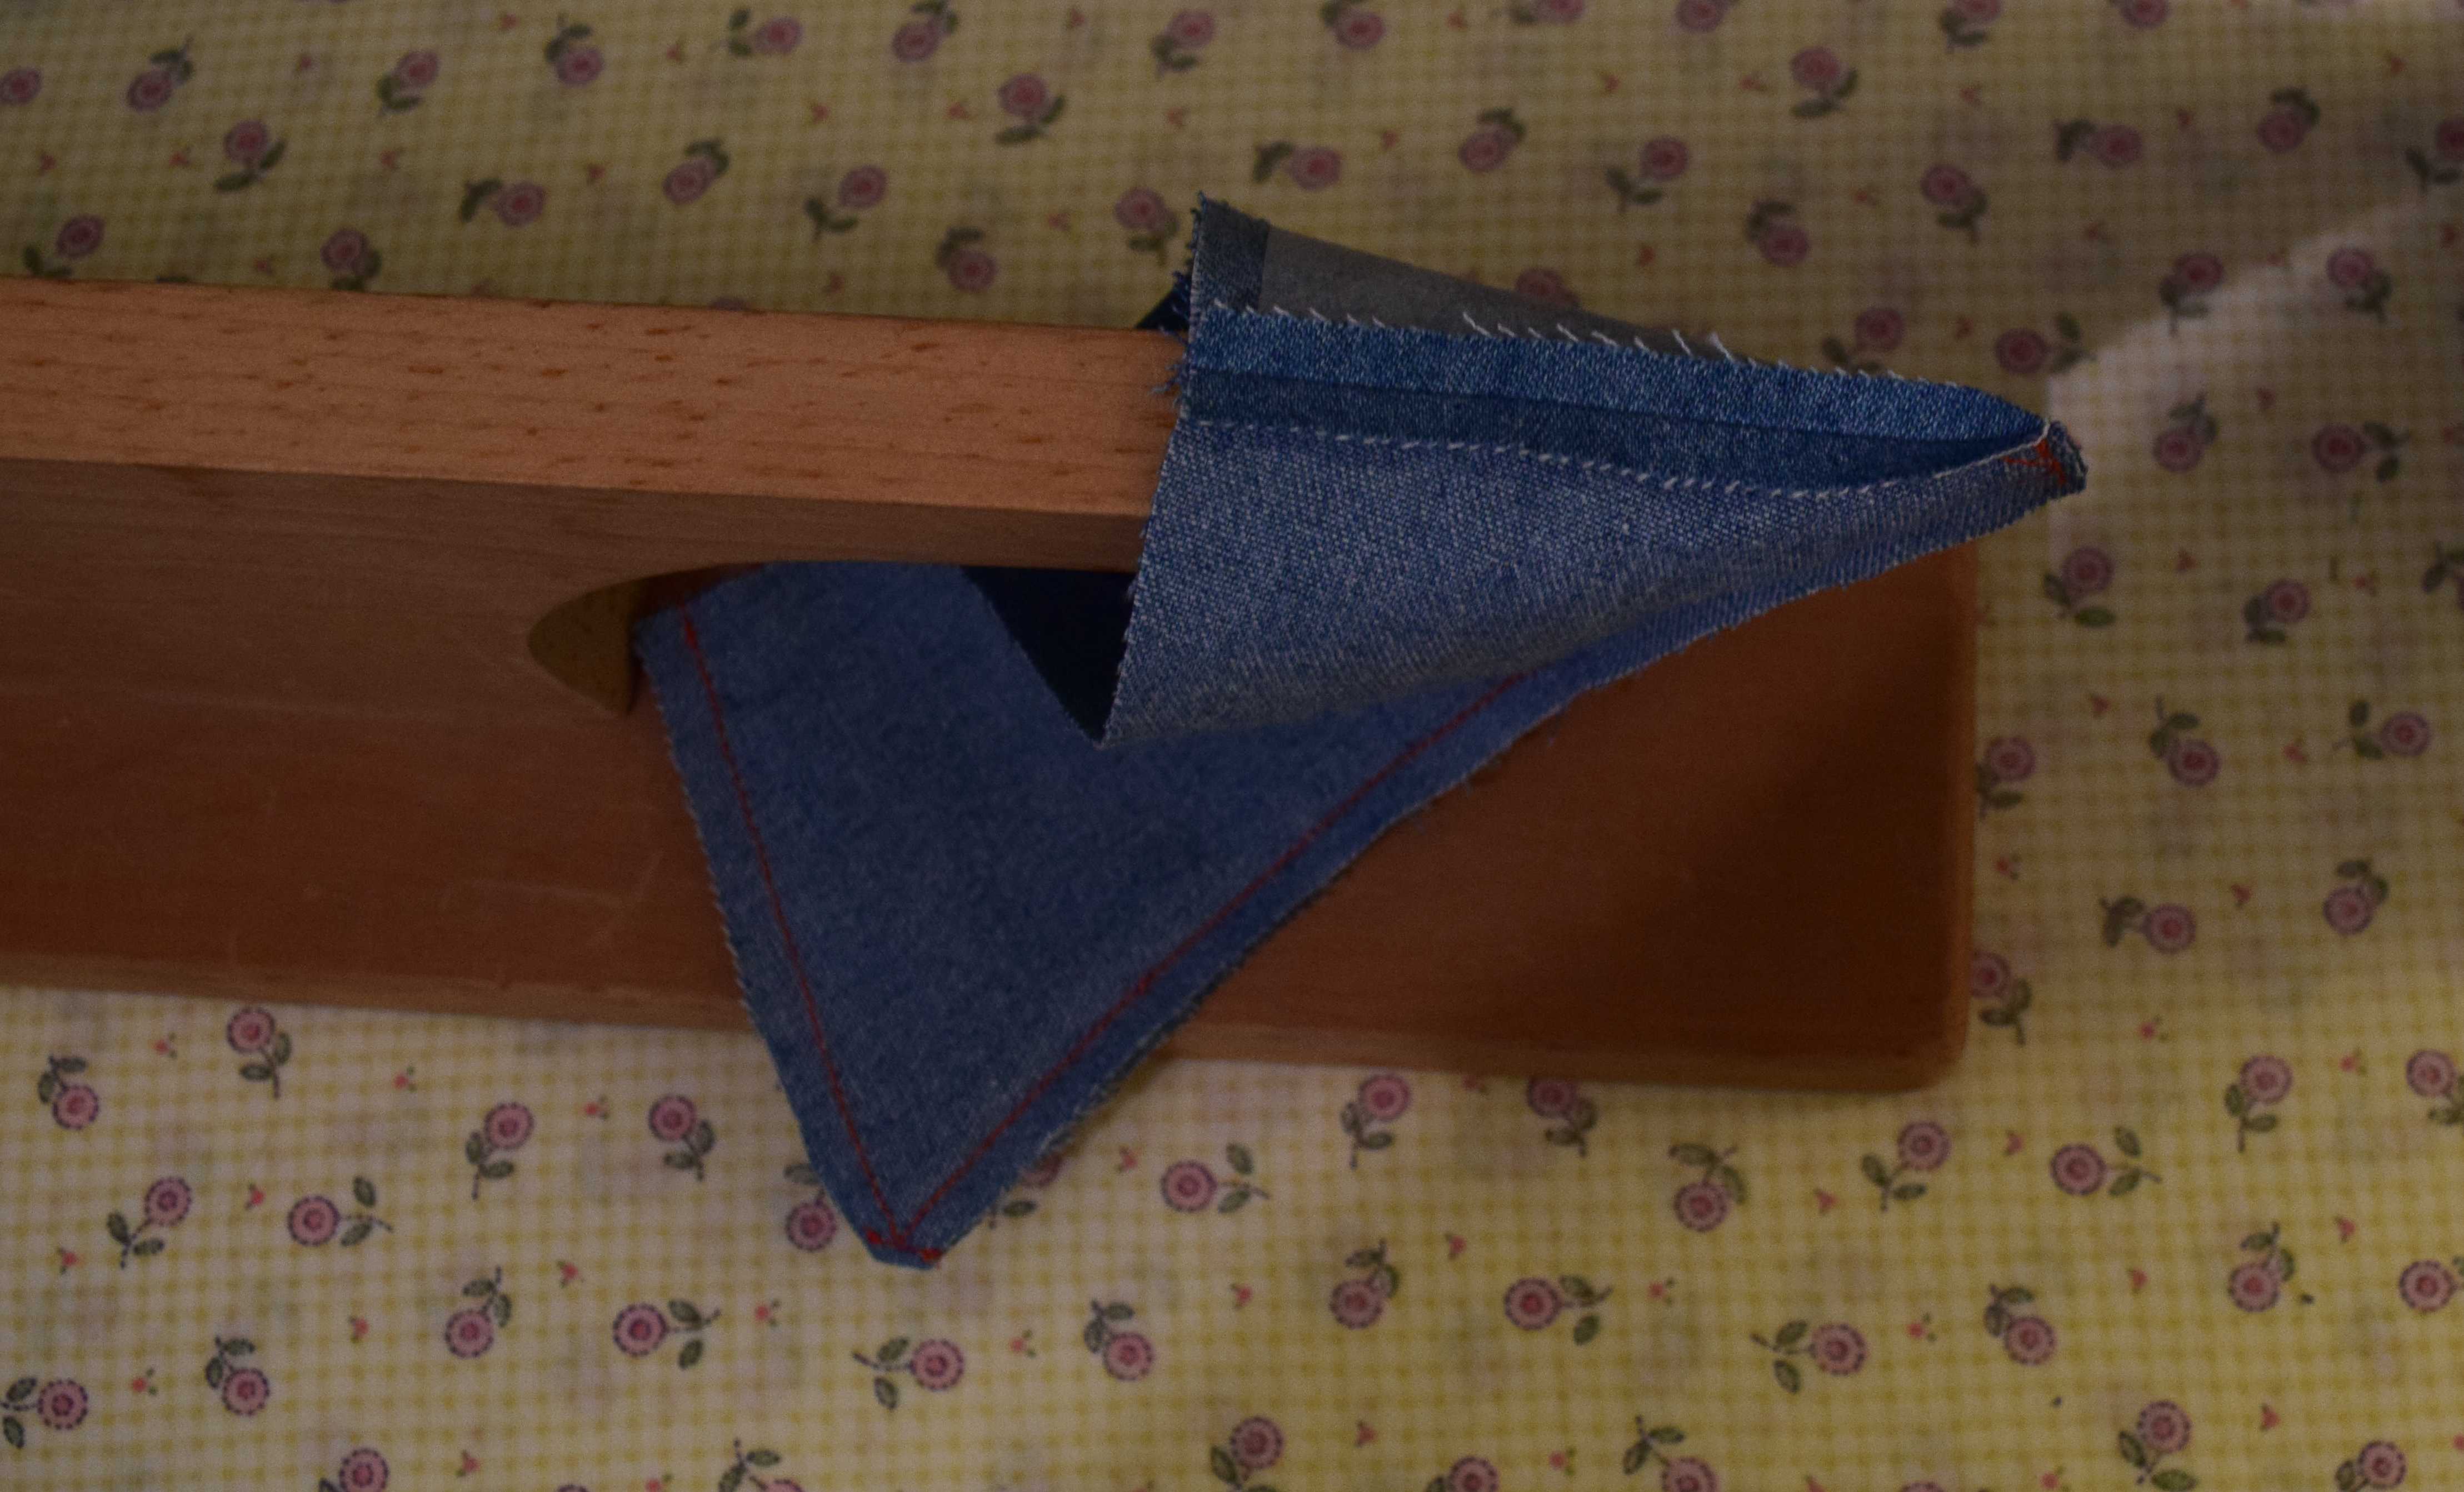
These are my mini test collars. They have quarter inch seam allowances. If you use larger seam allowances, trim them to 1/4″ after stitching, but do not clip or notch the seam allowances.
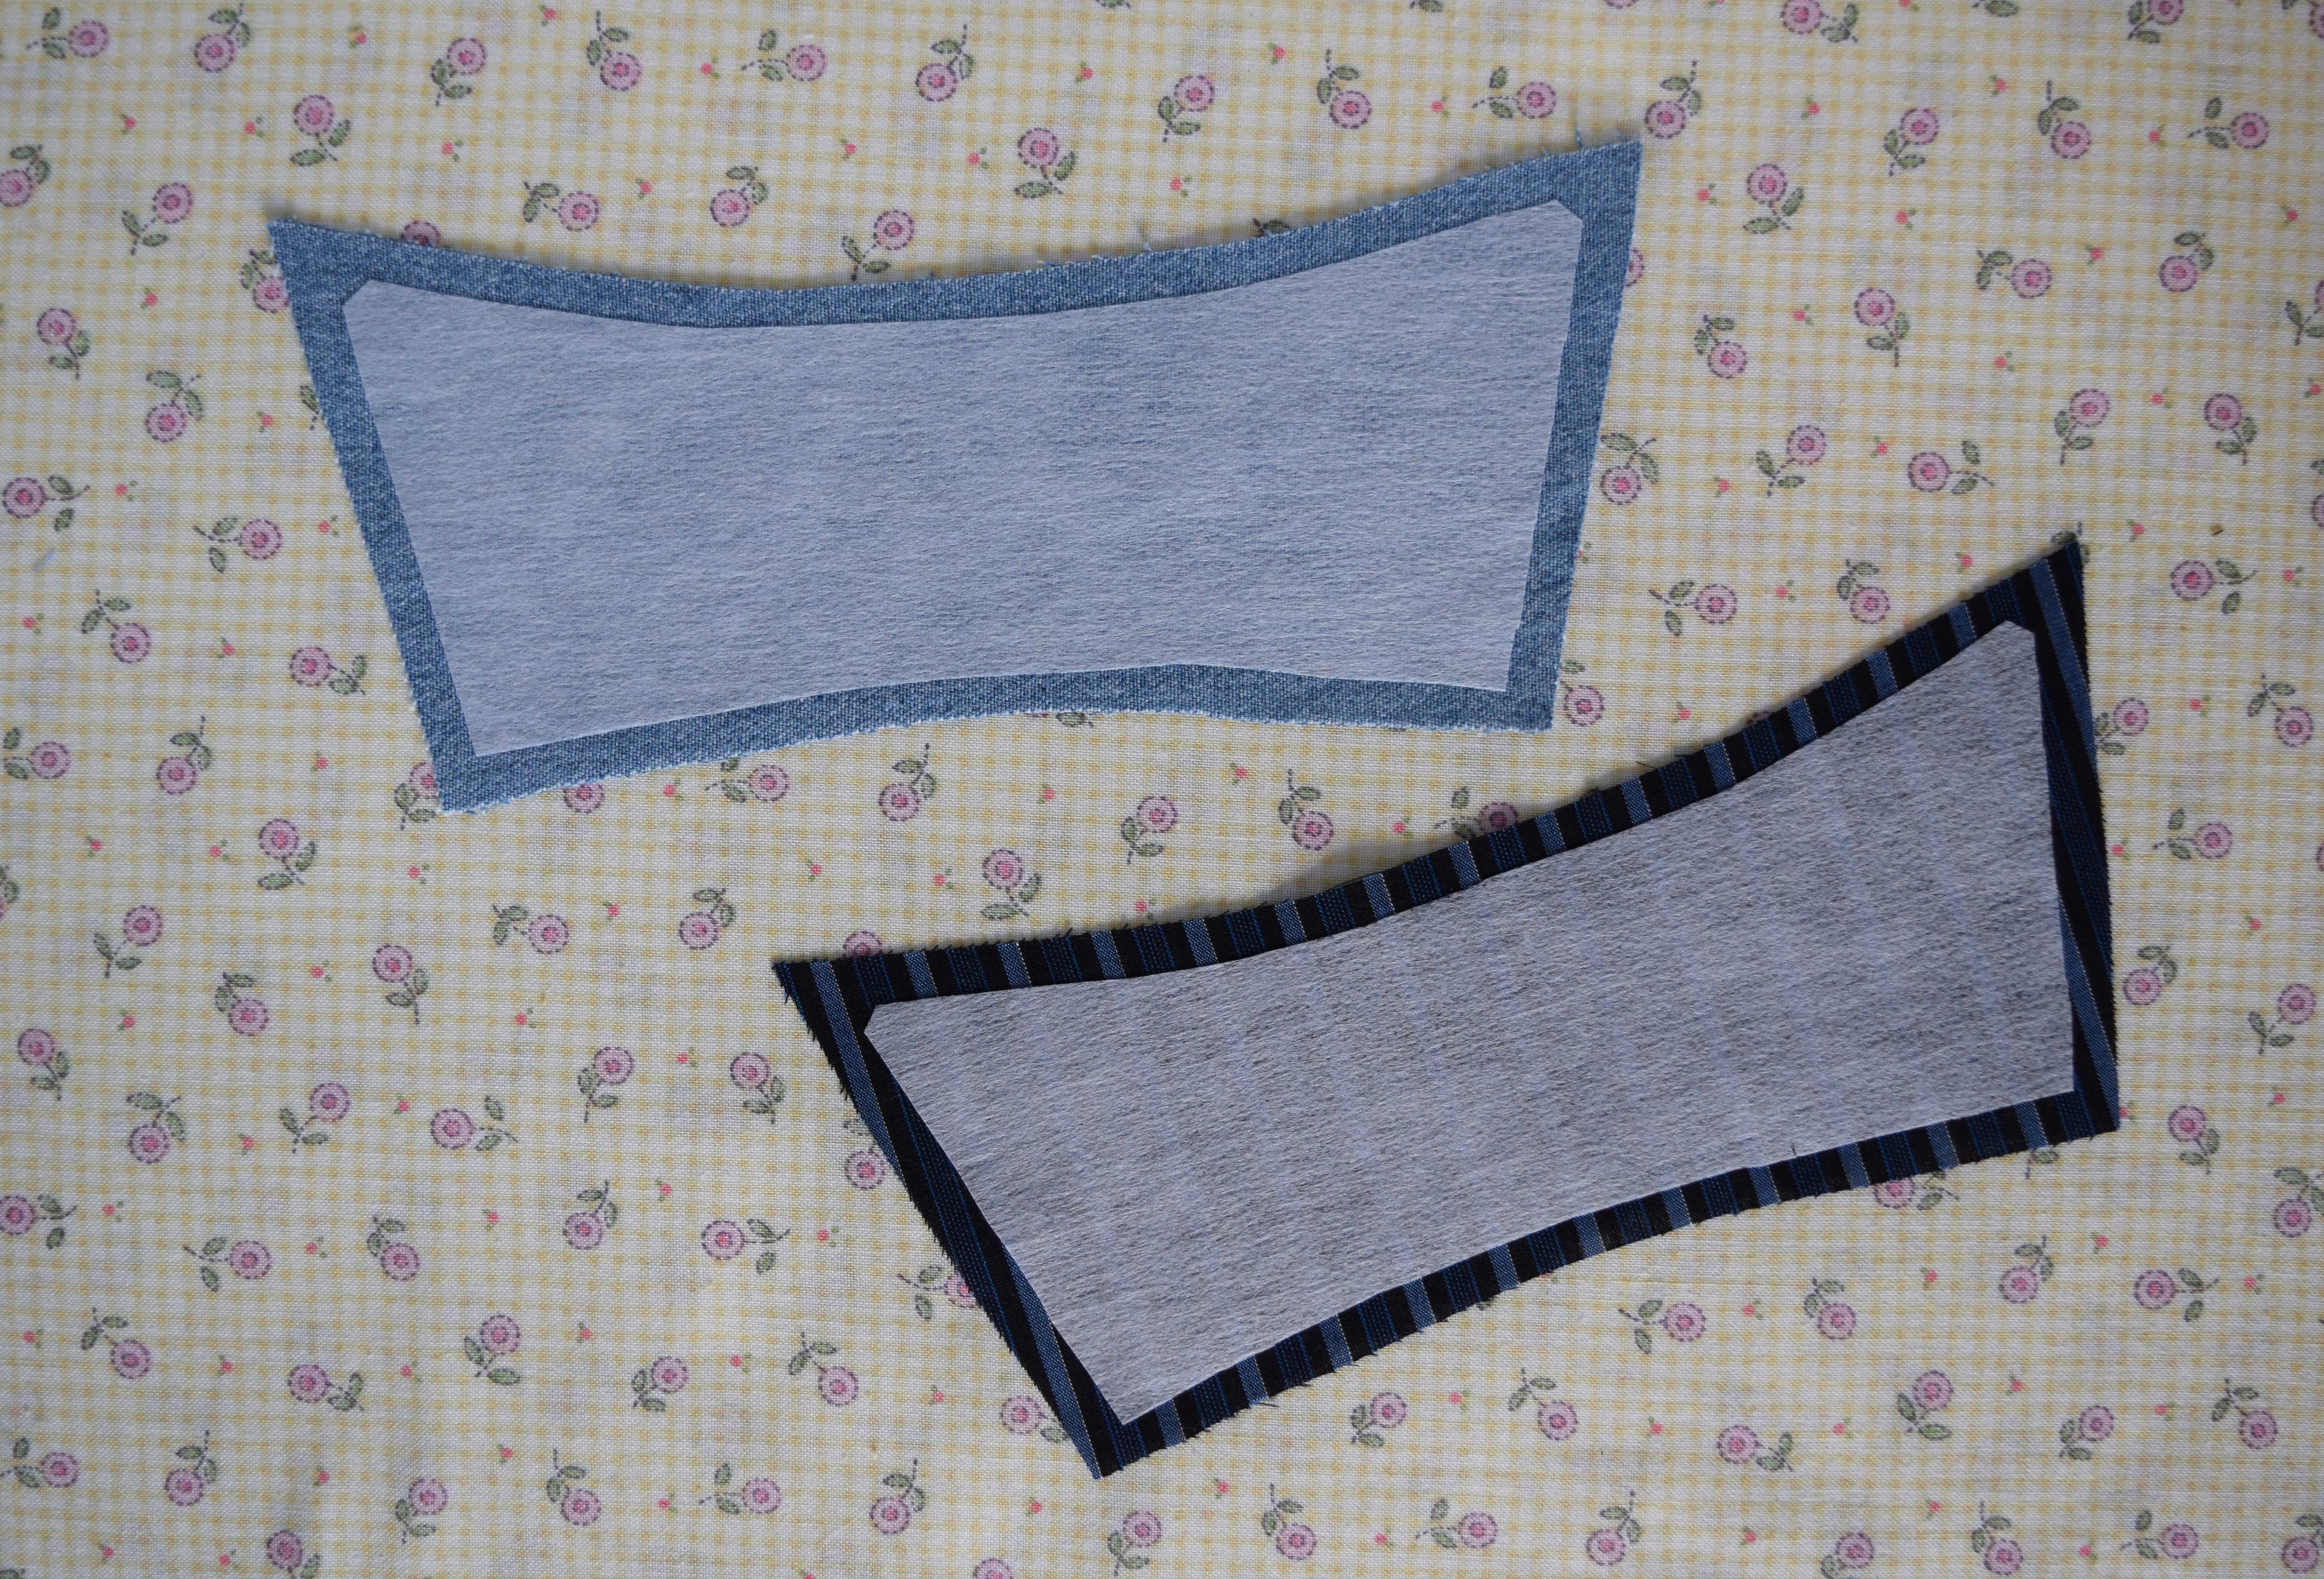
I’m not sure why I trimmed the interfacing out of the collar point area on my sample collars. It’s probably not necessary. In fact, these RTW collars that I dissected have extra interfacing in the seam allowance just at the collar point! That’s exactly the opposite of the “trim, trim, trim, reduce bulk, reduce bulk” message you get from home sewing directions.

Start stitching the collar seam. Always stitch with the interfaced collar piece facing up. Stop with the needle down one stitch away from the first collar point.
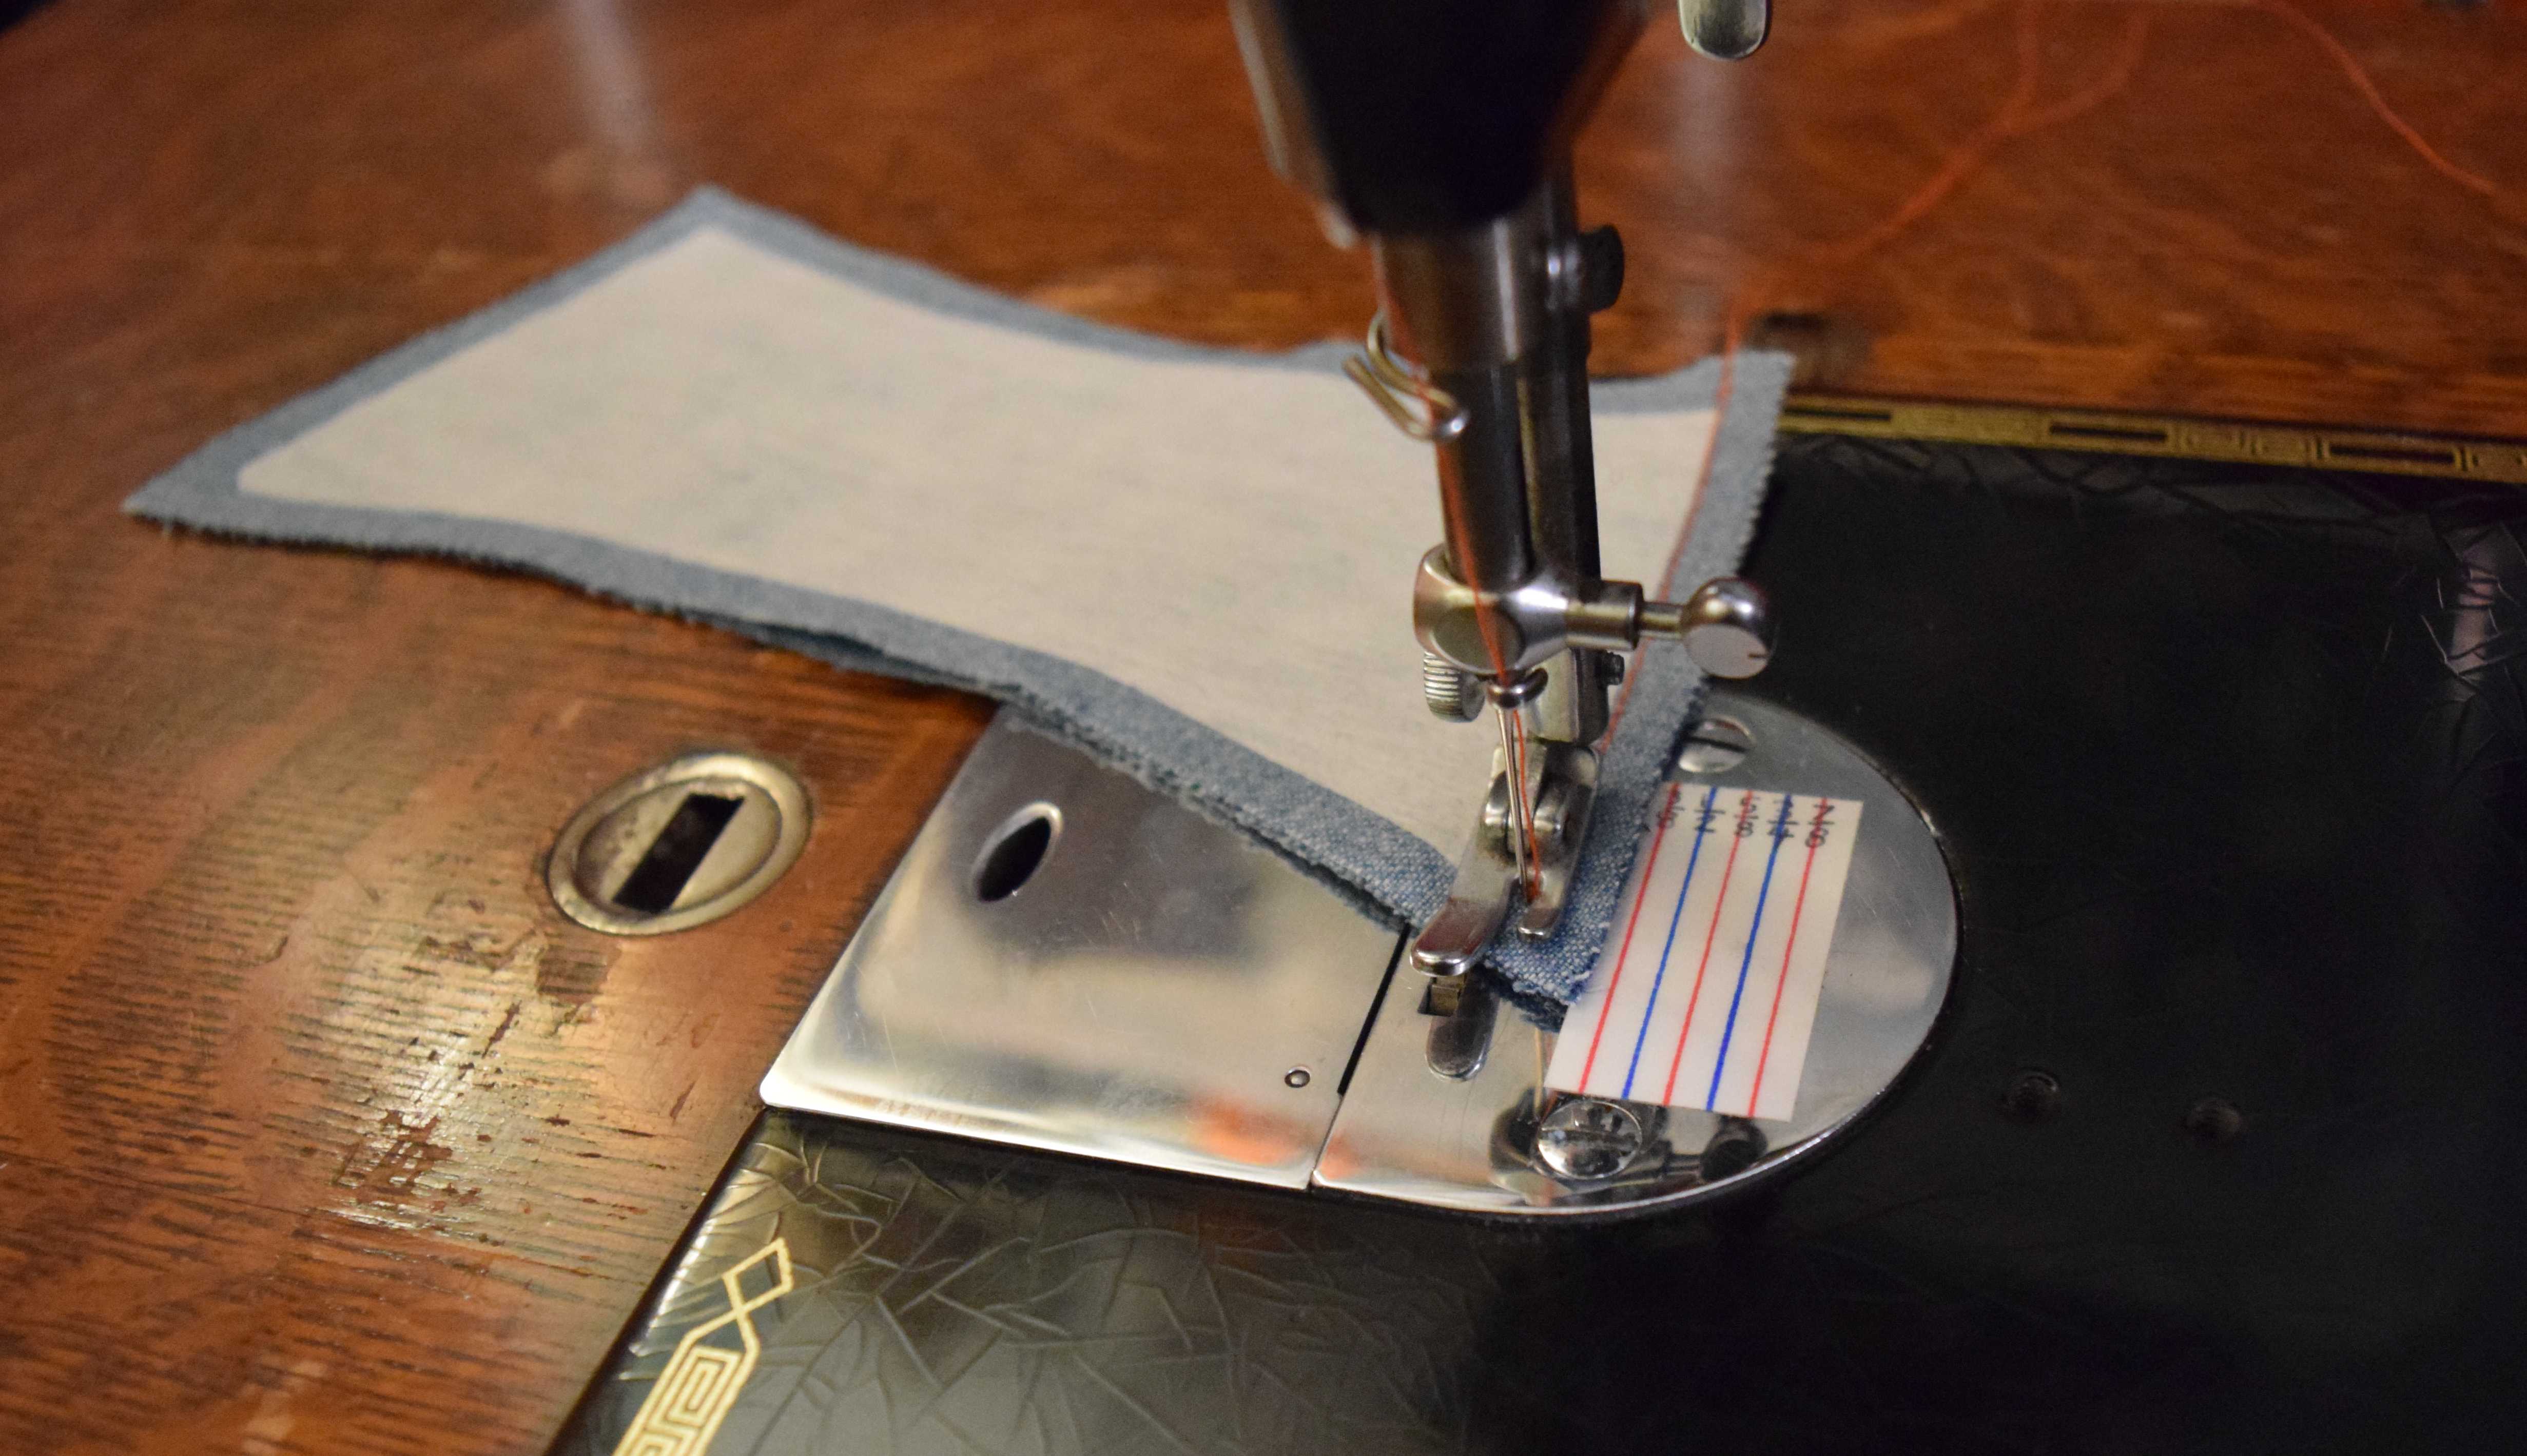
Raise the presser foot and insert a one foot (30 cm) long piece of thread between the layers of fabric right up against the needle, with the longer portion of the thread off to the right. Lower the presser foot and take the final stitch to the corner.
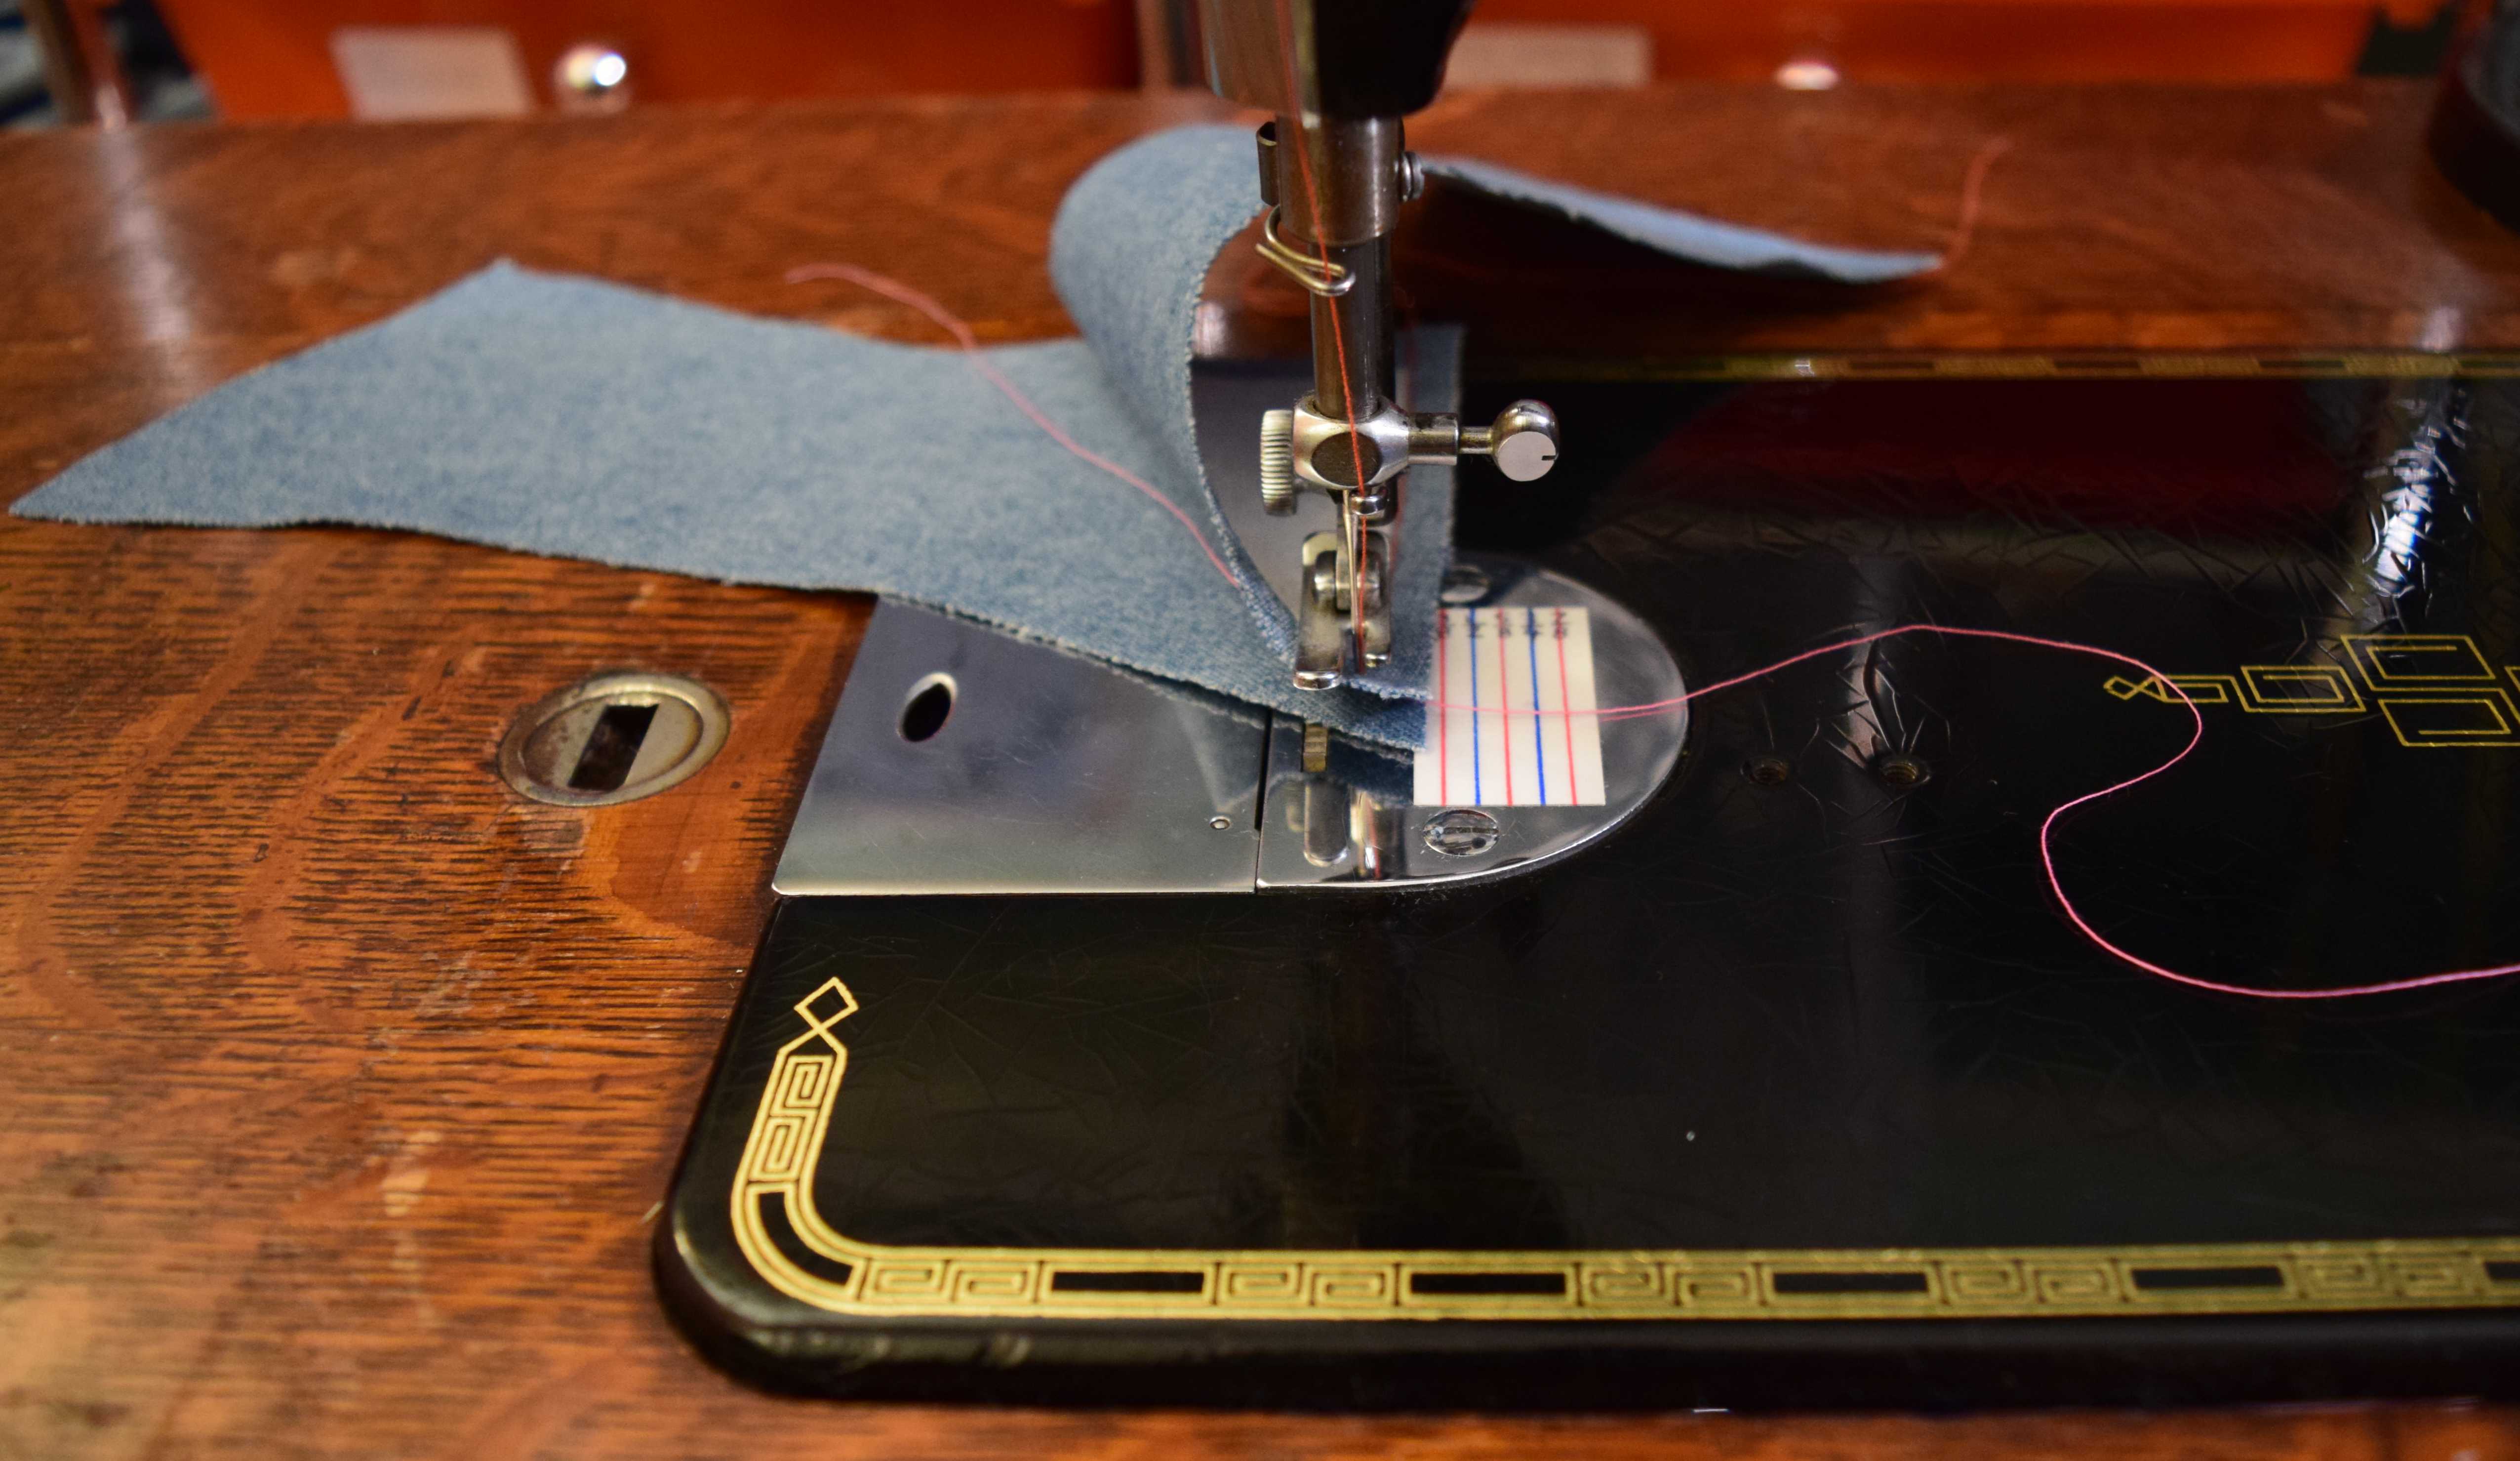
With the needle down, pivot at the corner, then raise the presser foot. Take the thread that was off to the right and snug it up against the needle, leaving a loop of thread to the right of the collar point.
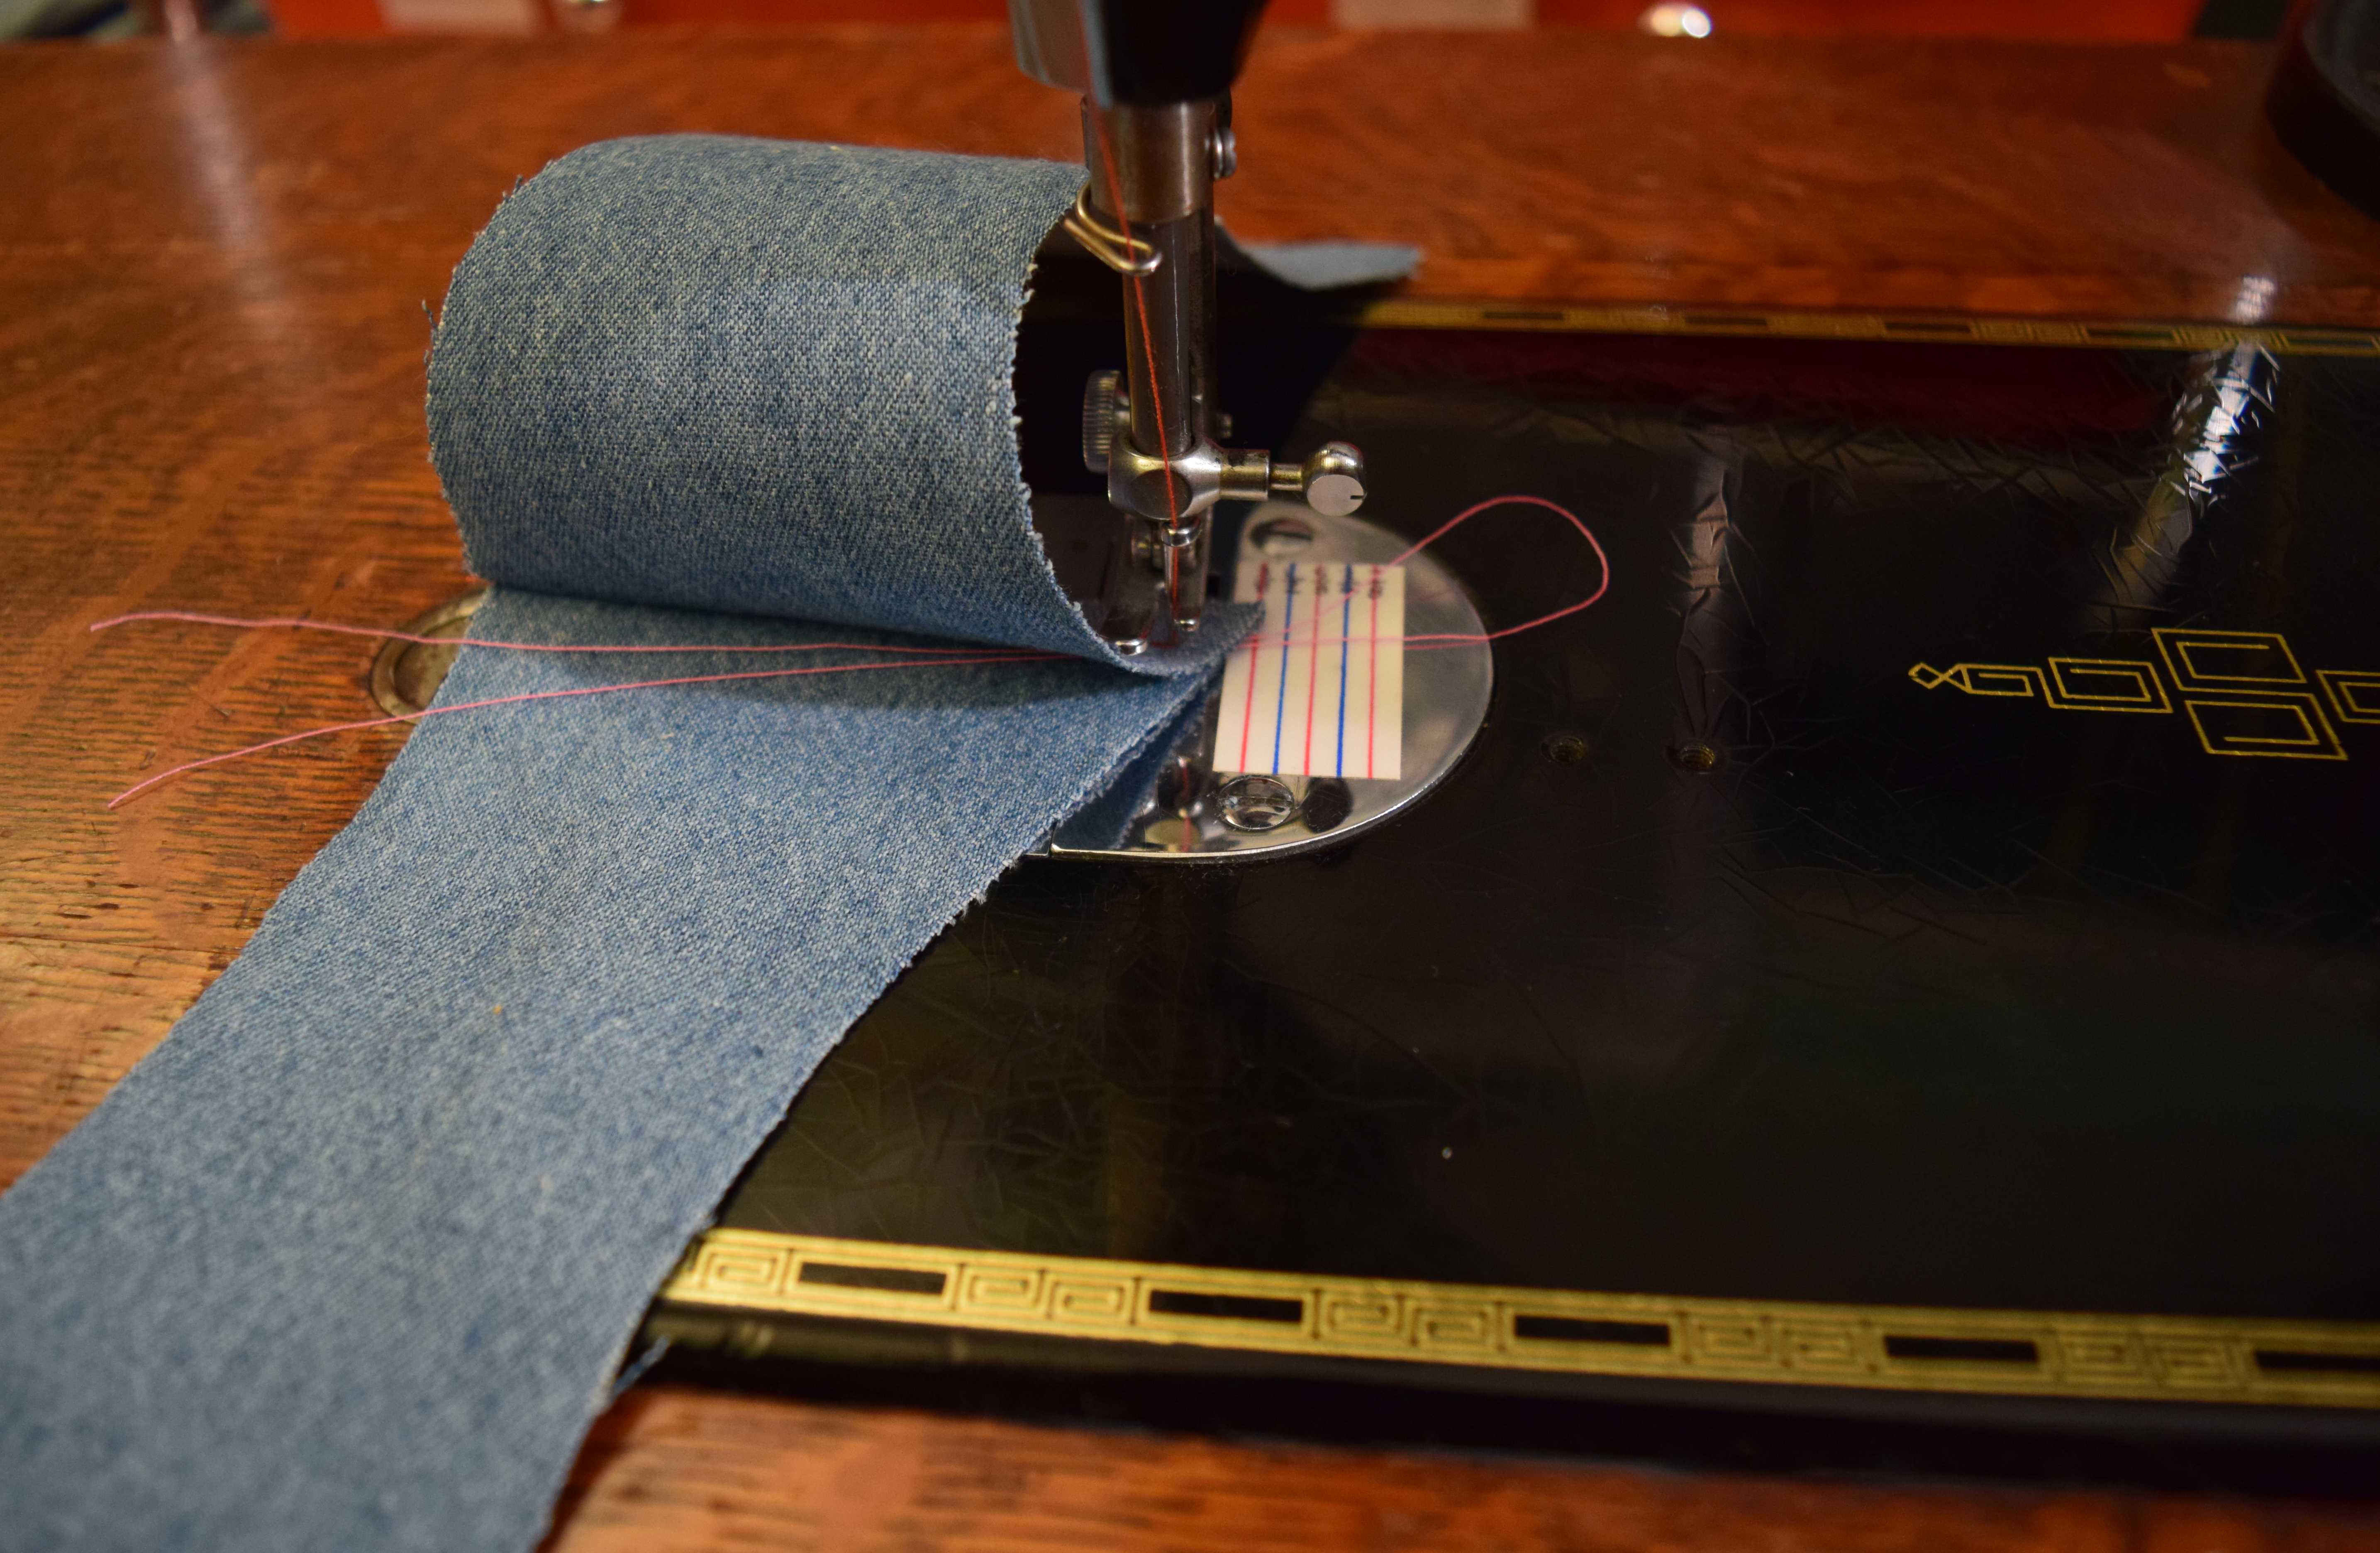
Finish stitching the collar, making another thread loop at the other point. Open up a collar point and check that the thread loop is not twisted.
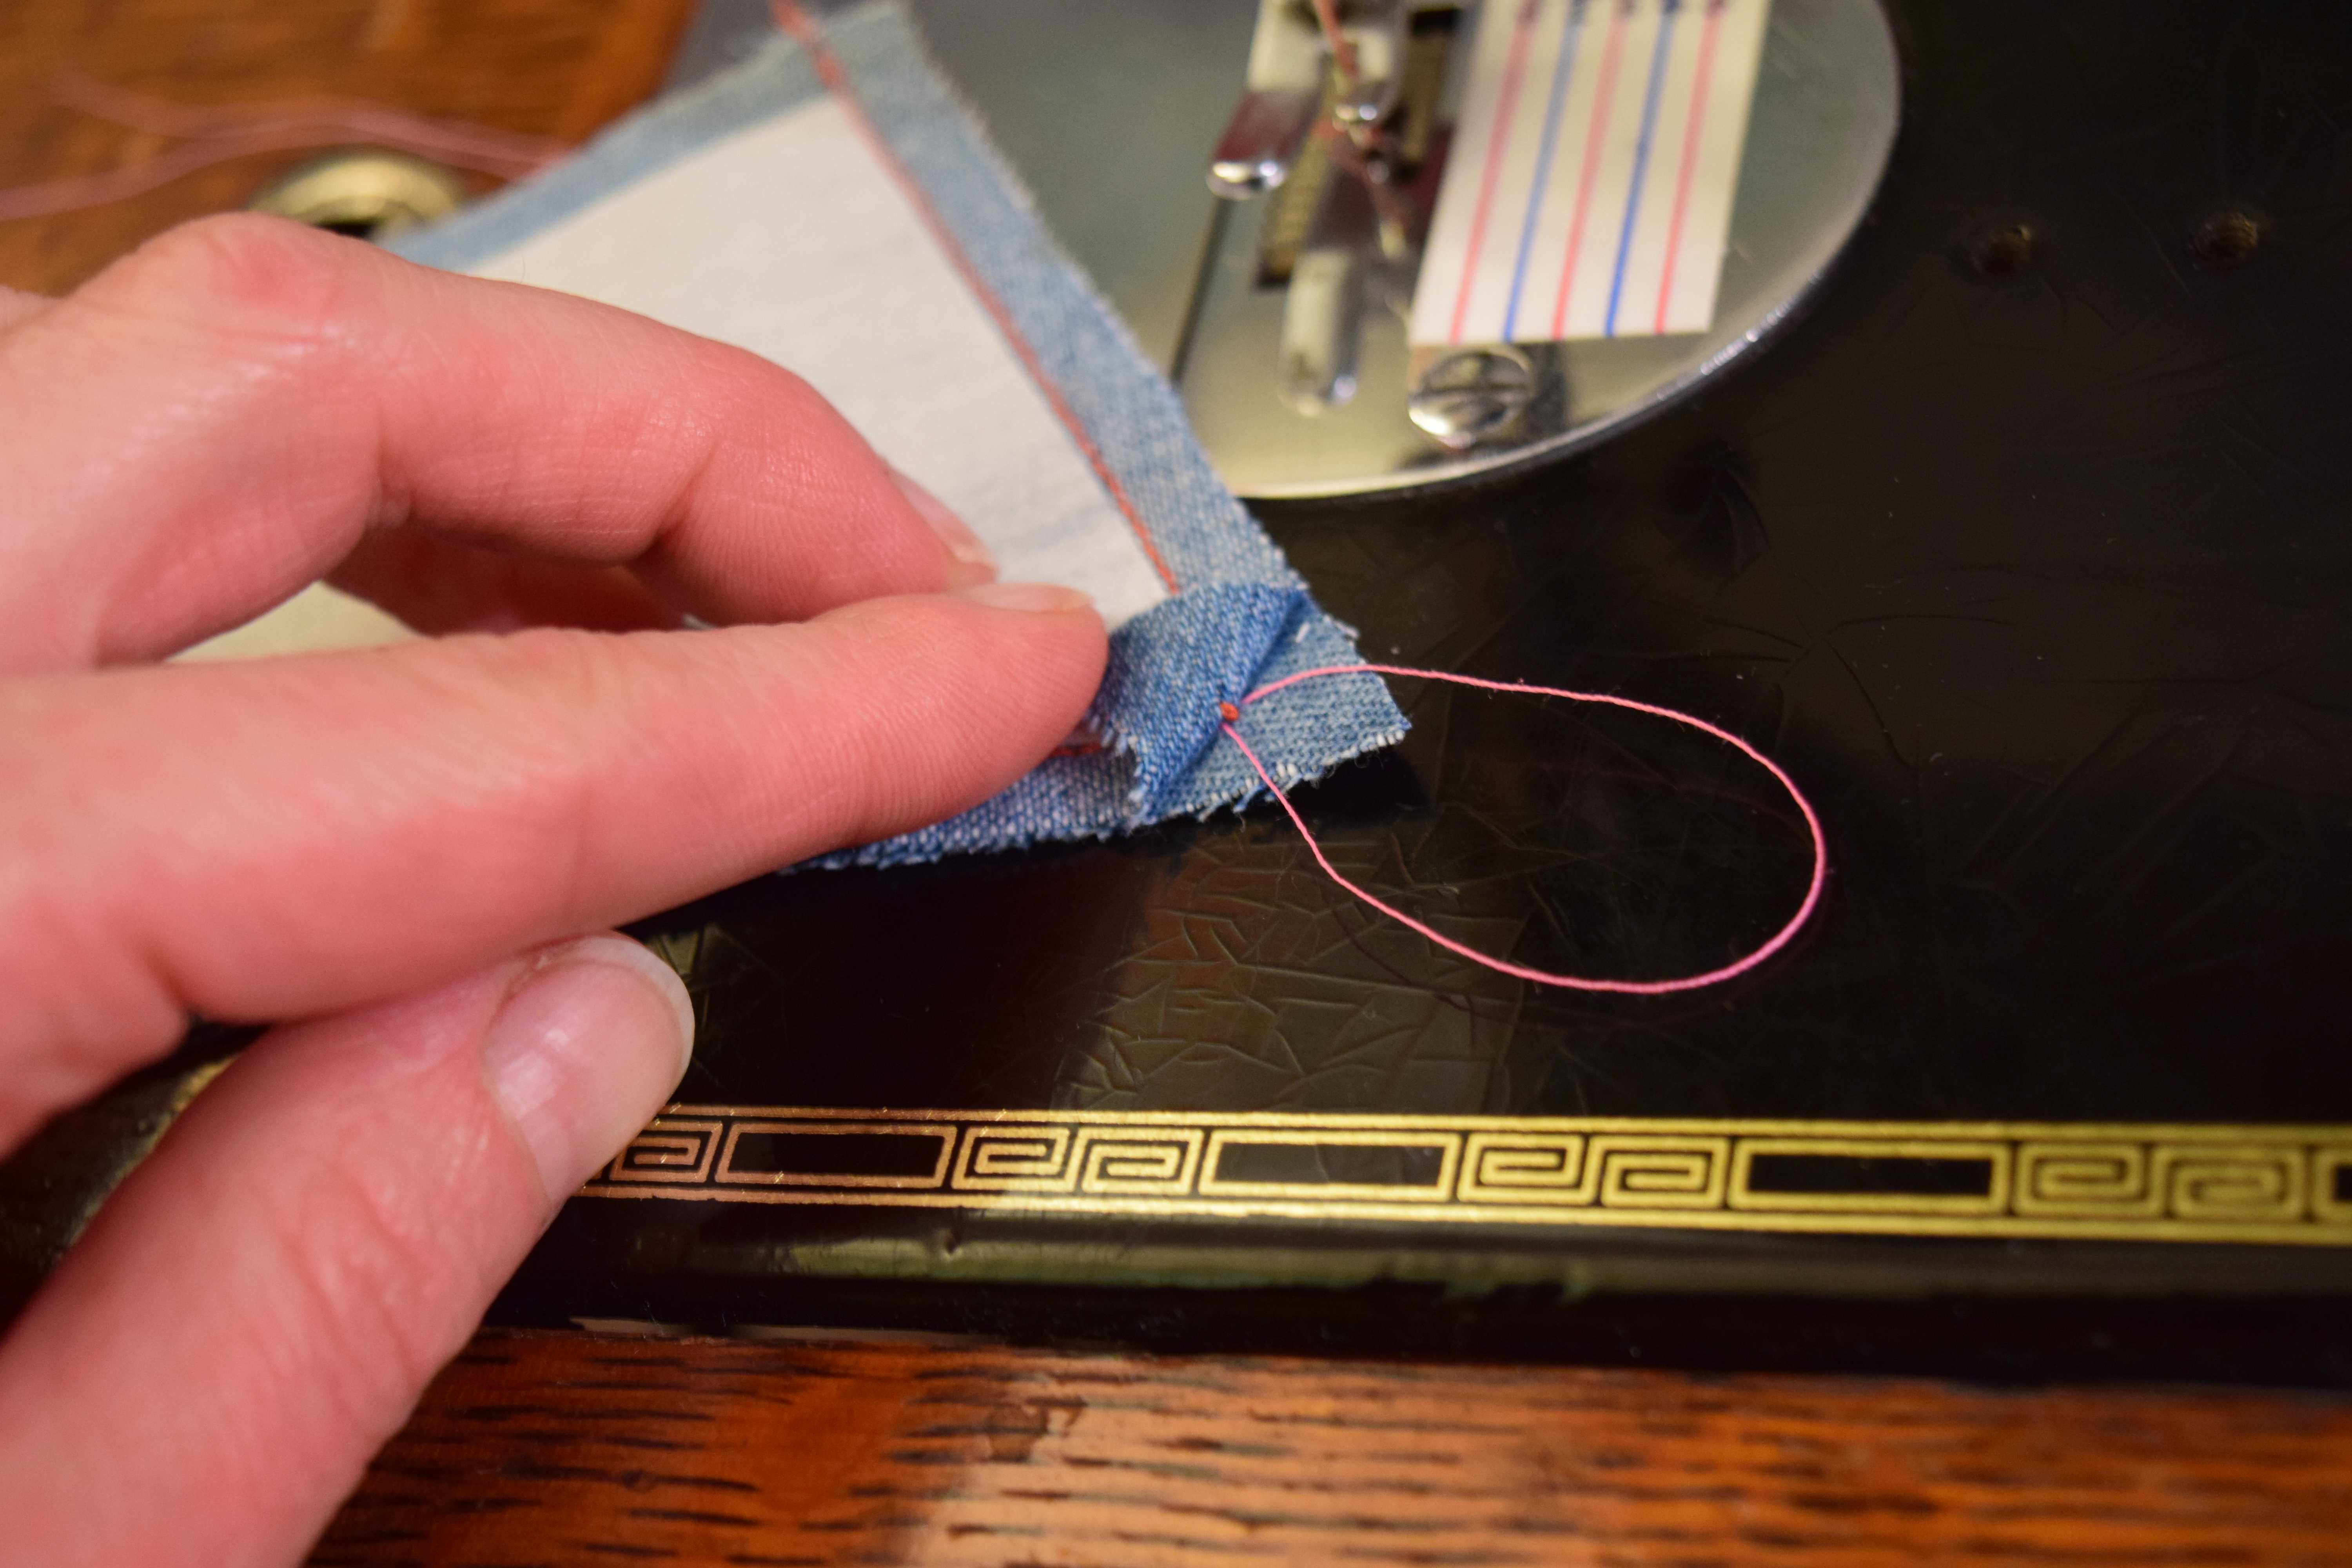
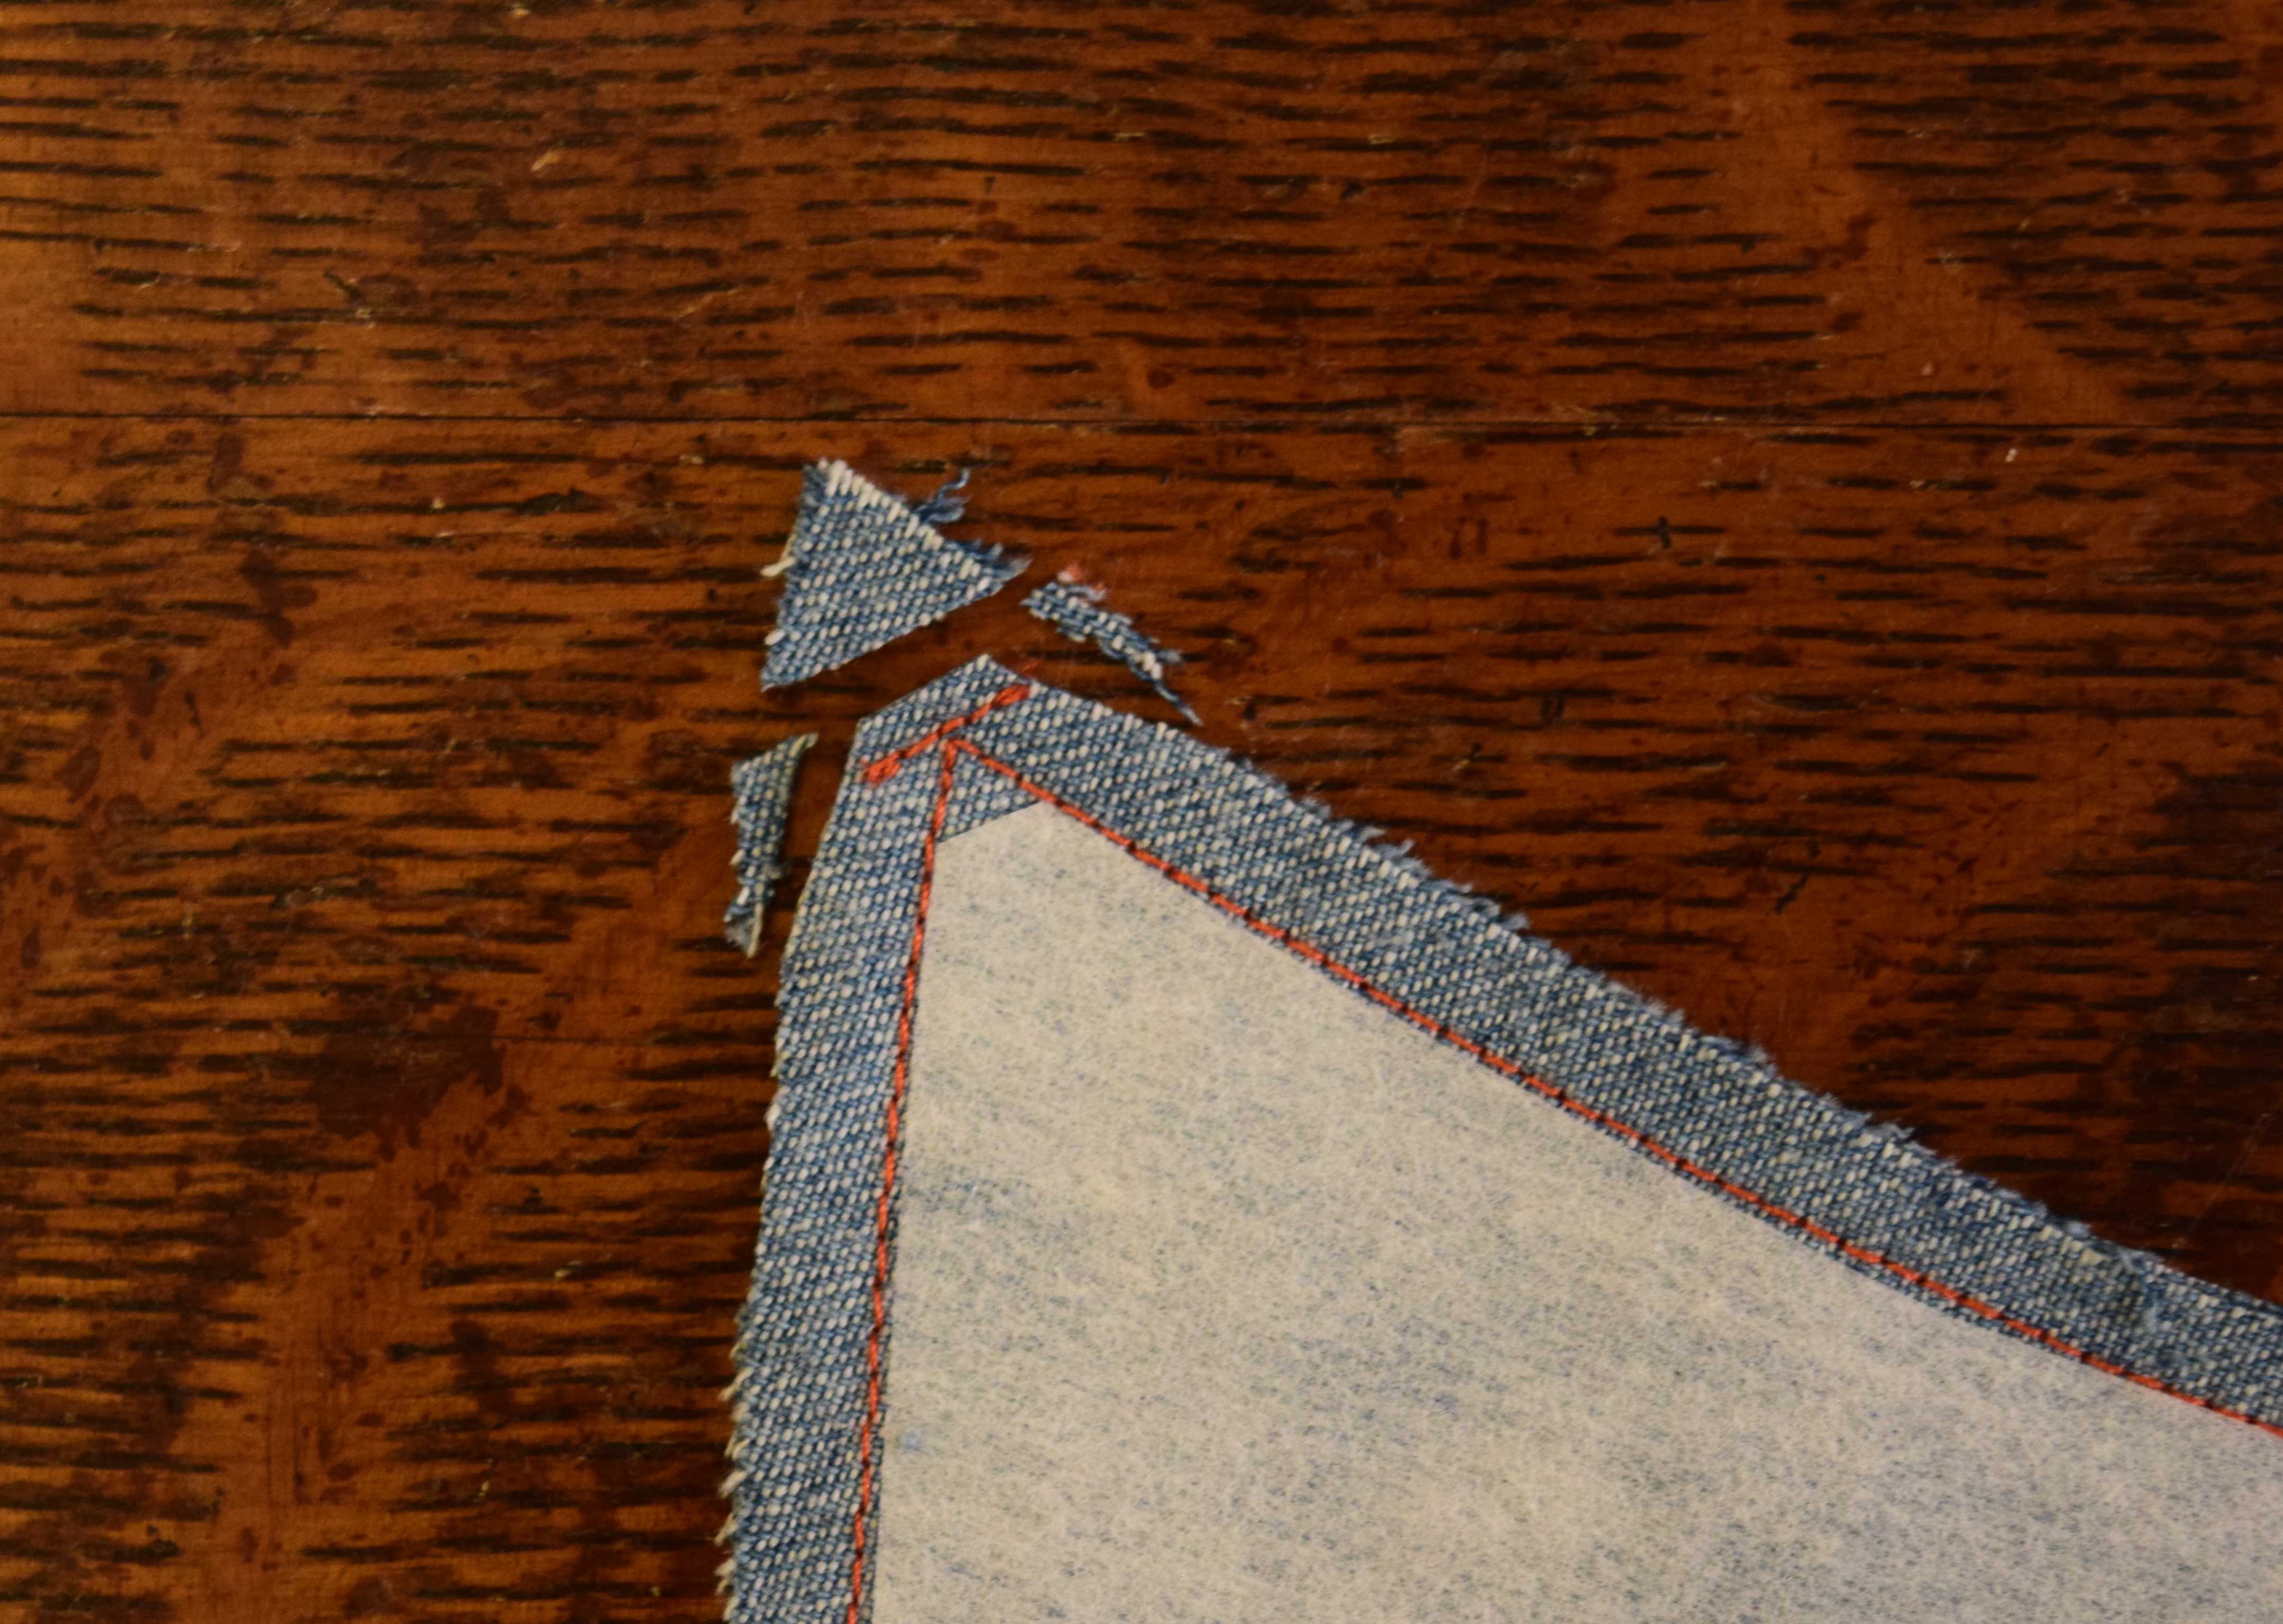
Stitch a line of reinforcing stitches at the corner as shown below. Start and stop 2 mm from each fabric edge, and use a single backstitch (or a couple of tiny backstitches) to secure the stitching at each end. Use stitches about 2 mm long, and lengthen or shorten your stitches as needed to make sure the needle enters the fabric right at the seam corner. The goal is to form a stitch over each thread without punching the needle down into the thread and splitting it in half.

Pull on the cut ends of the turning threads so you no longer have loops. Trim off the point 2 to 3 mm (1/8″) from the line of stitches at the collar point. If the angle of your collar point is close to a right angle, that’s all the trimming you need. Trim off a little bit more on the sides for an acute point, especially if your fabric is thick, but don’t clip into your line of reinforcing stitches. If your fabric is thin, you can skip trimming altogether and just fold down the fabric at the point.
Press open your seam allowances over a point presser.
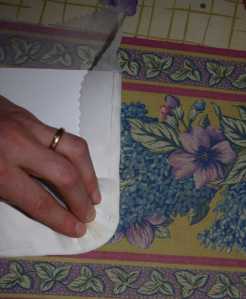
Insert your index finger into a collar point. Fold down the seam allowances toward the interfaced collar piece and pinch them in place with your thumb.
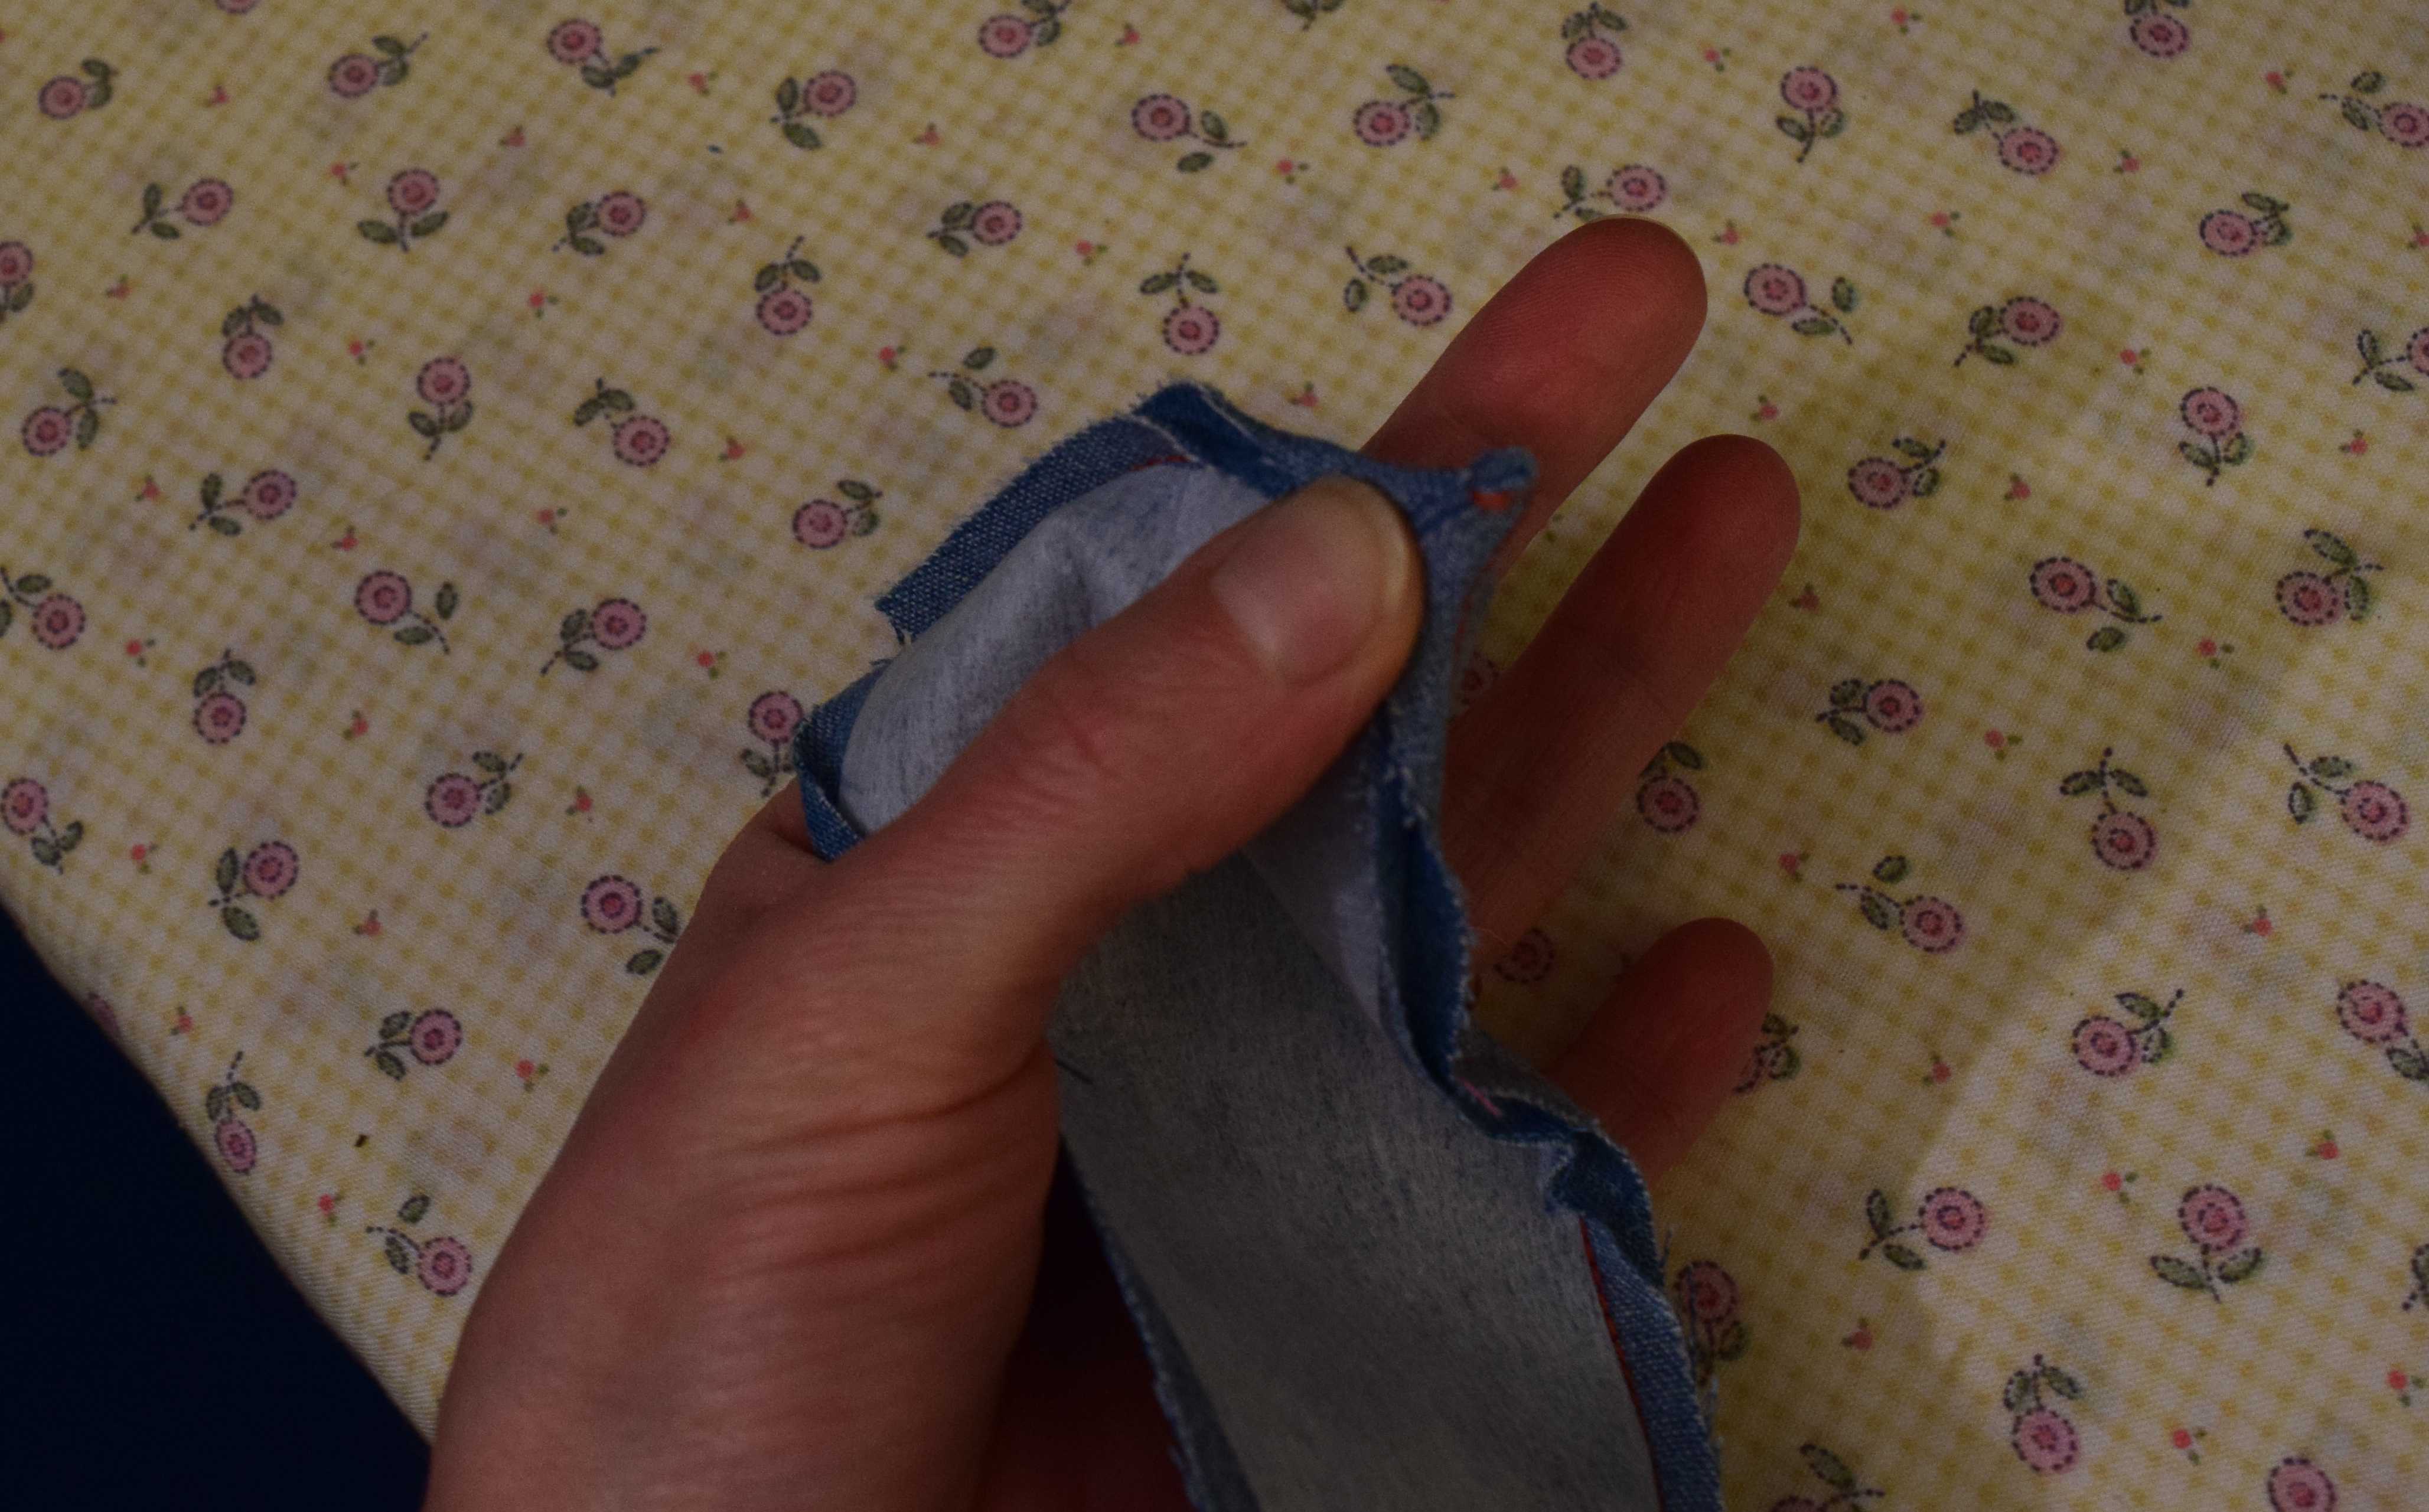
Keep pinching the seam allowances between your thumb and index finger and turn the collar point over your thumb. Your thumb will end up inside the collar.

Here’s where all that extra work pays off. Getting a perfect point is now super easy. Pull on the thread ends to finish turning out the collar point. I found a few gentle tugs worked better than a steady pull. Clip the thread near the collar point and pull it out. Repeat for the other point, and press the collar.
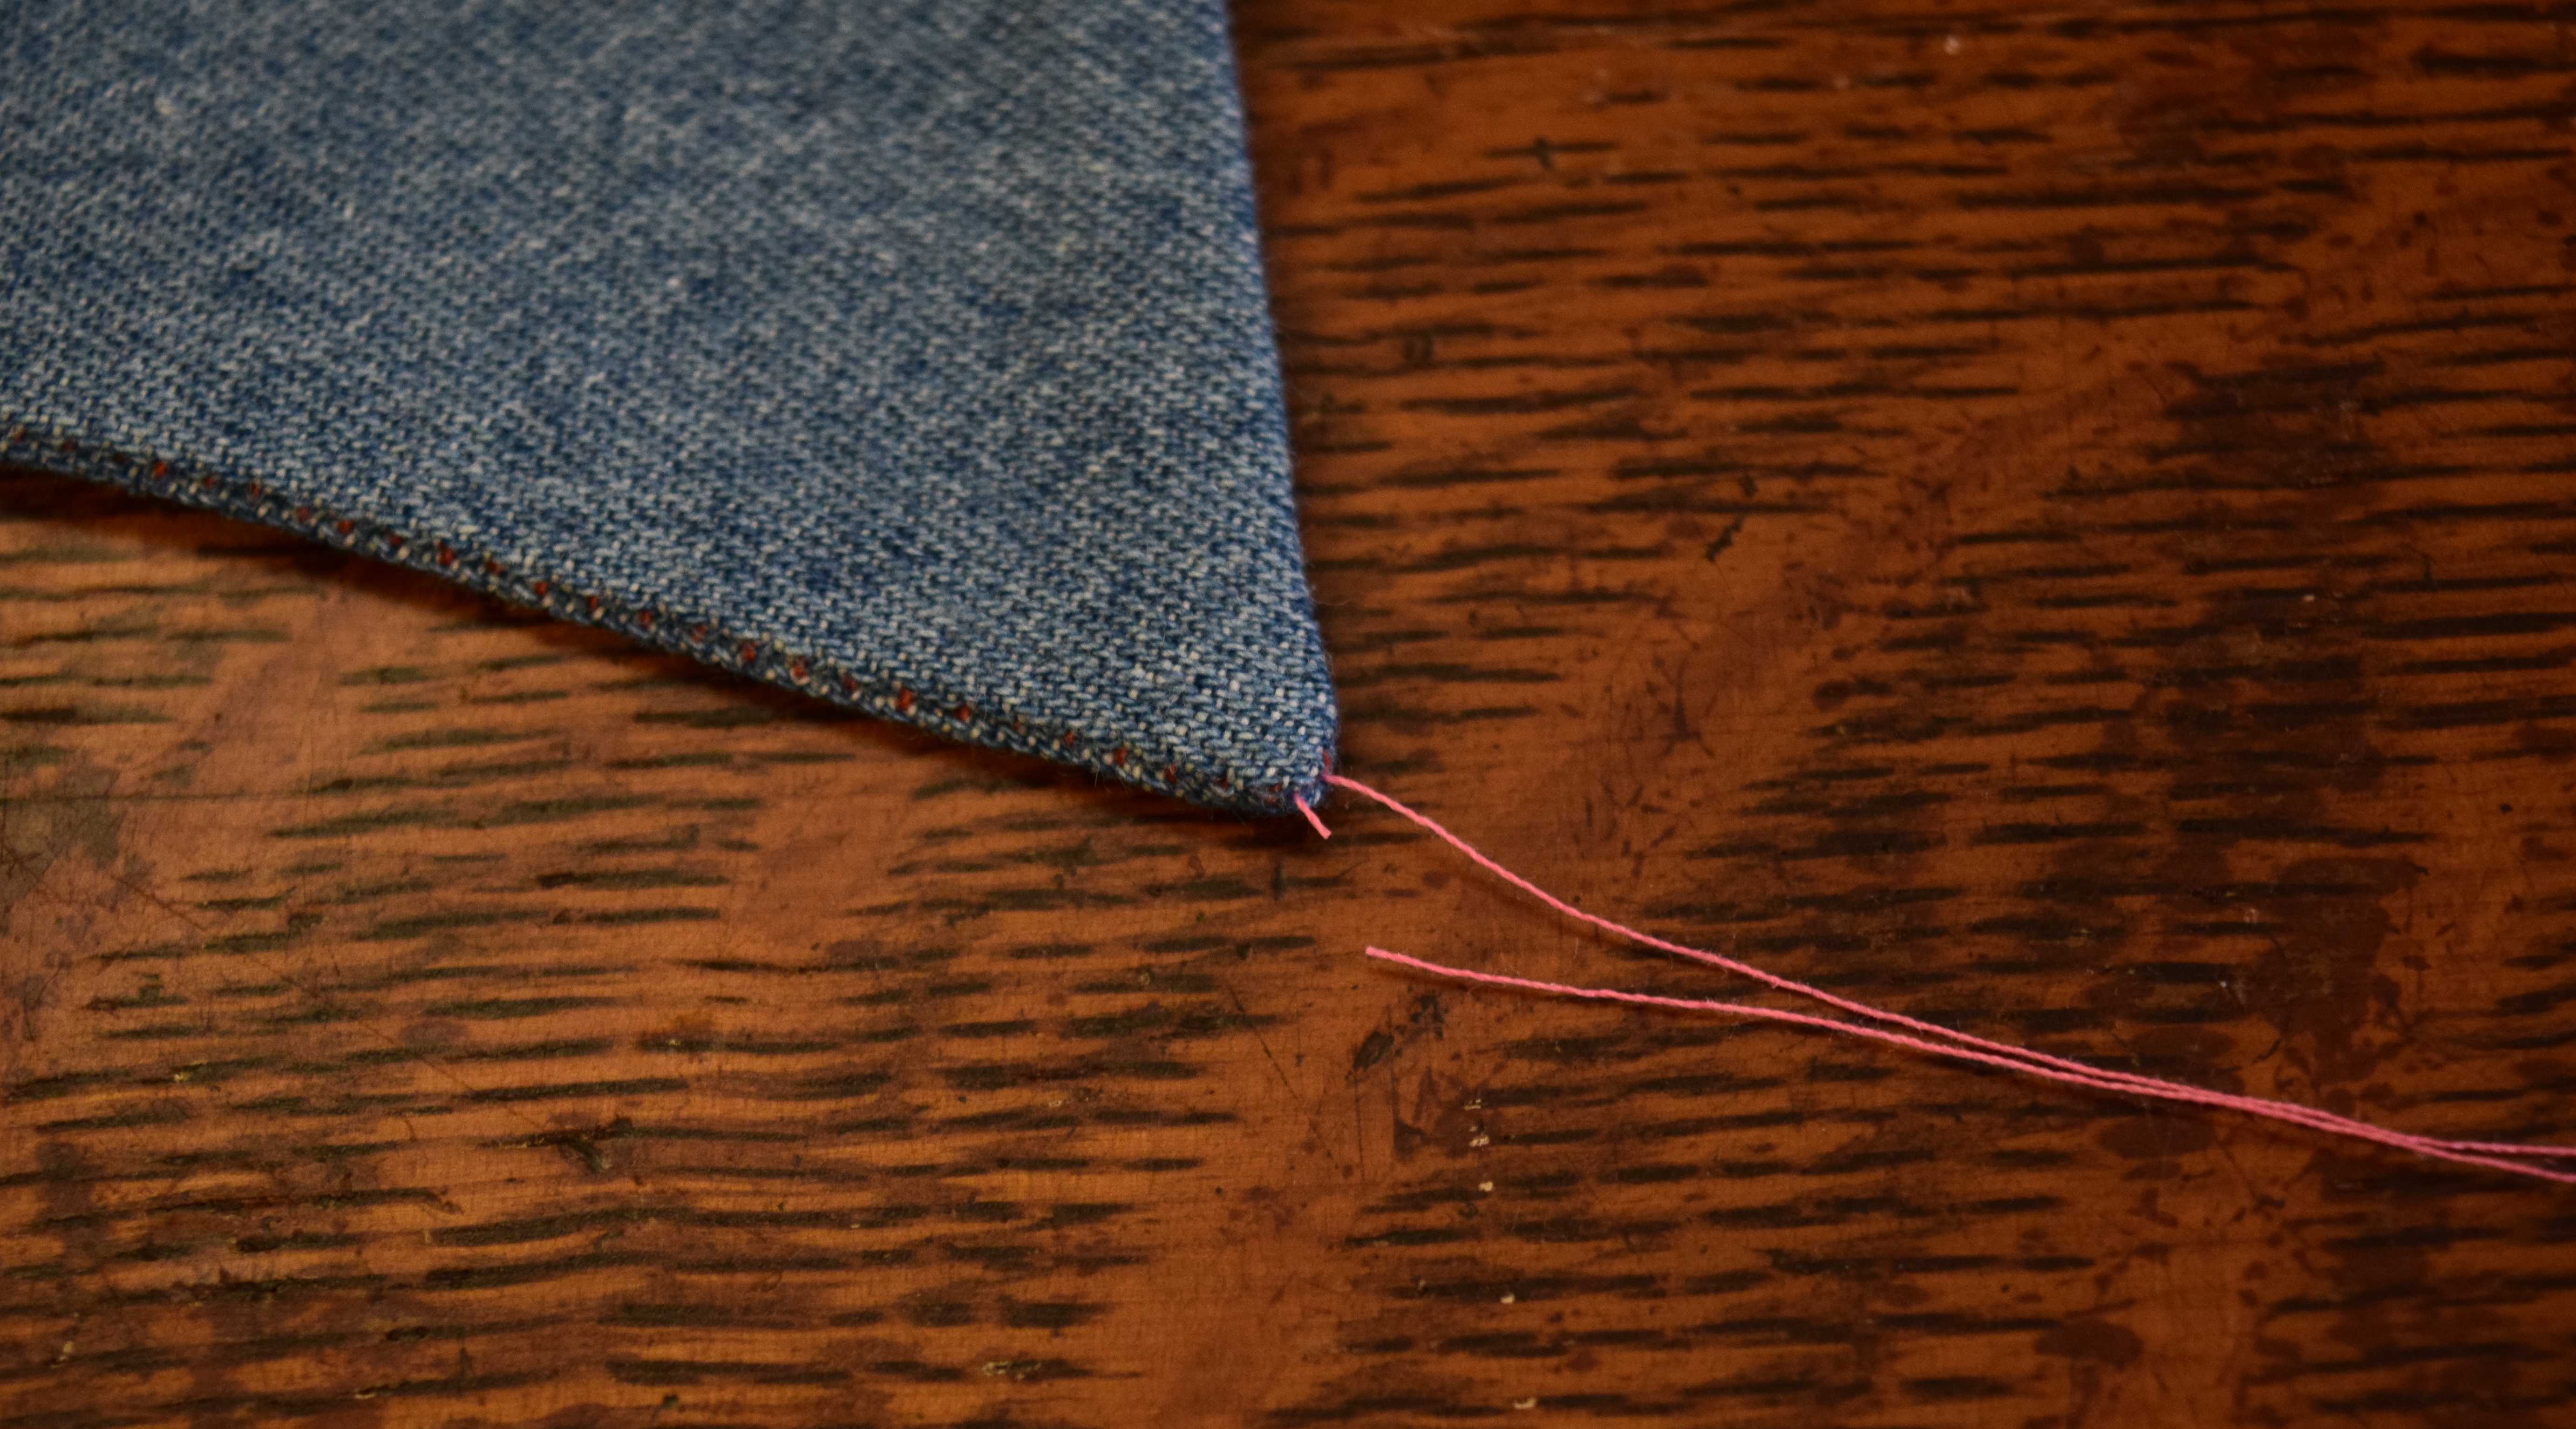
Here’s another sample, done in a thinner fabric. See how the collar point was turned out completely, right up to the stitching at the corner? Oh, how pointy it is!
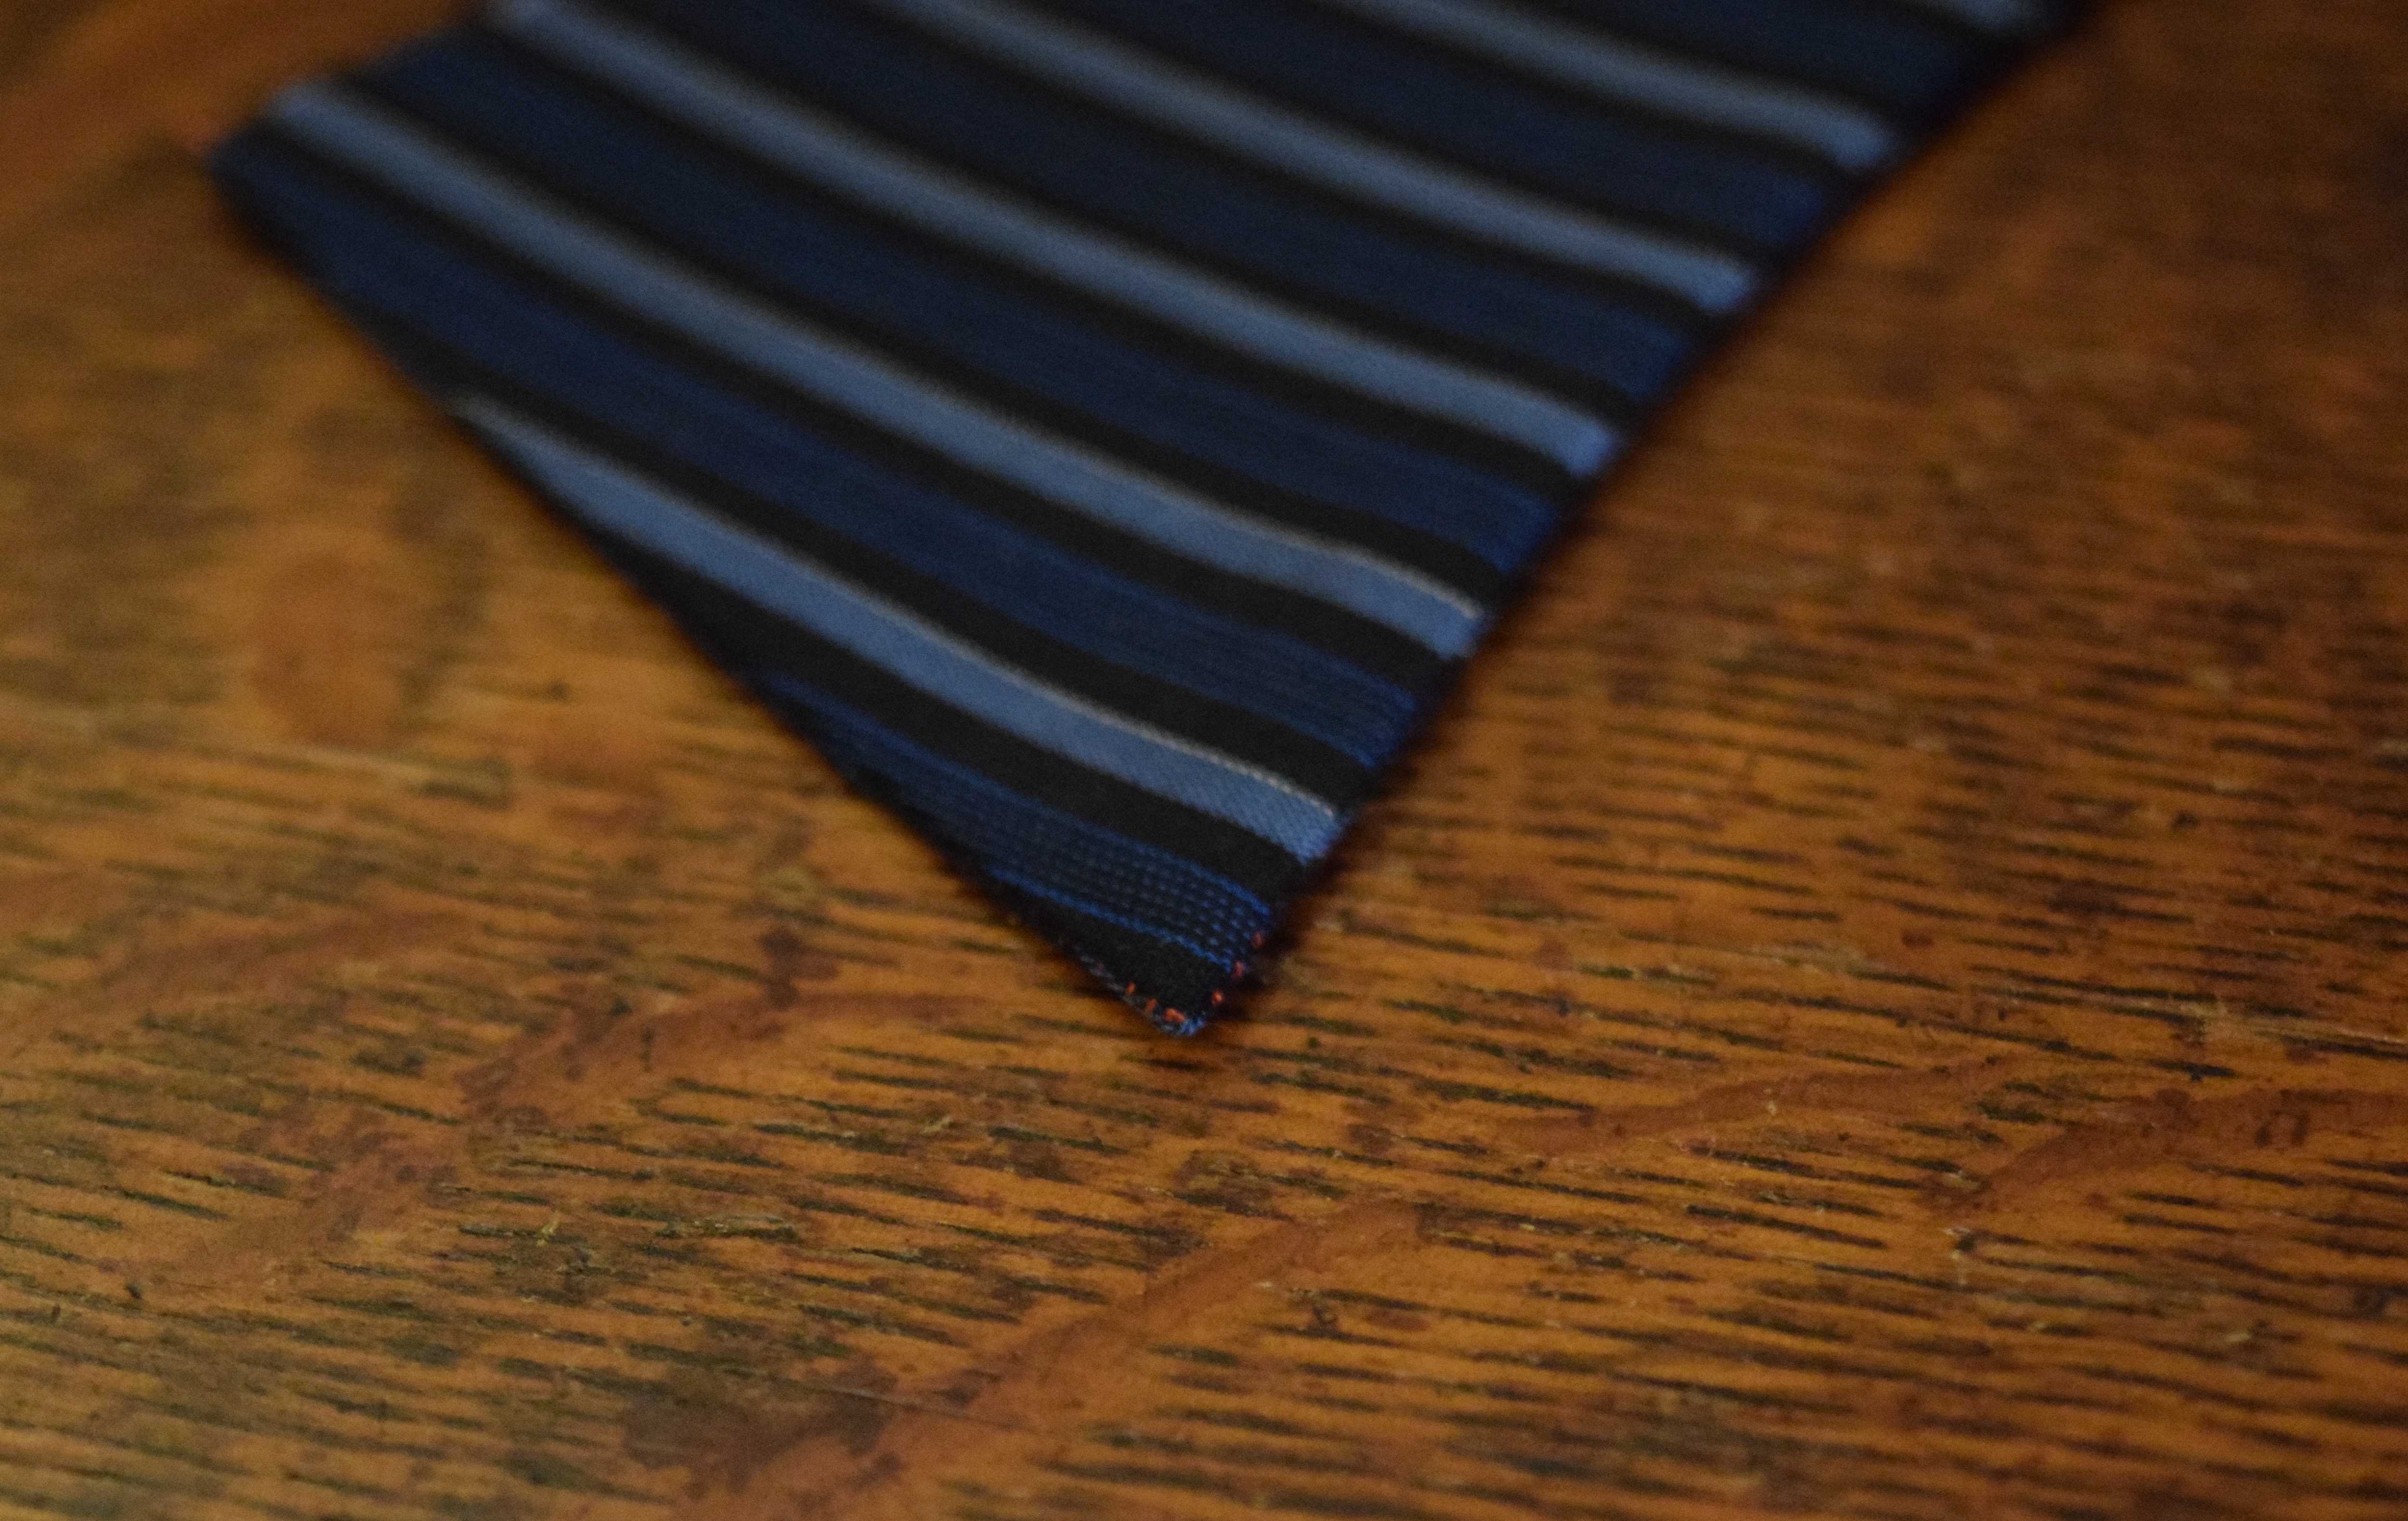
I was able to turn the collar points out completely, even on the test sample done in lightweight denim. I could even see the stitch right at the corner. Of course, you will use matching thread on a real collar, so hopefully the stitches won’t be as visible. You can tell by looking at this picture that the often repeated advice to take a diagonal stitch or two at the corner of a point to get a sharper point is completely wrong. The only thing it will give you is a diagonal point on your collar and maybe a hole in your collar point. It’s unbelievable how many people have repeated that bad advice. I’ve come across so many bad ideas like this repeated over and over by so-called sewing experts that I tend to not trust anything they say unless I’ve verified it myself.
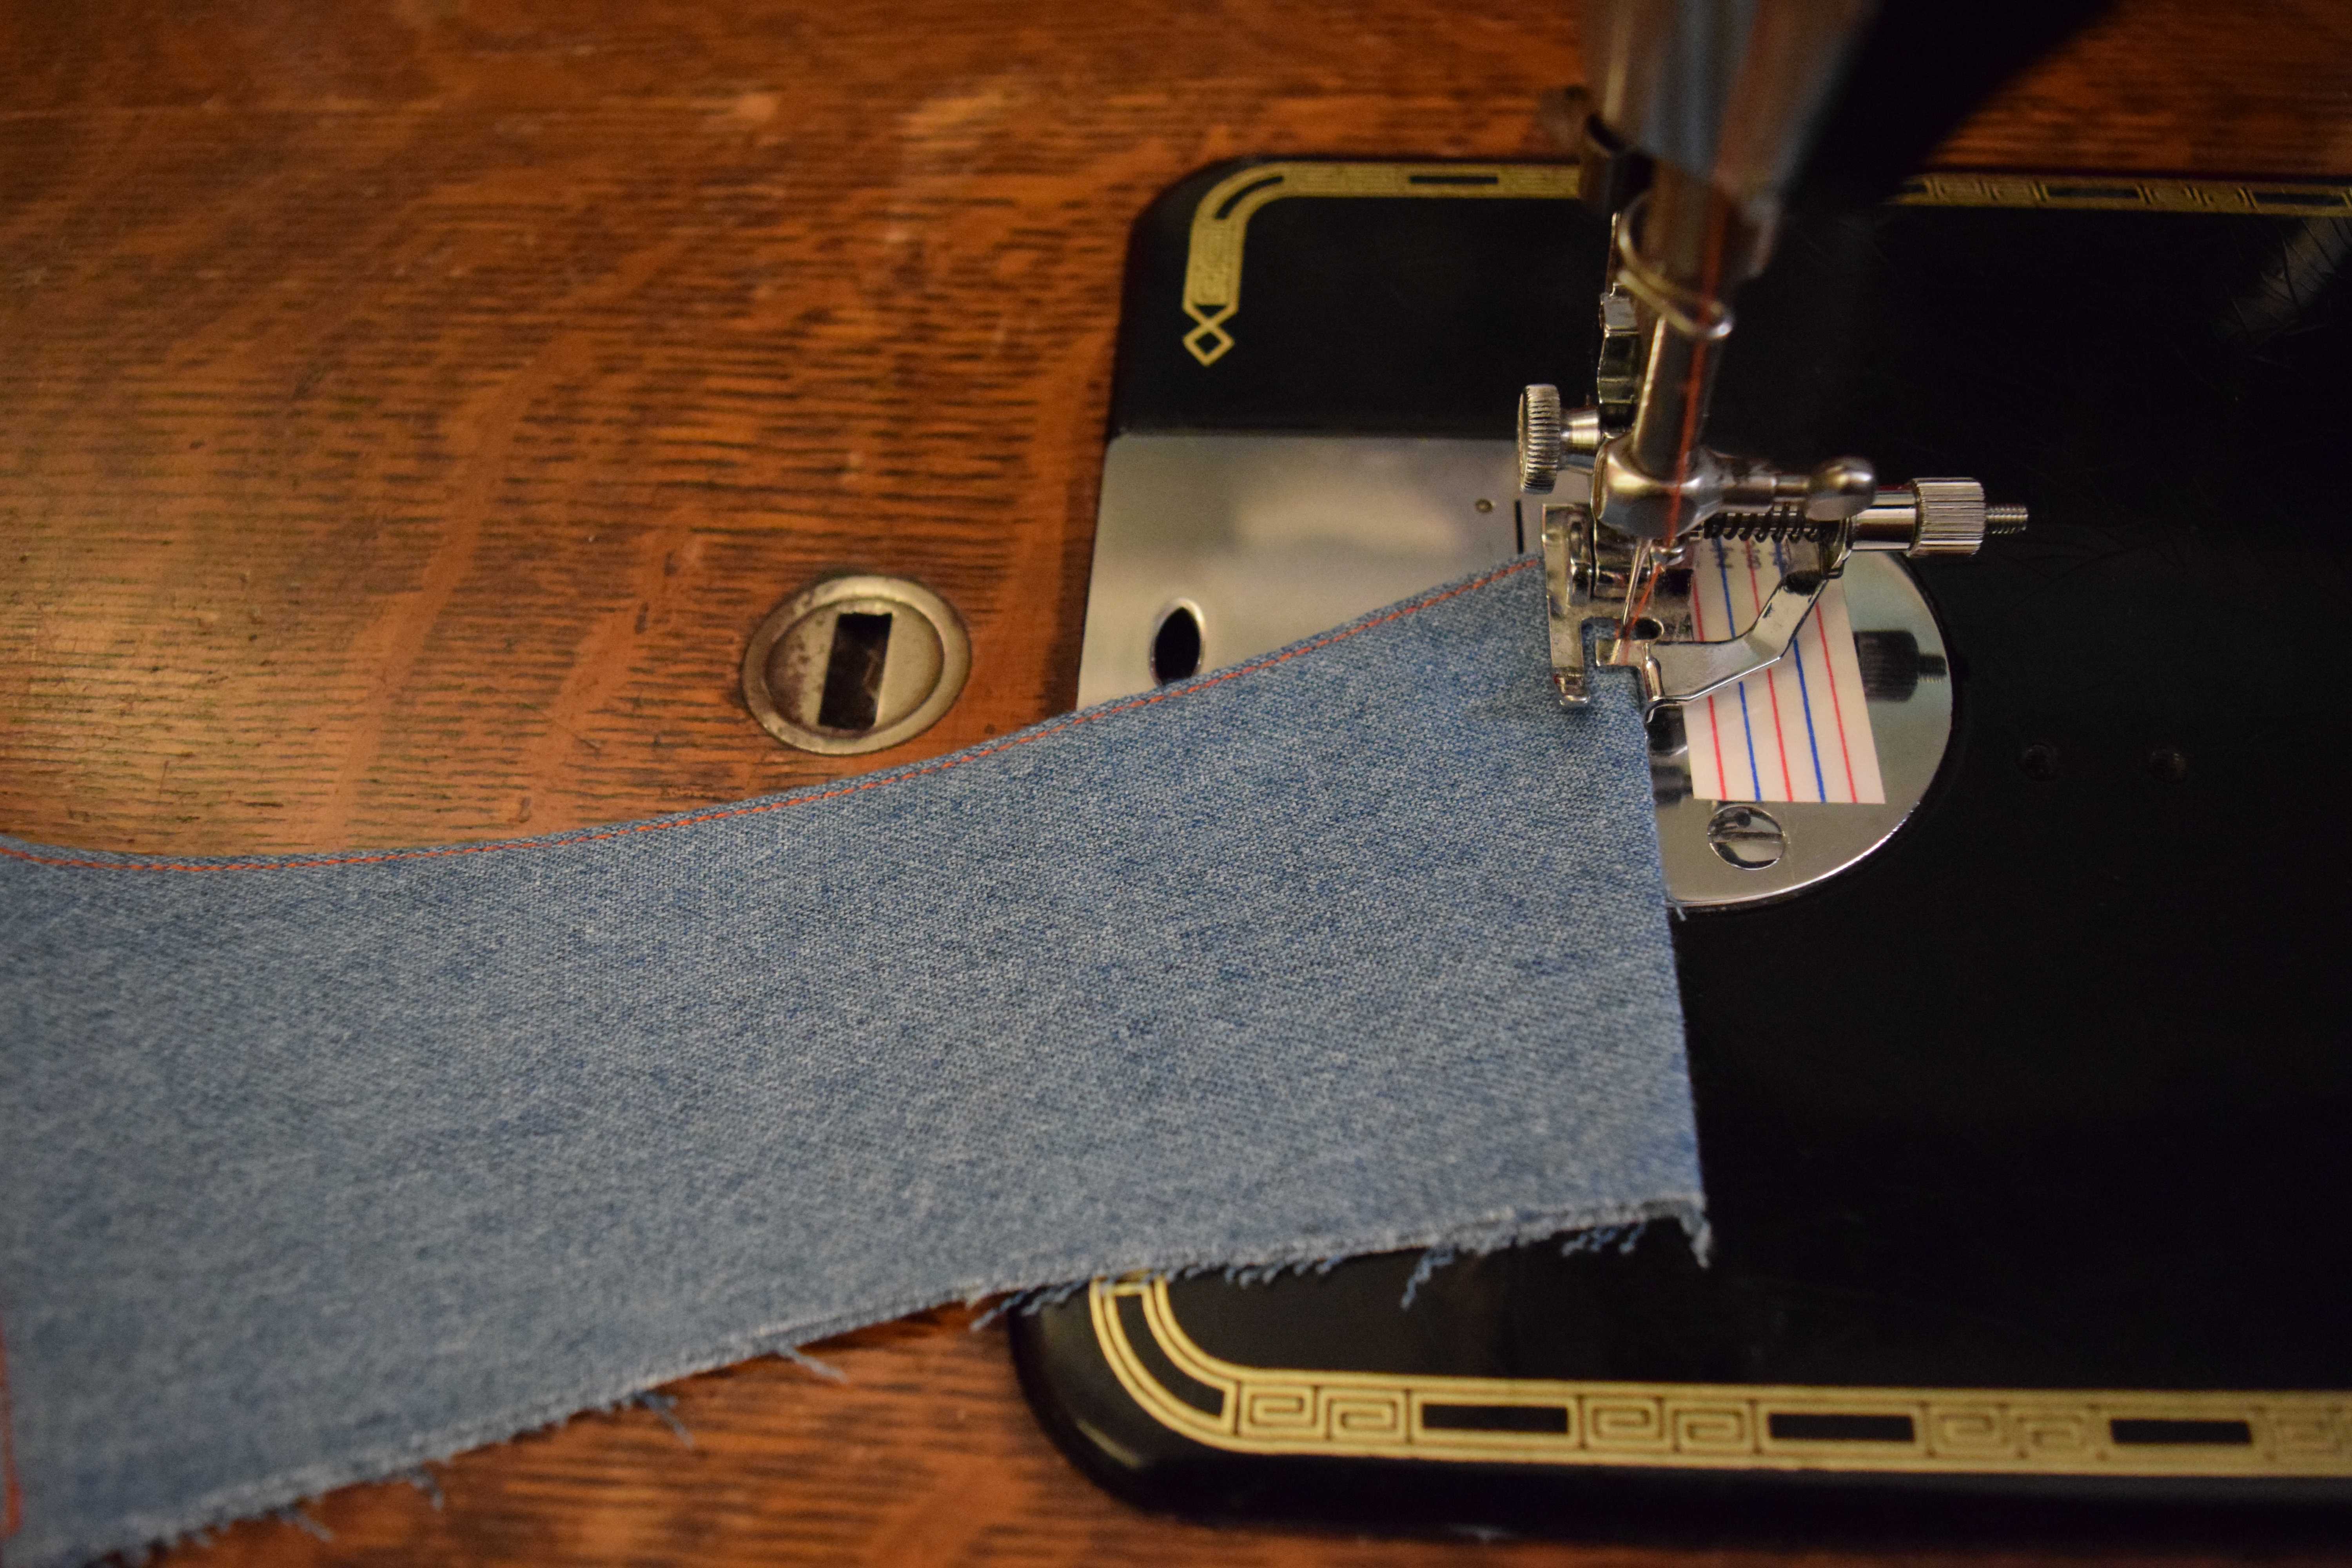
Here’s one more tip for sewing collars to make them look less homemade. If your pattern calls for topstitching 1/8″ (3 mm) from the edge, do your topstitching 1 mm from the edge instead. I use a blind hem foot to keep my stitching an even distance from the edge. Make sure the interfaced side of the collar is facing up when you do your topstitching.
 GrowYourOwnClothes Etsy Shop

What an interesting post! I’d never heard of the industrial collar turners before. Not practical for most home sewers but I can see how they produce such good results.
LikeLike
I am bookmarking this for the next shirt I sew! Your shirt looks immaculate. I’ve done 4 for the husband, so far, and I have given up on making them look like RTW’s. They look better, in a way (-; (He doesn’t shop in the high-end price range of shirts, so most of the shirts in his closet make me cringe when I iron them.) Beware: the more men’s shirts you sew, the less bearable it becomes to look at the shirts on offer in the stores!
LikeLike
I have an industrial collar turner and use it in combination with a thread similar to Coffin’s technique. I agree that the industrial turners are not suited for home sewers, but since I use industrial machines as well, I have just the right place to mount the turner. I got it for Christmas one year and just love it.
I found it interesting that the shirts you took apart had extra interfacing at the points. I’ve taken shirts apart, too, and they were like your sample, i.e., no interfacing at the points or in the seam allowances. My own shirts have interfacing at the point and in the seam allowances simply because I use a form of block fusing. All of which reminds me how much I love making shirts and that I should bump those up the priority list soon!
LikeLike
That is interesting. I actually took apart several more collars, and the interfacing was different on each one, so I guess it’s fine to use whatever method works for your particular fabric/interfacing combo. Two of the collars I examined were block fused. The silk shirt had non-fusible interfacing cut to the same size as the collar. The seam allowances on some were trimmed a little at the point, but most were not trimmed.
I also prefer to block fuse most of the time, but I had problems turning the collar point when I block fused stiff interfacing. In the future I’ll probably block fuse when my fabric and interfacing are thin enough, and keep the interfacing out of the seam allowances when I’m using thicker fabric or stiff interfacing.
LikeLike
I can see that the stiffness of the interfacing would make a difference at the points. My typical interfacing isn’t stiff, so that’s probably why I can get away with block fusing.
LikeLike
Extremely interesting. What patience you have, but so worth it.
LikeLike
Thanks for sharing this so that we can benefit from your research too! I’m definitely going to try the thread next time I make a collar.
LikeLike
Well done! Such professional work. I’m going to have to keep this blog post in mind when I do shirts!
LikeLike
Well done (both the research/innovation and the presentation!), and very interesting! I’ve always been struck by the difference between craft methods that depend on at least a little or even a lot of practice (which turn out to be almost ANY methods, given enough practice or familiarity, but tend towards being the fastest ones given the high motivation to get good and be fast provided by being paid by the piece), and those that work well with very little need to practice (given some general but quite high skill level with precision stitching), perfect for occasional makers and usually way too fussy and time-consuming for pros. I’m much more interested in the latter, and your reinforced version of the thread turning idea is a perfect example, as the factory worker who showed it to me would definitely feel the practice needed to do it without breaking stitches was way more efficient in the long run compared to adding the “training wheels” of those extra stitches every time—but not me! I do sometimes wonder if I were to put in the same amount of time practicing any given pro method as I was willing to put into coming up with a good no-practice method, if I would eventually like the former better. No matter; practicing is WAY more boring than research and invention, and there’s so much less to say about it:) Brava and thanks!
It’s also fascinating to me how significant personal preferences and inclinations are for we non-pro but still demanding home workers as we chose our tools and techniques, not forced to do anything in any particular way nor with any particular tools. Something in me simply gravitates more happily towards metal grabbers than towards thread loops, which is all I can offer as to why I doubt I’ll ever prefer your method (though I’ll certainly try it!) and will continue instead to refine and explore my cherished collection of tweezers and hemostats, which probably DO require a bit more practice to manage—vive la différence, and thanks for the reminder:)
PS, I loved seeing your plywood and knitting needles turning device, too bad it didn’t work; really impressive that you went so far! Following your blog for sure:)
LikeLike
I sew a variety of different things, so I definitely lean toward methods that produce consistent results without a lot of practice, even if they take longer.
LikeLike
Ditto, definitely:)
LikeLike
[…] Lower cup, cup sides, and bridge: Mercerized cotton poplin left over from my husband’s white shirt […]
LikeLike
Thank you so much for this Leila. It worked so well!! Can you please tell me where you bought that blind hem foot that you mentioned when talking about top stitching. I have a Singer Featherweight 221 machine. Thanks again!!
LikeLike
Any generic low shank blind hem foot should work with a Featherweight. Usually they are sold as snap-on feet. You can get a whole set of snap-on feet with a low shank adapter inexpensively. Those sets usually have a blind hem foot included. If you were interested in the specific all-metal blind hem foot I have in the picture, I think it was one that came with a low-end low shank Janome machine. That particular foot has since broken, unfortunately. I did prefer that one to the others I have with plastic parts, but the ones with the plastic edge guide work just the same.
I found Janome brand name all-metal ones that look like what I had by searching for “Janome Blind Hem Foot #200130006”. This generic one looks pretty similar: https://www.amazon.com/YICBOR-Janome-Oscillating-Models-200130006/dp/B07FDWDXN5. Note you will also need a low shank to snap-on foot adapter with it.
LikeLike