
Adding seam allowances has always been one of my least favorite aspects of patternmaking. It’s easy to add seam allowances with a gridded ruler on straight edges, but adding seam allowance around curves is a pain. I made some tools to make it easier to add seam allowances. They are little plastic circles that you stick a pencil in and use to trace around the pattern.
Update: If you don’t want to draw circles by hand, you can print out my seam allowance guide templates.
To make these you will need:
• HDPE plastic lid (e.g. a lid from a margarine container). Colored lids are best.
• Ruler
• Masking tape
• Scissors
• Mechanical pencil
• Awl or large needle
• Scrap of manila folder or heavy paper

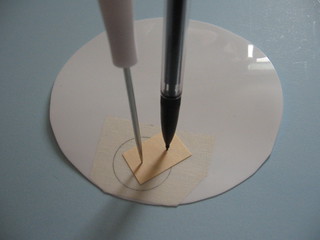
First cut off the rim of the lid so you have a flat piece of plastic. Put a piece of masking tape on the lid where you are going to draw a circle for the marker.

Using an awl, poke two tiny holes in a scrap of manila paper. They should be as far apart as the width of the seam allowance you are making a marker for. Enlarge one of the holes just enough to fit your pencil lead through.

Use the scrap of manila paper as a compass to draw a circle on the masking tape. Punch a hole in the center of the circle just large enough to fit your pencil lead through.
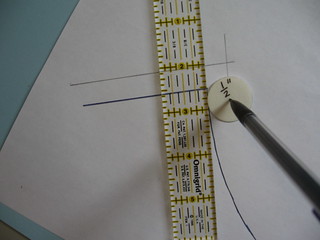
Carefully cut out the circle. Use the ruler to check if it came out exactly the right size. Label the circle with its size.
To use the seam allowance marker, put the tip of your pencil lead through the hole in the middle, then trace around the stitching line of your pattern with the edge of the circle on the stitching line. On outer corners or straight sections, trace along the edge of a ruler.
I made a whole set of these in different sizes. I even made 2” and 2 ½” radius circles for making facings. The only problem with these things is keeping track of all of the tiny circles. I keep them in a little plastic box and make sure to put each circle away as soon as I’m done with it. Now I find adding seam allowances easy and fun instead of tedious.
 GrowYourOwnClothes Etsy Shop

[…] Seam Allowance Guides […]
LikeLike
A woman down the road gave me a sewing machine. It was a Adler belvedere. As soon as I saw it I knew it would be great for a treadle because the hand wheel had such a narrow diameter. Emily cleaned and repaired. Today I got to use it for first time and it is wonderful and the fastest treadle I have ever used.
LikeLike
[…] Seam Allowance Guides […]
LikeLike
this is such a great idea!
LikeLike
I have done this using a Coats and Clark spool of thread…I put a pencil through the spool, and I’m ready to mark. The spool I use gives a 5/8″ seam allowance.
LikeLike
My mind was blown when I saw this!! You are a genius!
LikeLike
I absolutely love this site, it is informative and easy to understand.
Thank you
LikeLike
Lovelyy blog you have here
LikeLike