
 These instructions will show you step-by-step how to sew a jeans zipper fly with a sewn on facing.
I demonstrate the “men’s” fly lap direction, which is also used in ready-to-wear for women’s jeans and casual pants (the zipper is pulled up with the right hand). If you want to sew a zipper fly that zips up with your left hand, you will need to reverse “left” and “right” in the instructions.
Notes:
- When I say “overlock” you can substitute zig-zag stitching.
- I use double topstitching (mock flat fell) on the crotch seam. A couple of the steps will be different if you want to flat fell this seam.
Here are all of the pattern pieces. On your pants front pattern piece, mark the spot where the crotch seam starts to curve with a small circle. Increase the center front seam allowance above the circle to 3/4” (2 cm).

To make the fly facing and zipper shield, print out my zipper fly pattern and templates. Print at actual size, with no scaling. Measure the test lines on the page to make sure you printed to the correct scale. Cut out the patterns.
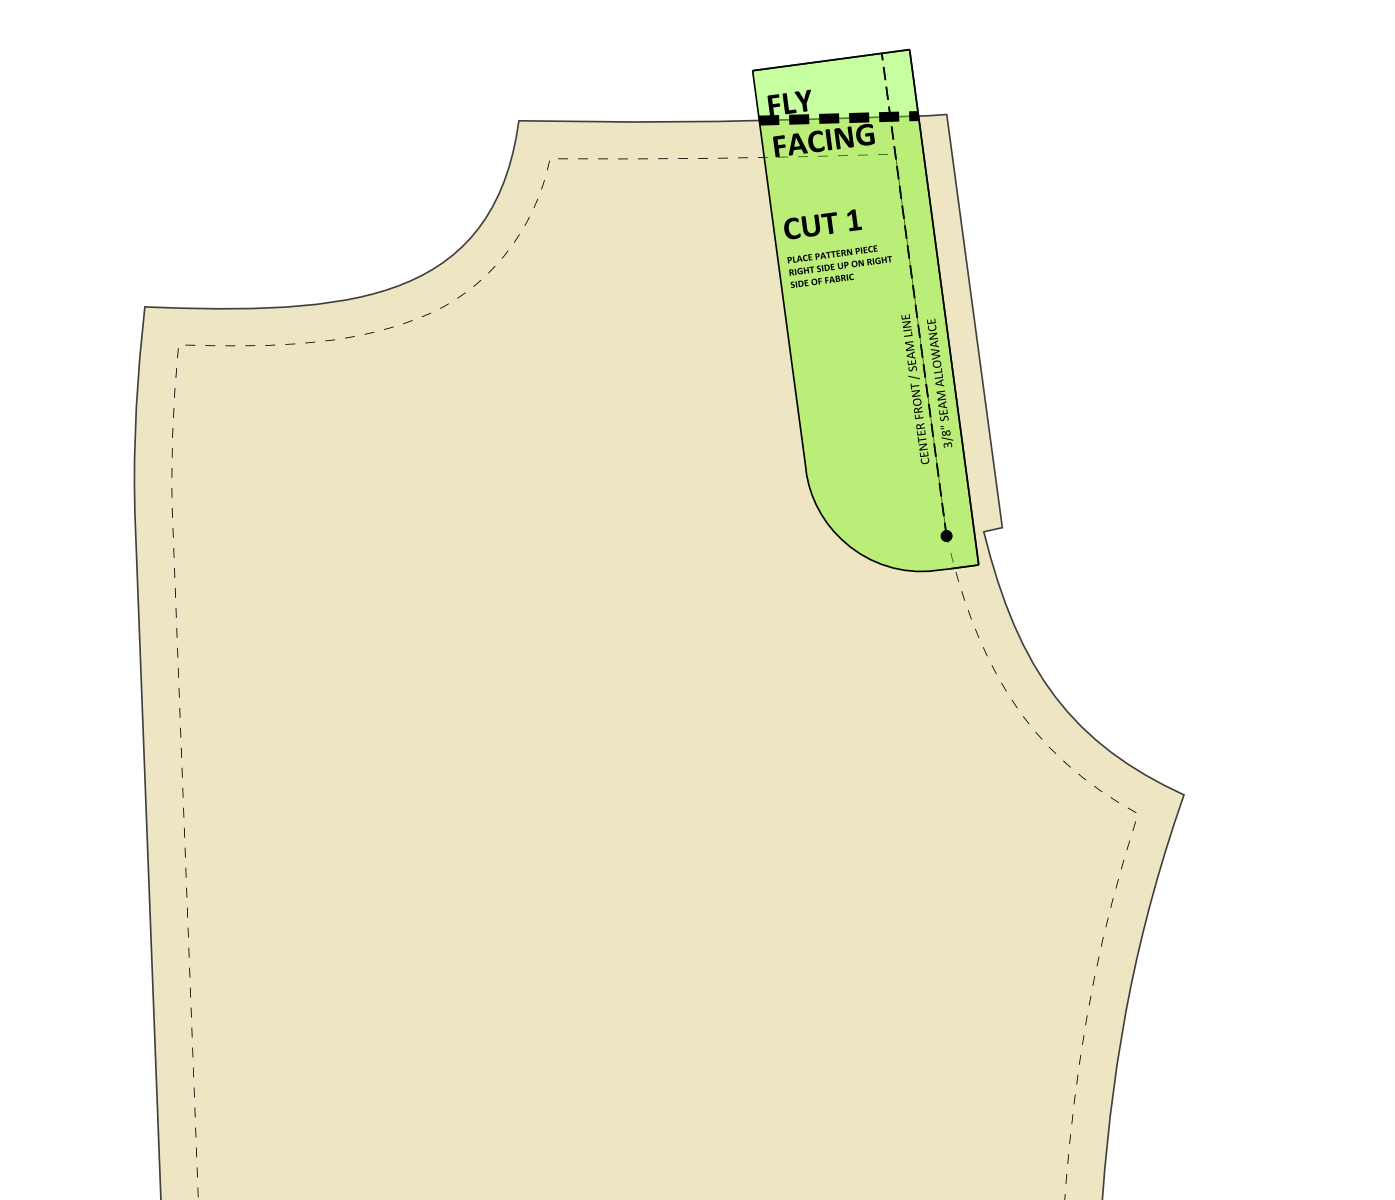
Place the fly facing piece on the pants front pattern piece, matching circles and center front lines. Trim or extend the top of the fly facing to match the shape of the pants front at the waist.
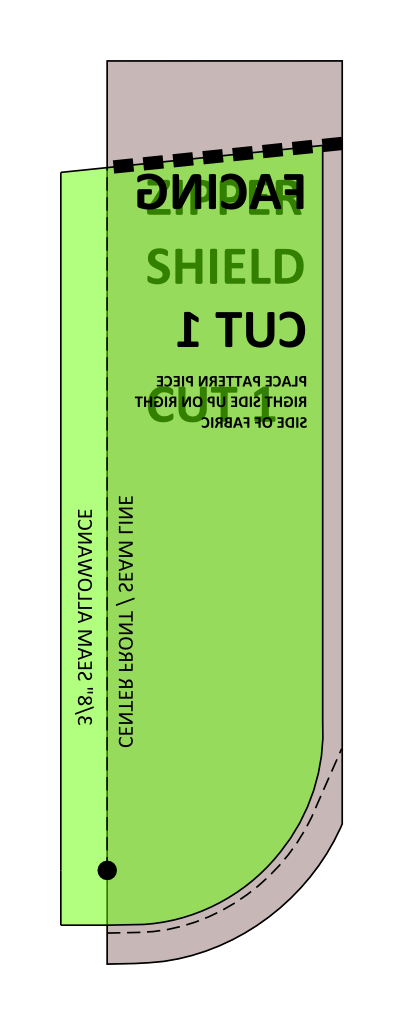
Fold the zipper shield pattern piece in half along the fold line. Place the adjusted fly facing pattern over the zipper shield pattern, matching circles and center front lines. Trim or extend the upper edge of the zipper shield pattern to match the fly facing pattern.
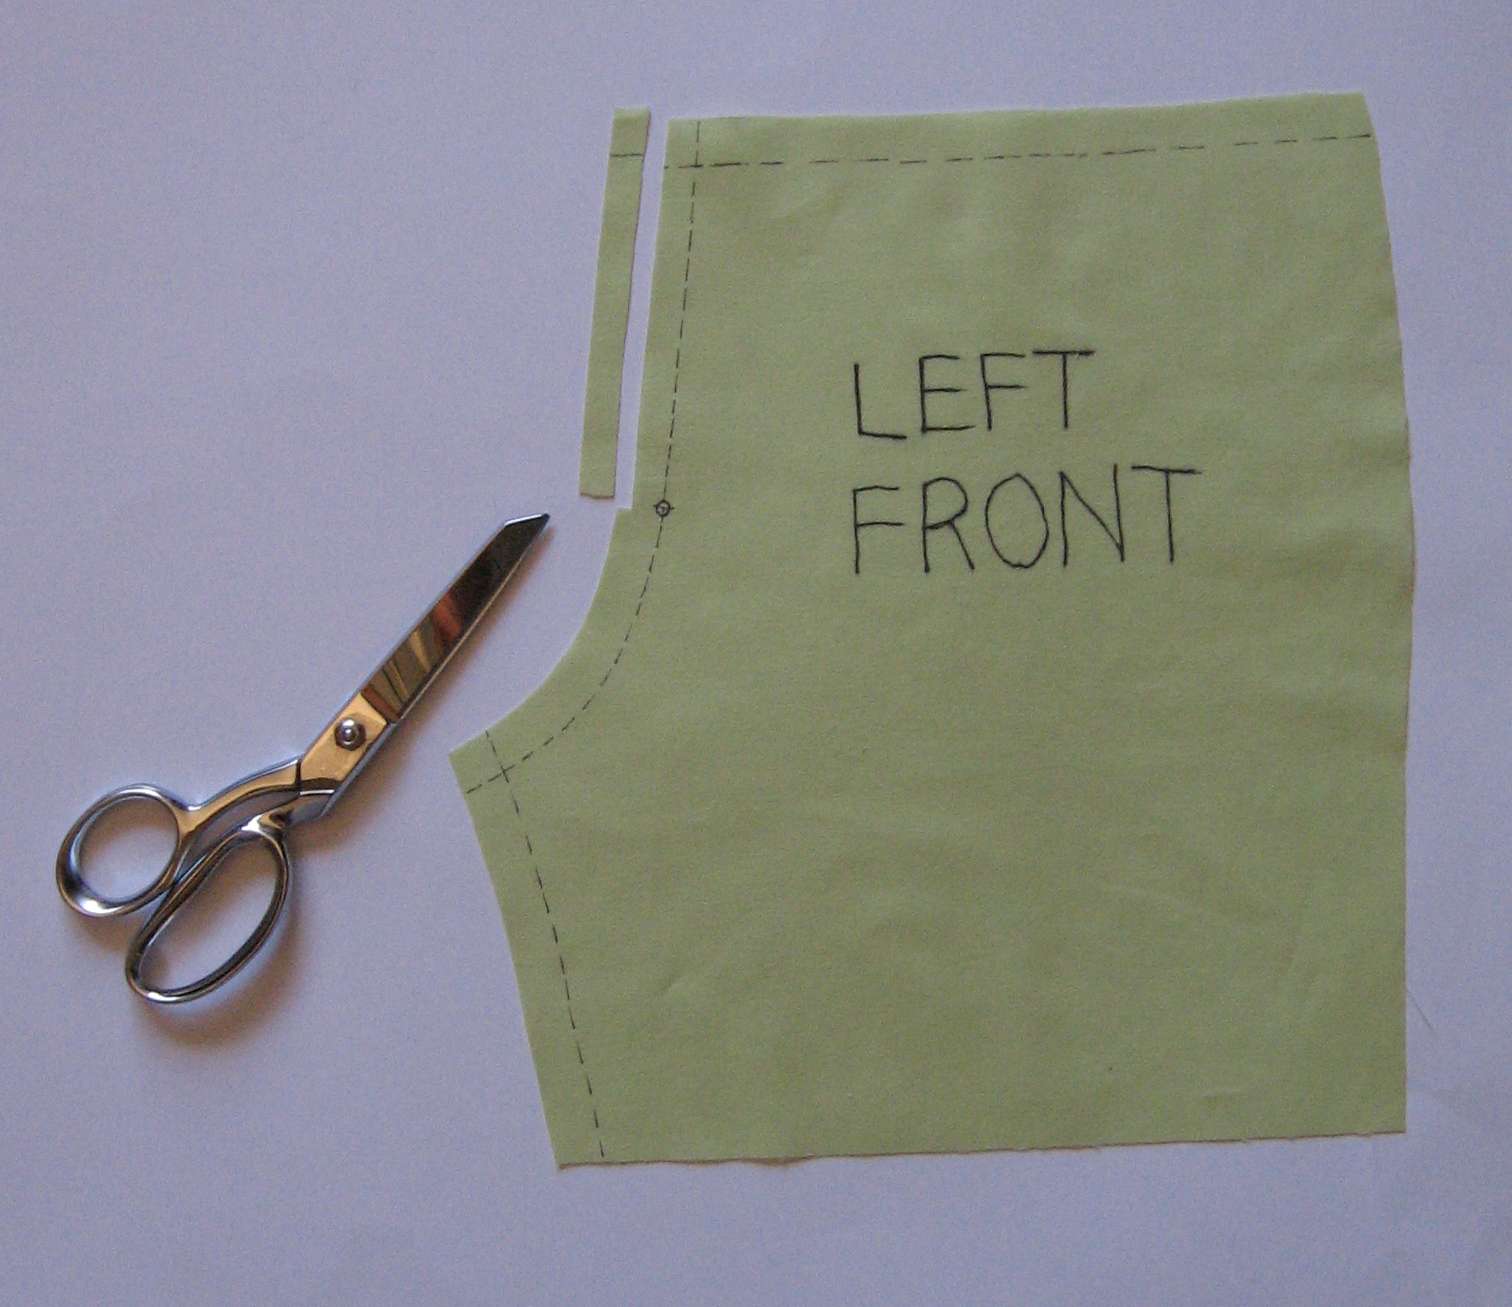
Cut out your pants front pieces in fabric. On pants front pieces, take a little snip into the seam allowance at center front along the waist edge.
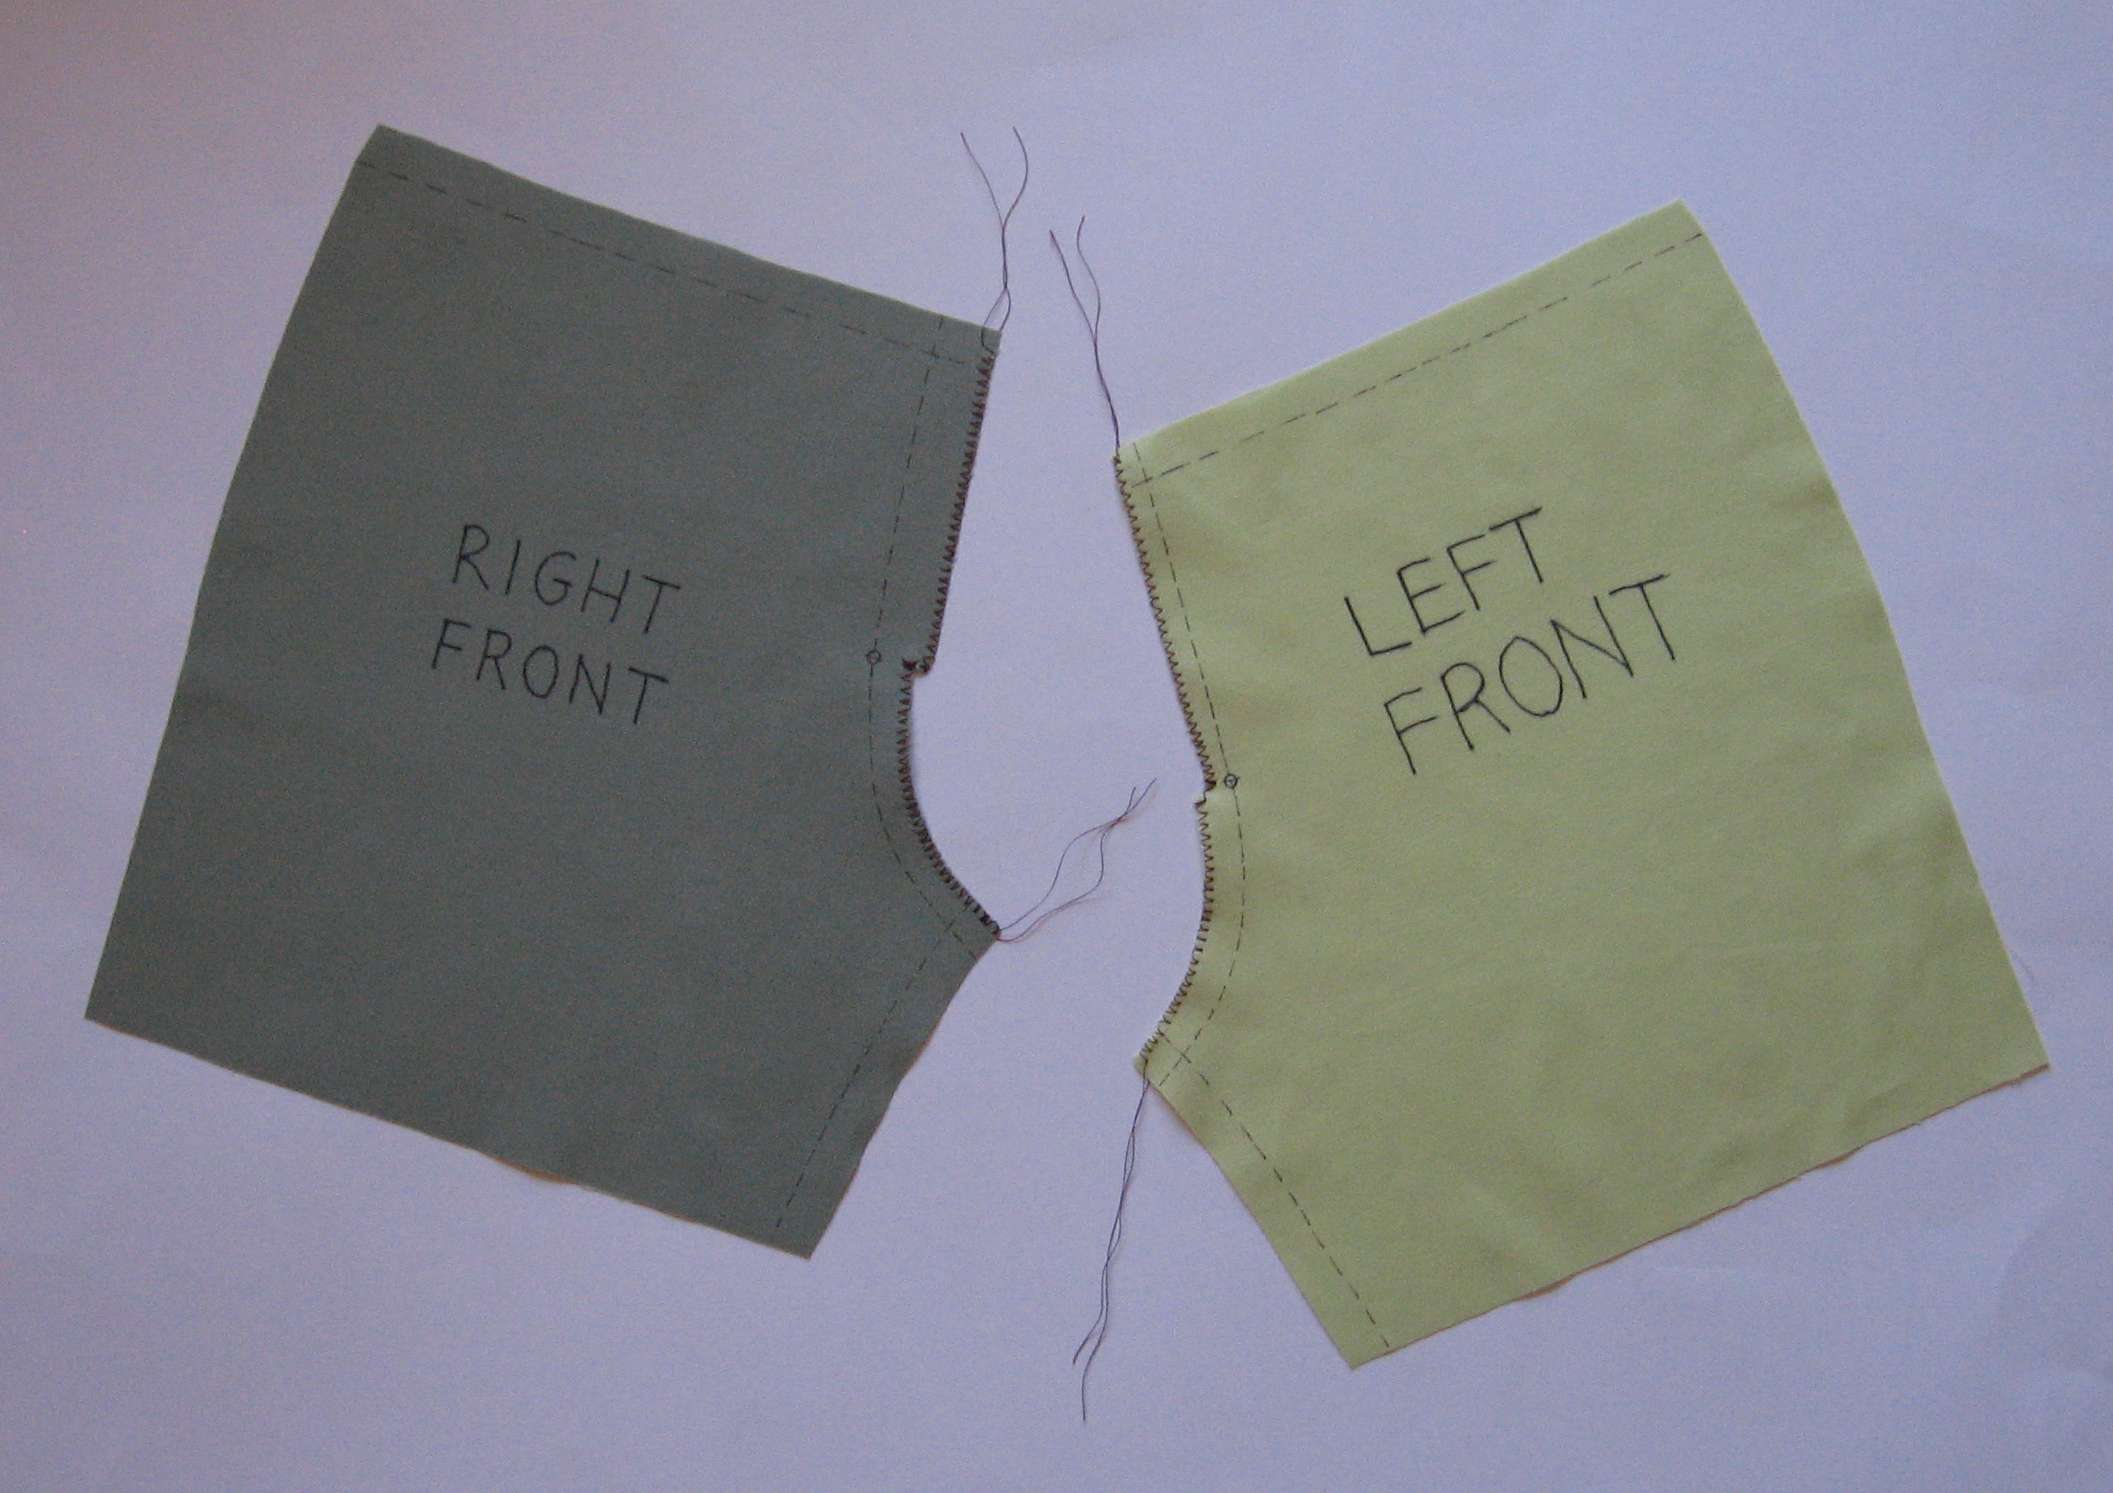
On the left front piece trim off 3/8” (1 cm) at the center front from the upper edge to the circle.
Finish the raw edges of the center front seams with zig-zag stitches or your sewing machine’s overcast stitch. I don’t like to overlock here because of the curves and the jogs in the seam allowance.
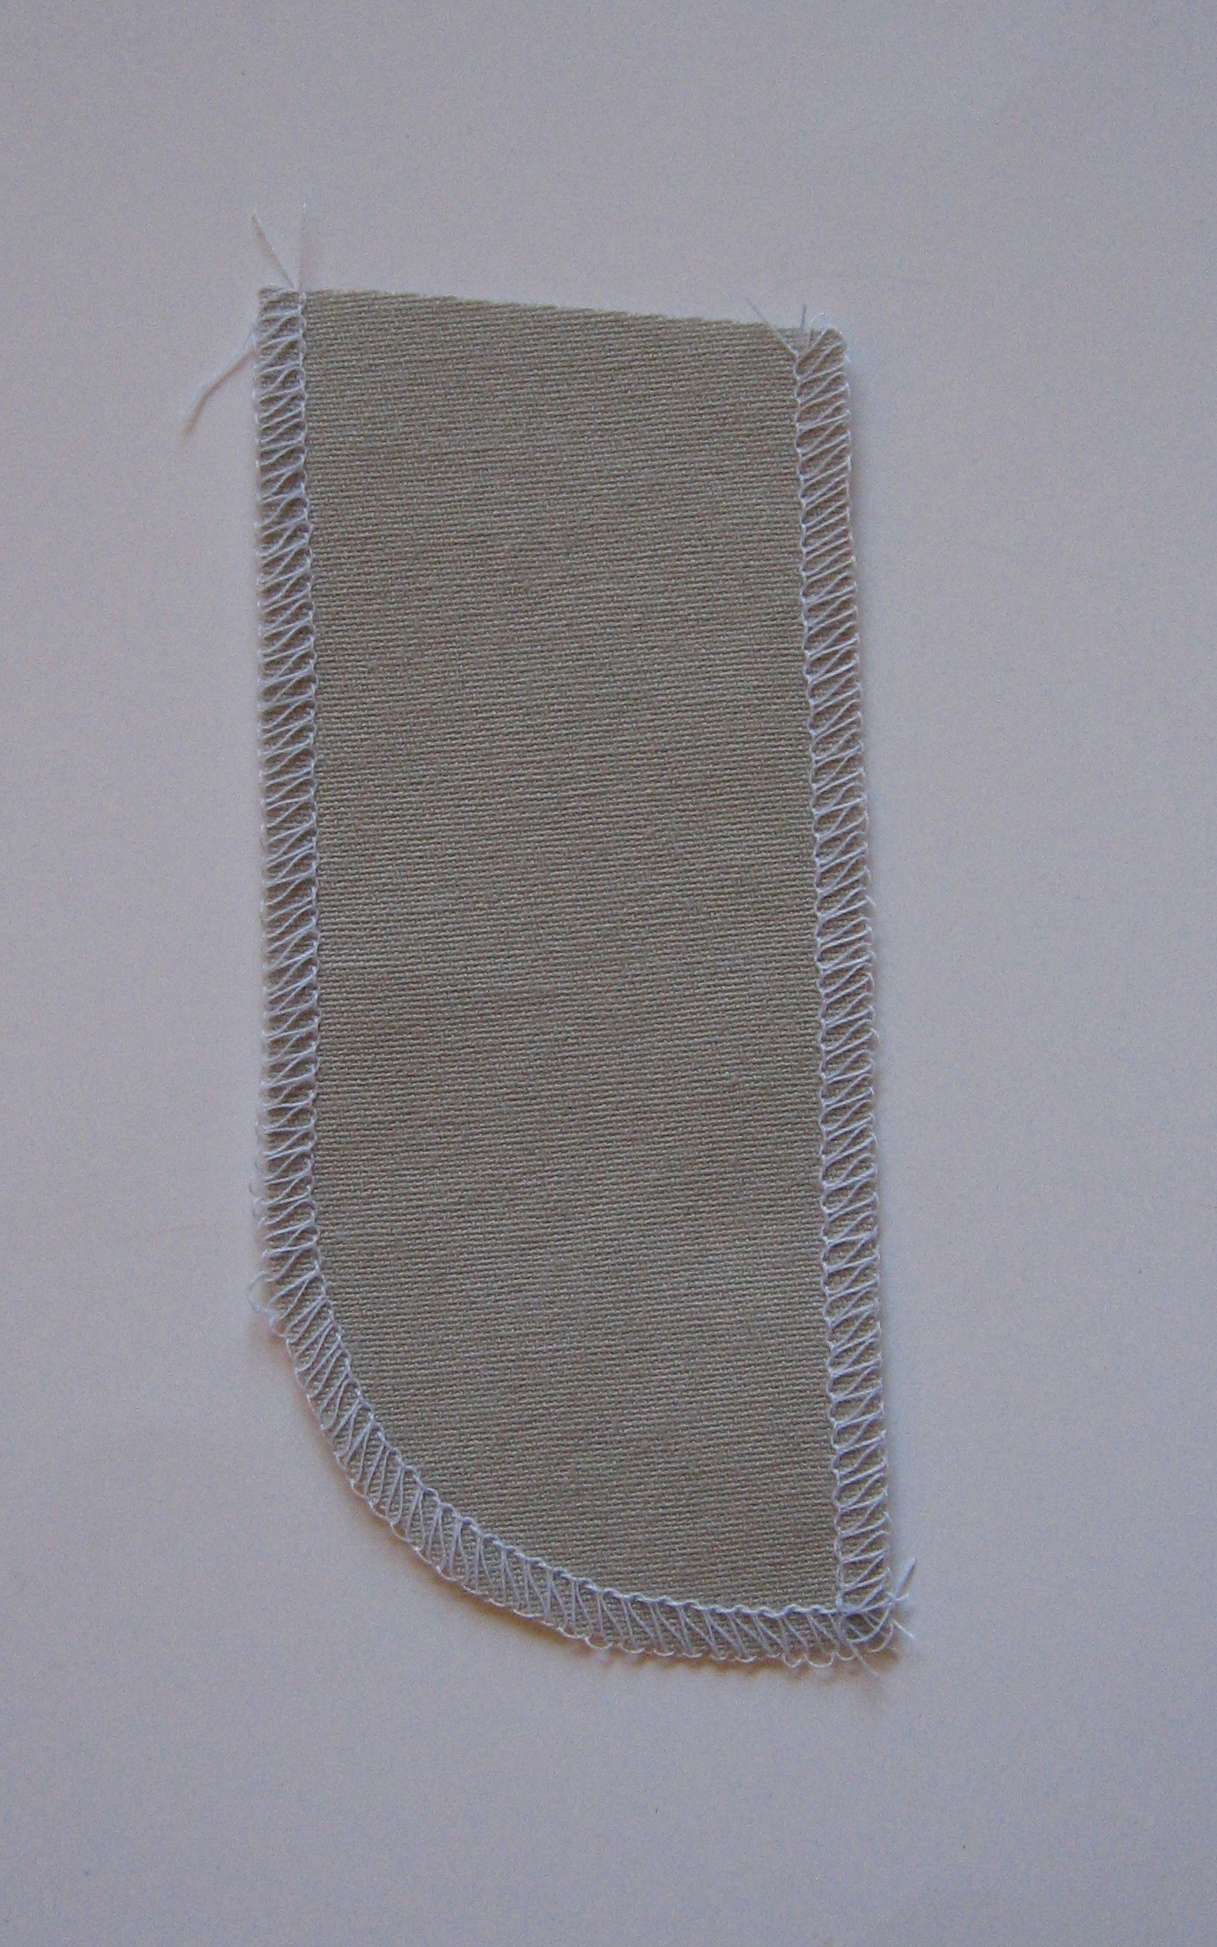
Overlock the long curved edge of the fly facing. I show the long straight edge overlocked also, but you really don’t need to because that edge will be enclosed.
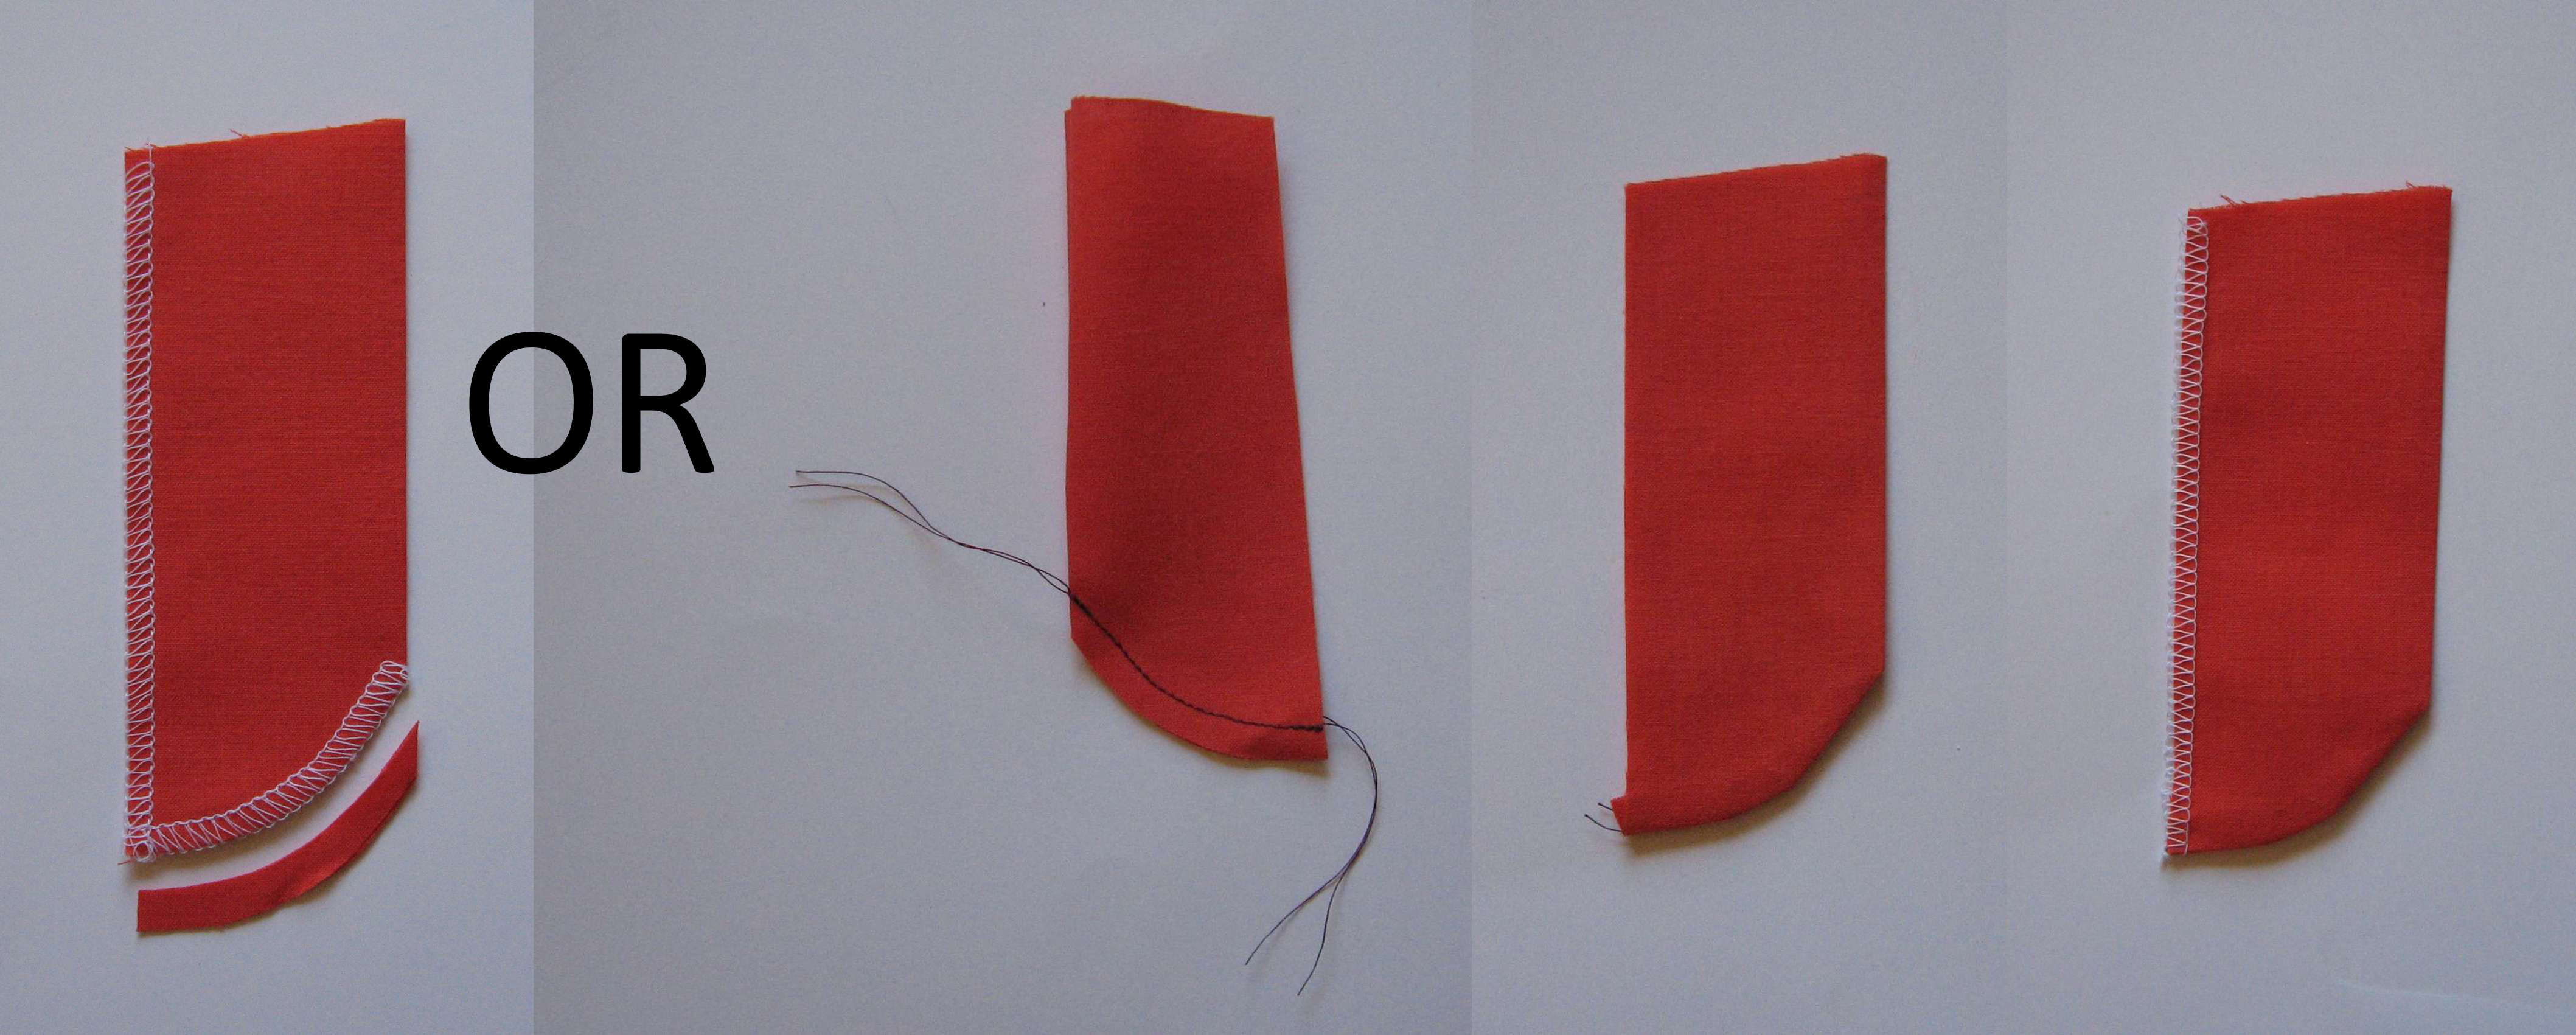
Either
a. Fold the zipper shield lengthwise, wrong sides together. Press. Overlock the curved edge, trimming off 1/4” (6 mm). Overlock the straight edge without trimming.
Or
b. Fold the zipper shield lengthwise, right sides together, stitch the curved edge with a 1/4” (6 mm) seam allowance, turn right side out, and press. Overlock the straight edge without trimming.
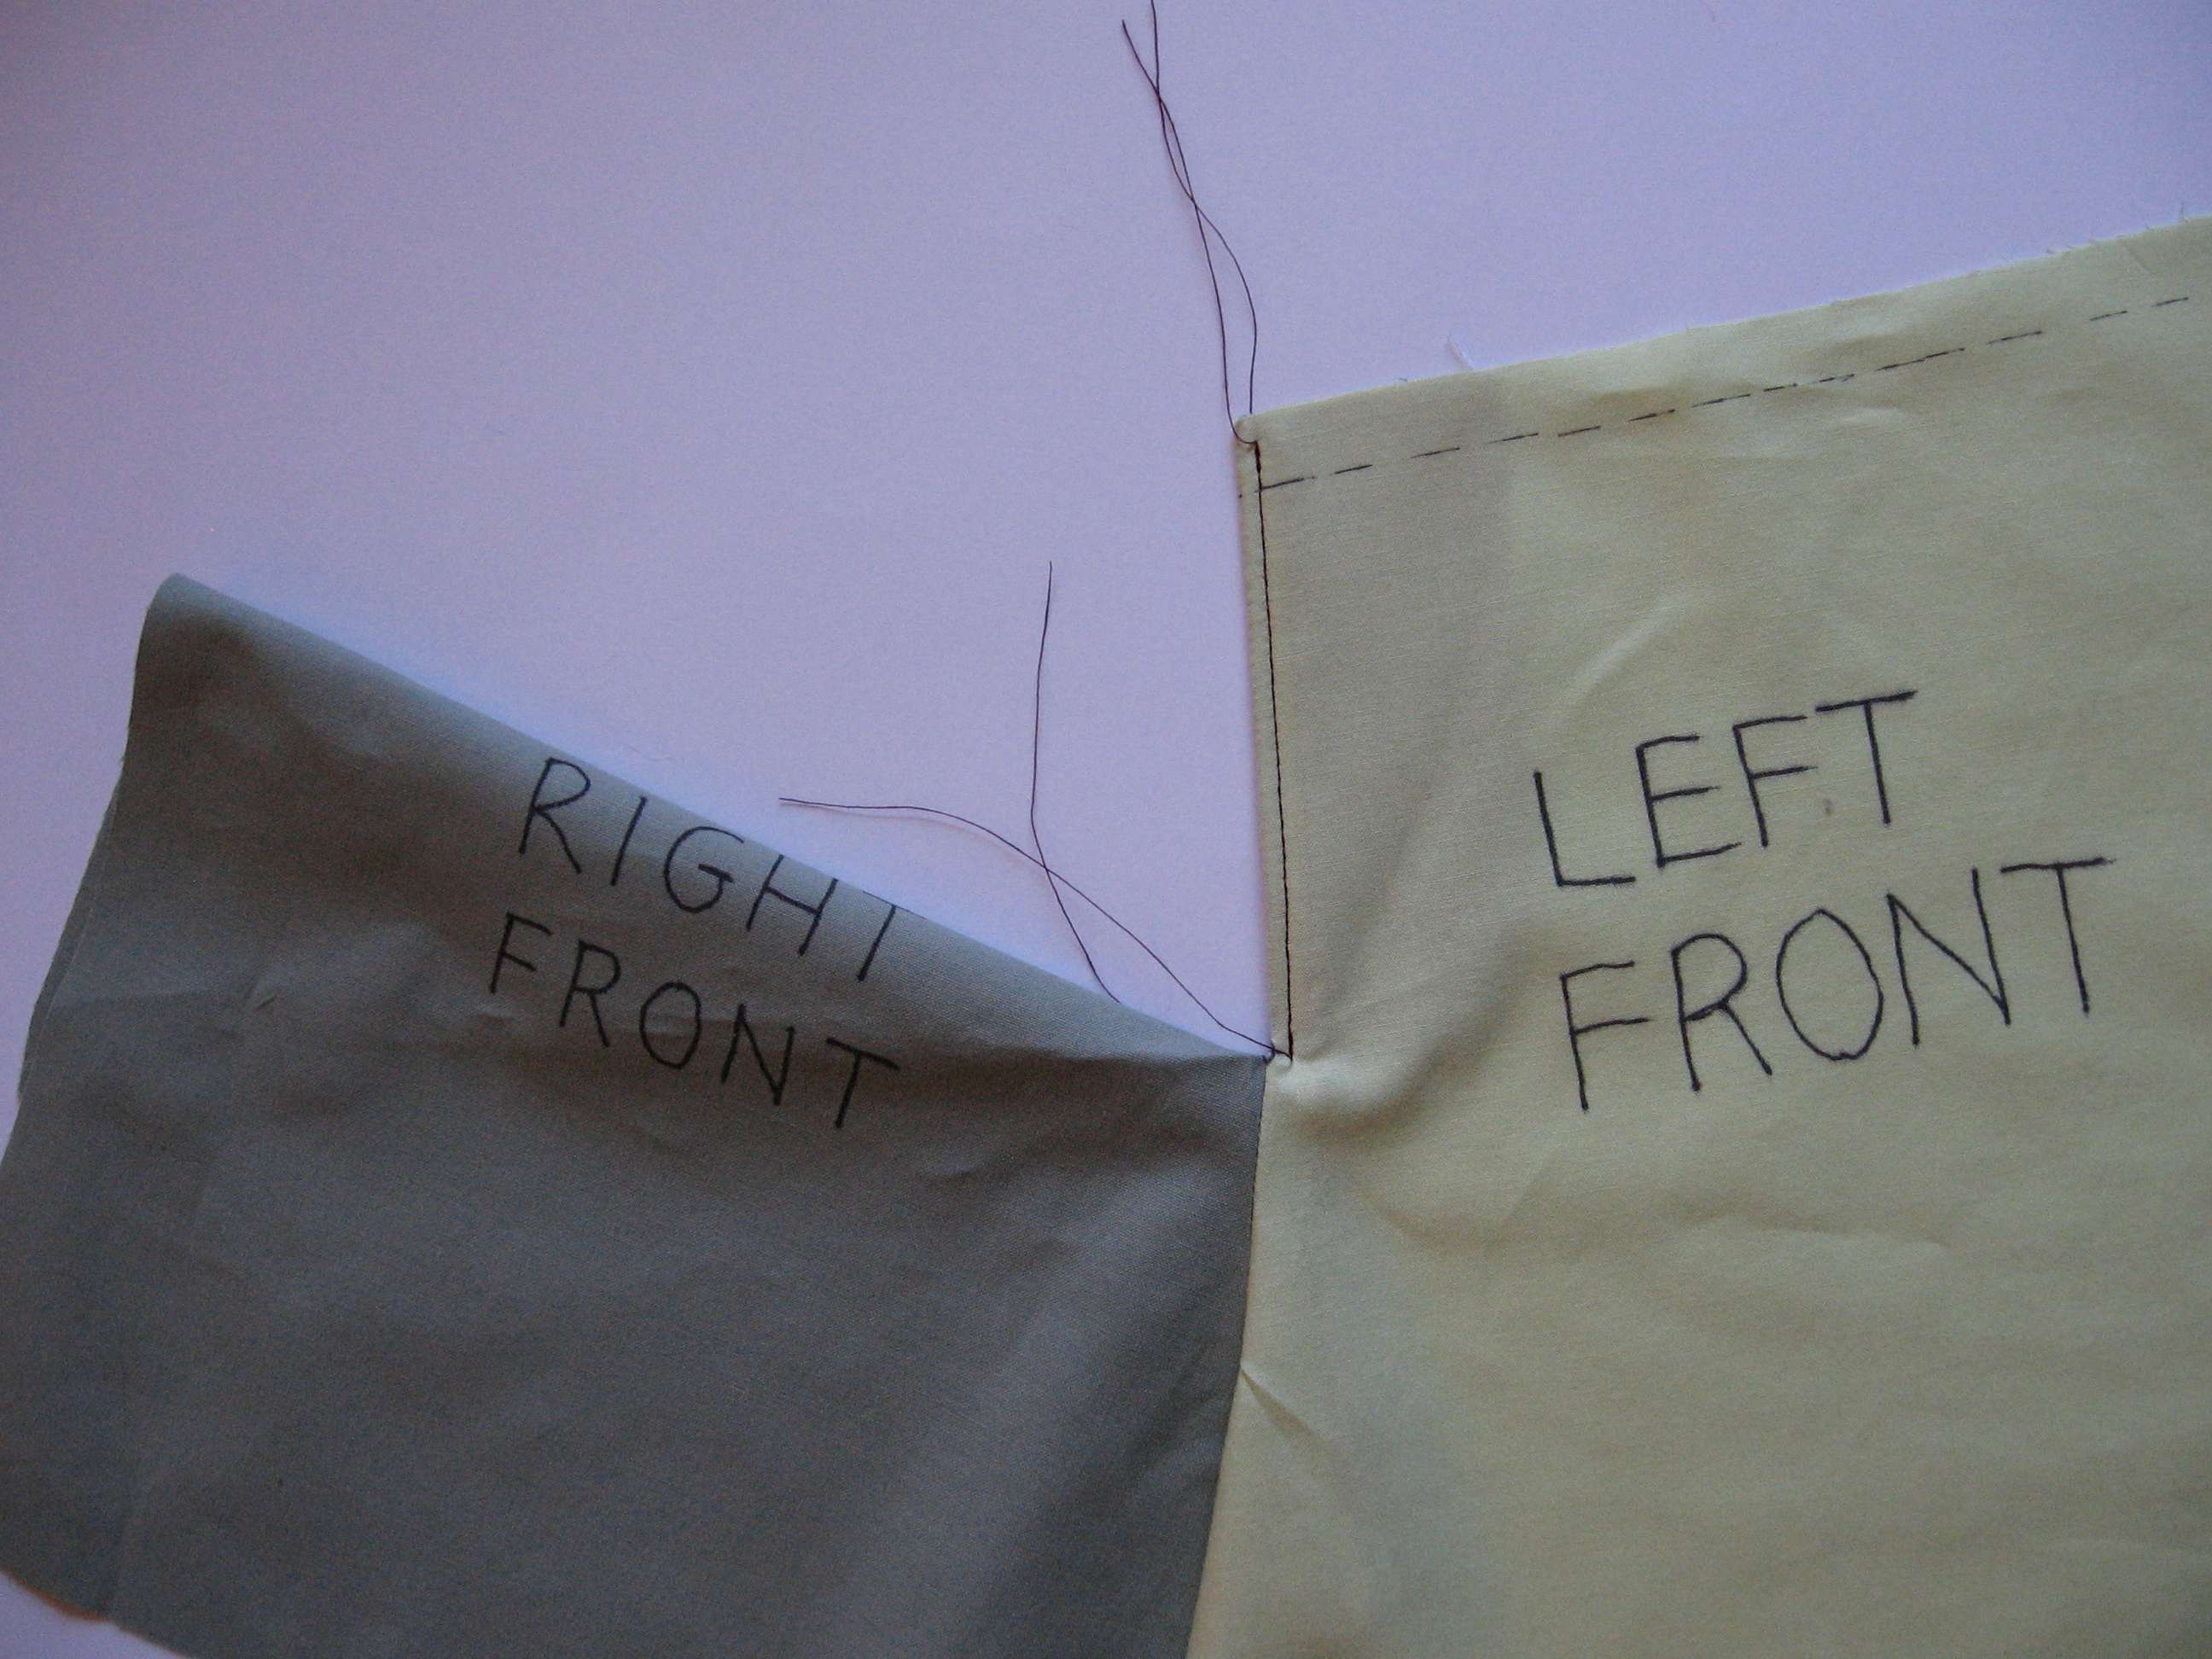
Stitch the front crotch seam from the circle to the crotch.
Press the seam open.
Press under 3/8” (1 cm) on the right front at center front. Clip 1/8” (3 mm) into the seam allowance an the lower edge of the fold to allow it to lie flat.

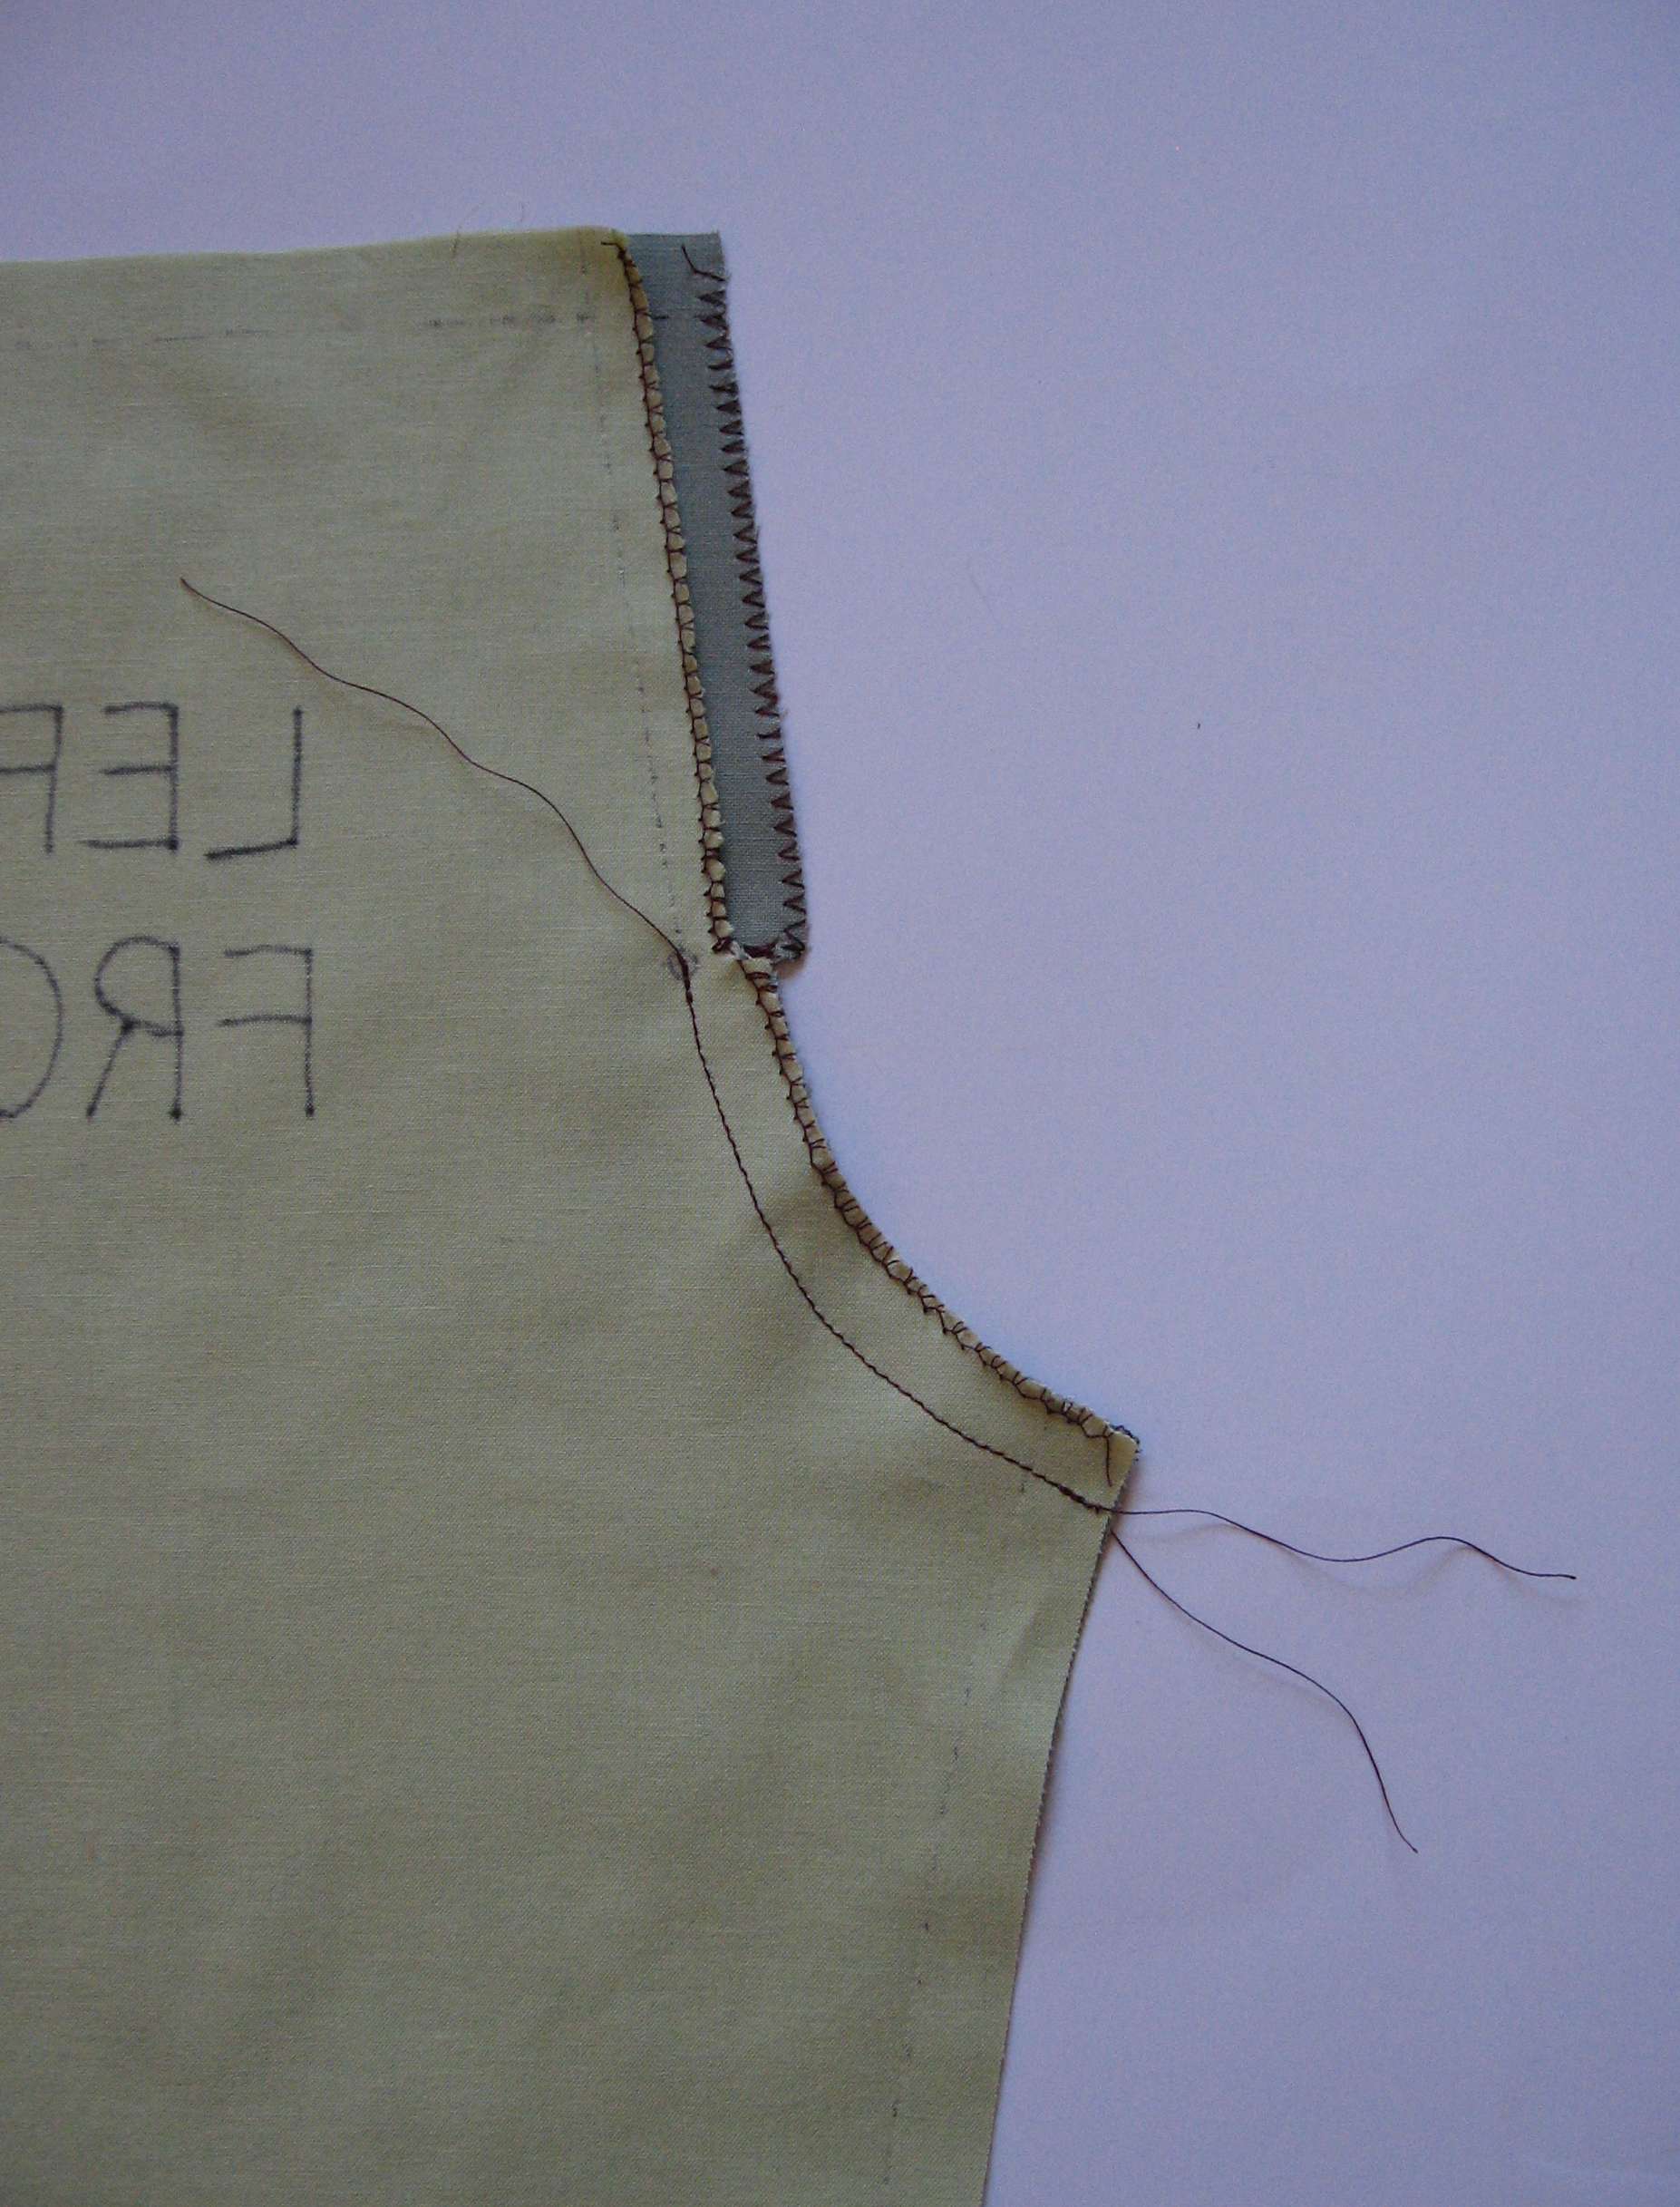
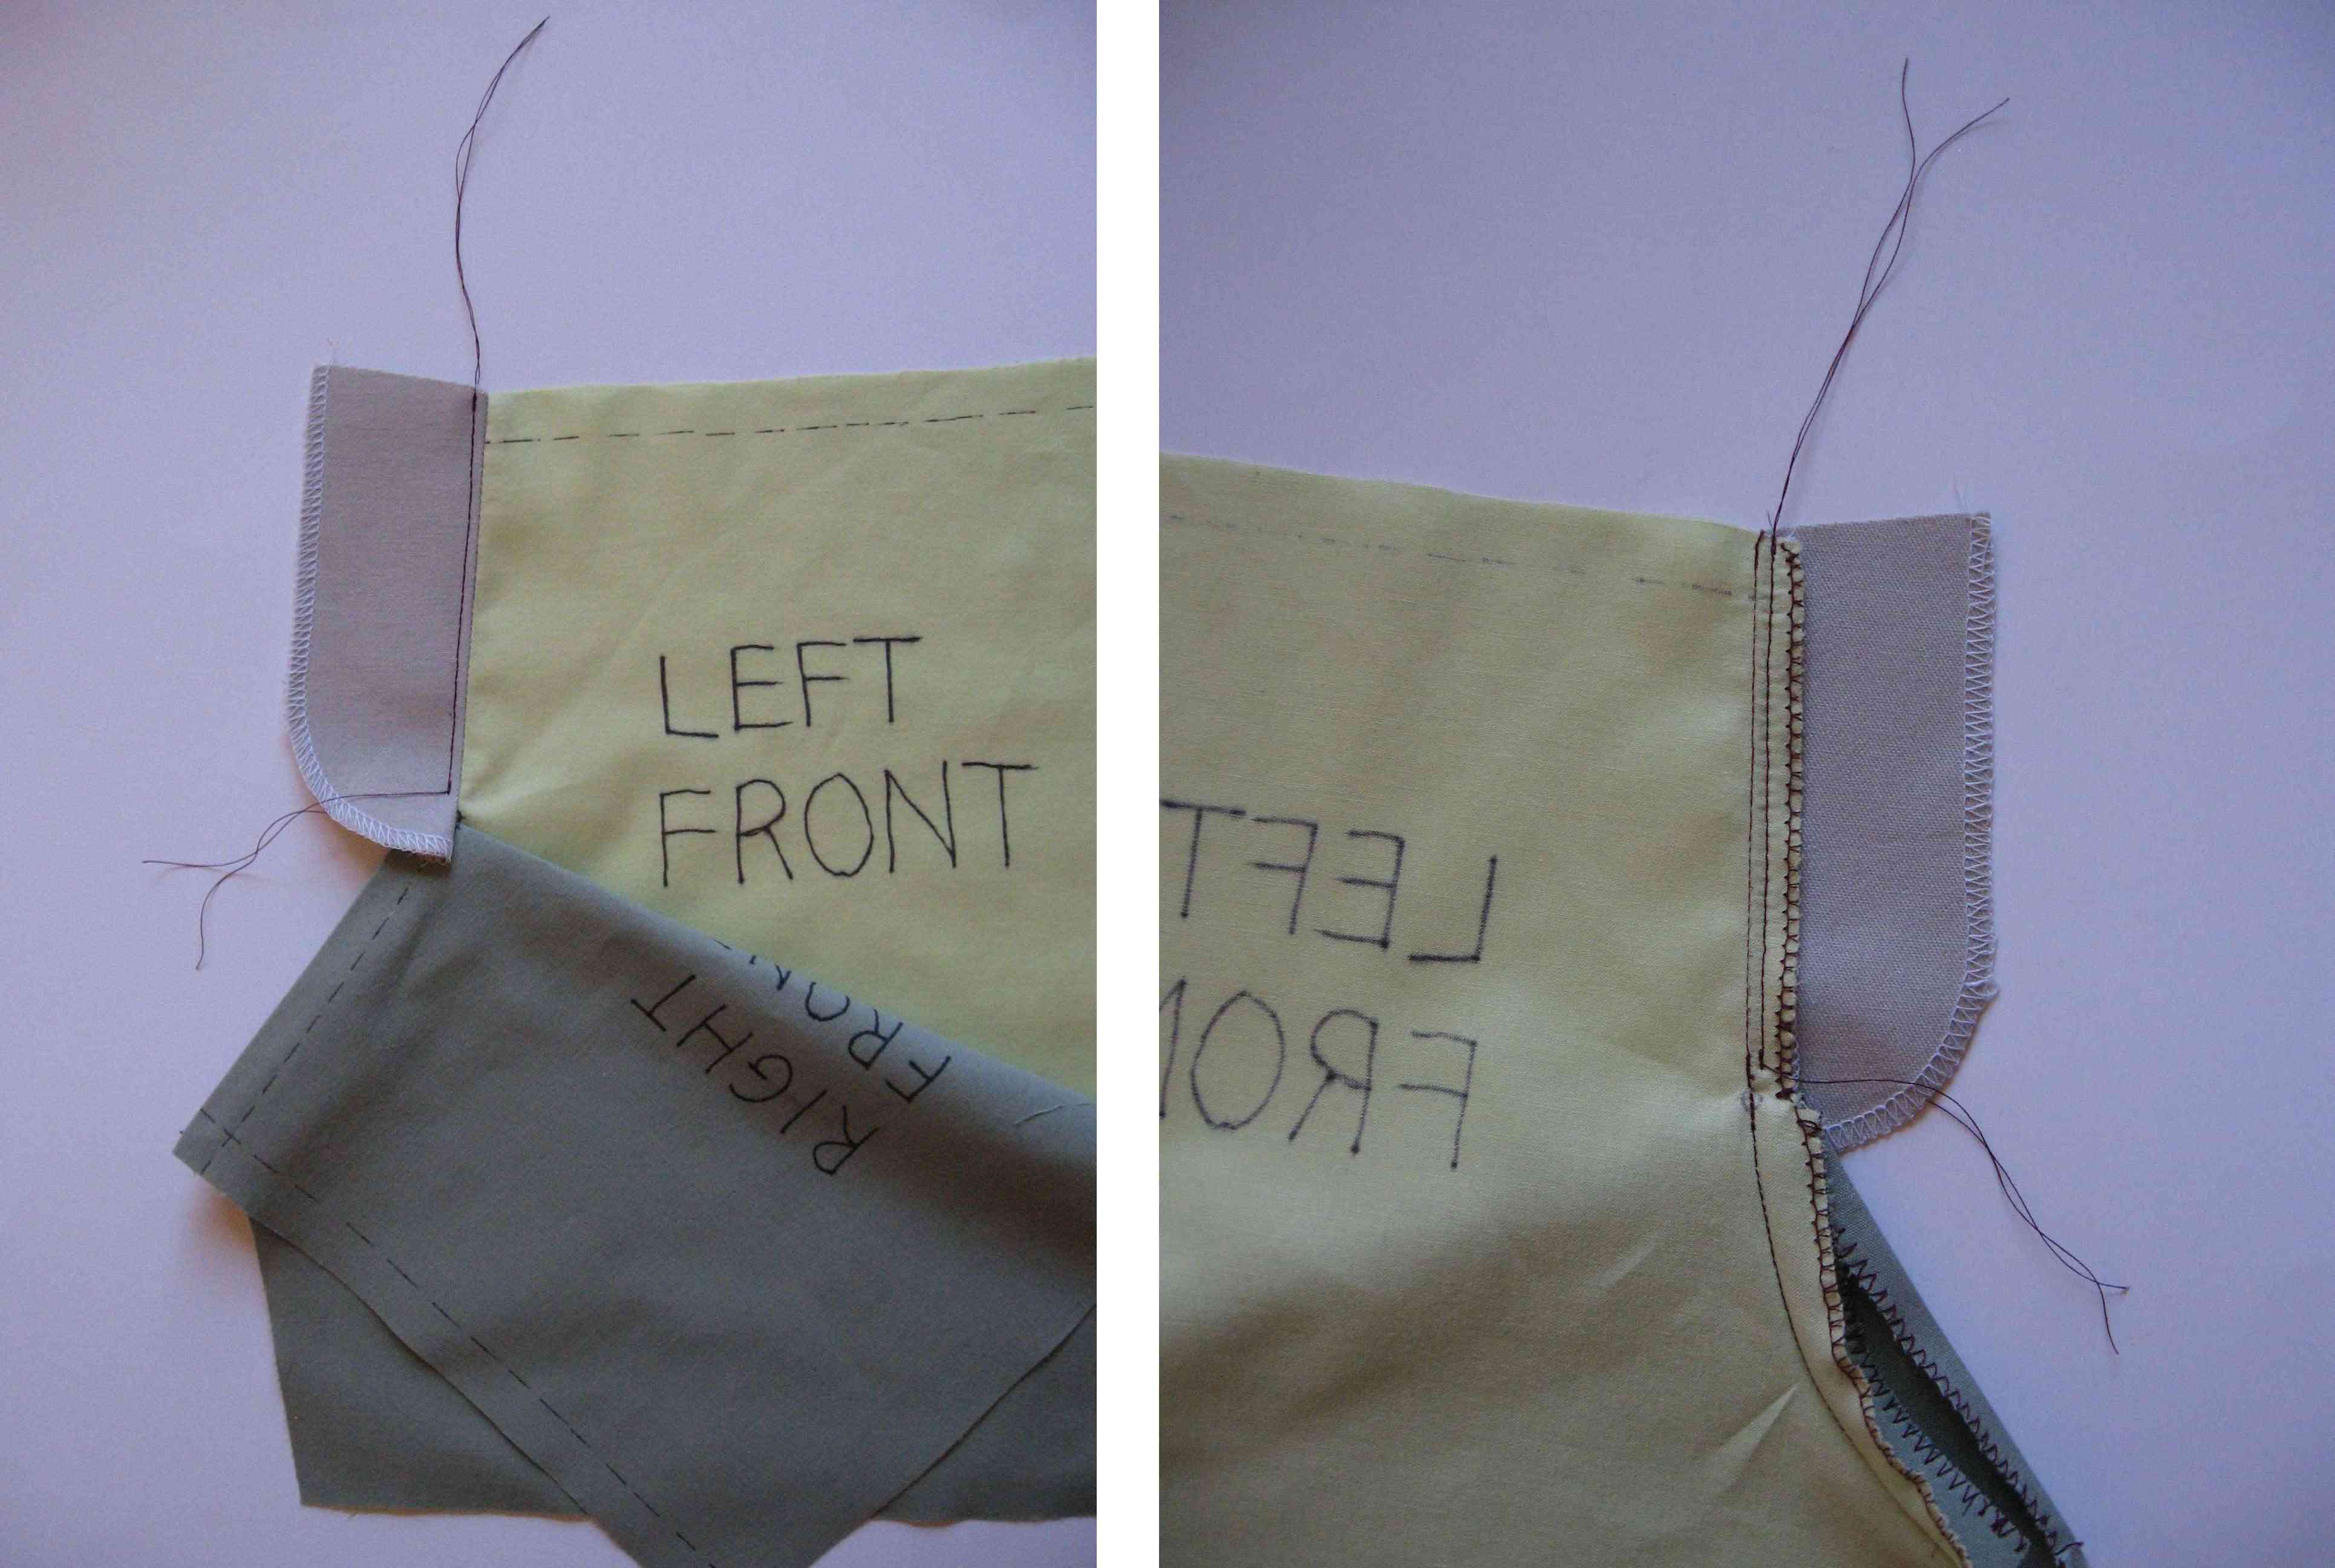
Fold down the right front out of the way. Stitch the fly facing to the left front, right sides together, from the upper edge almost to the circle, with a 3/8″ (1 cm) seam allowance. Be careful not to stitch into the right front. Open out the facing and press the seam allowances away from the left front.

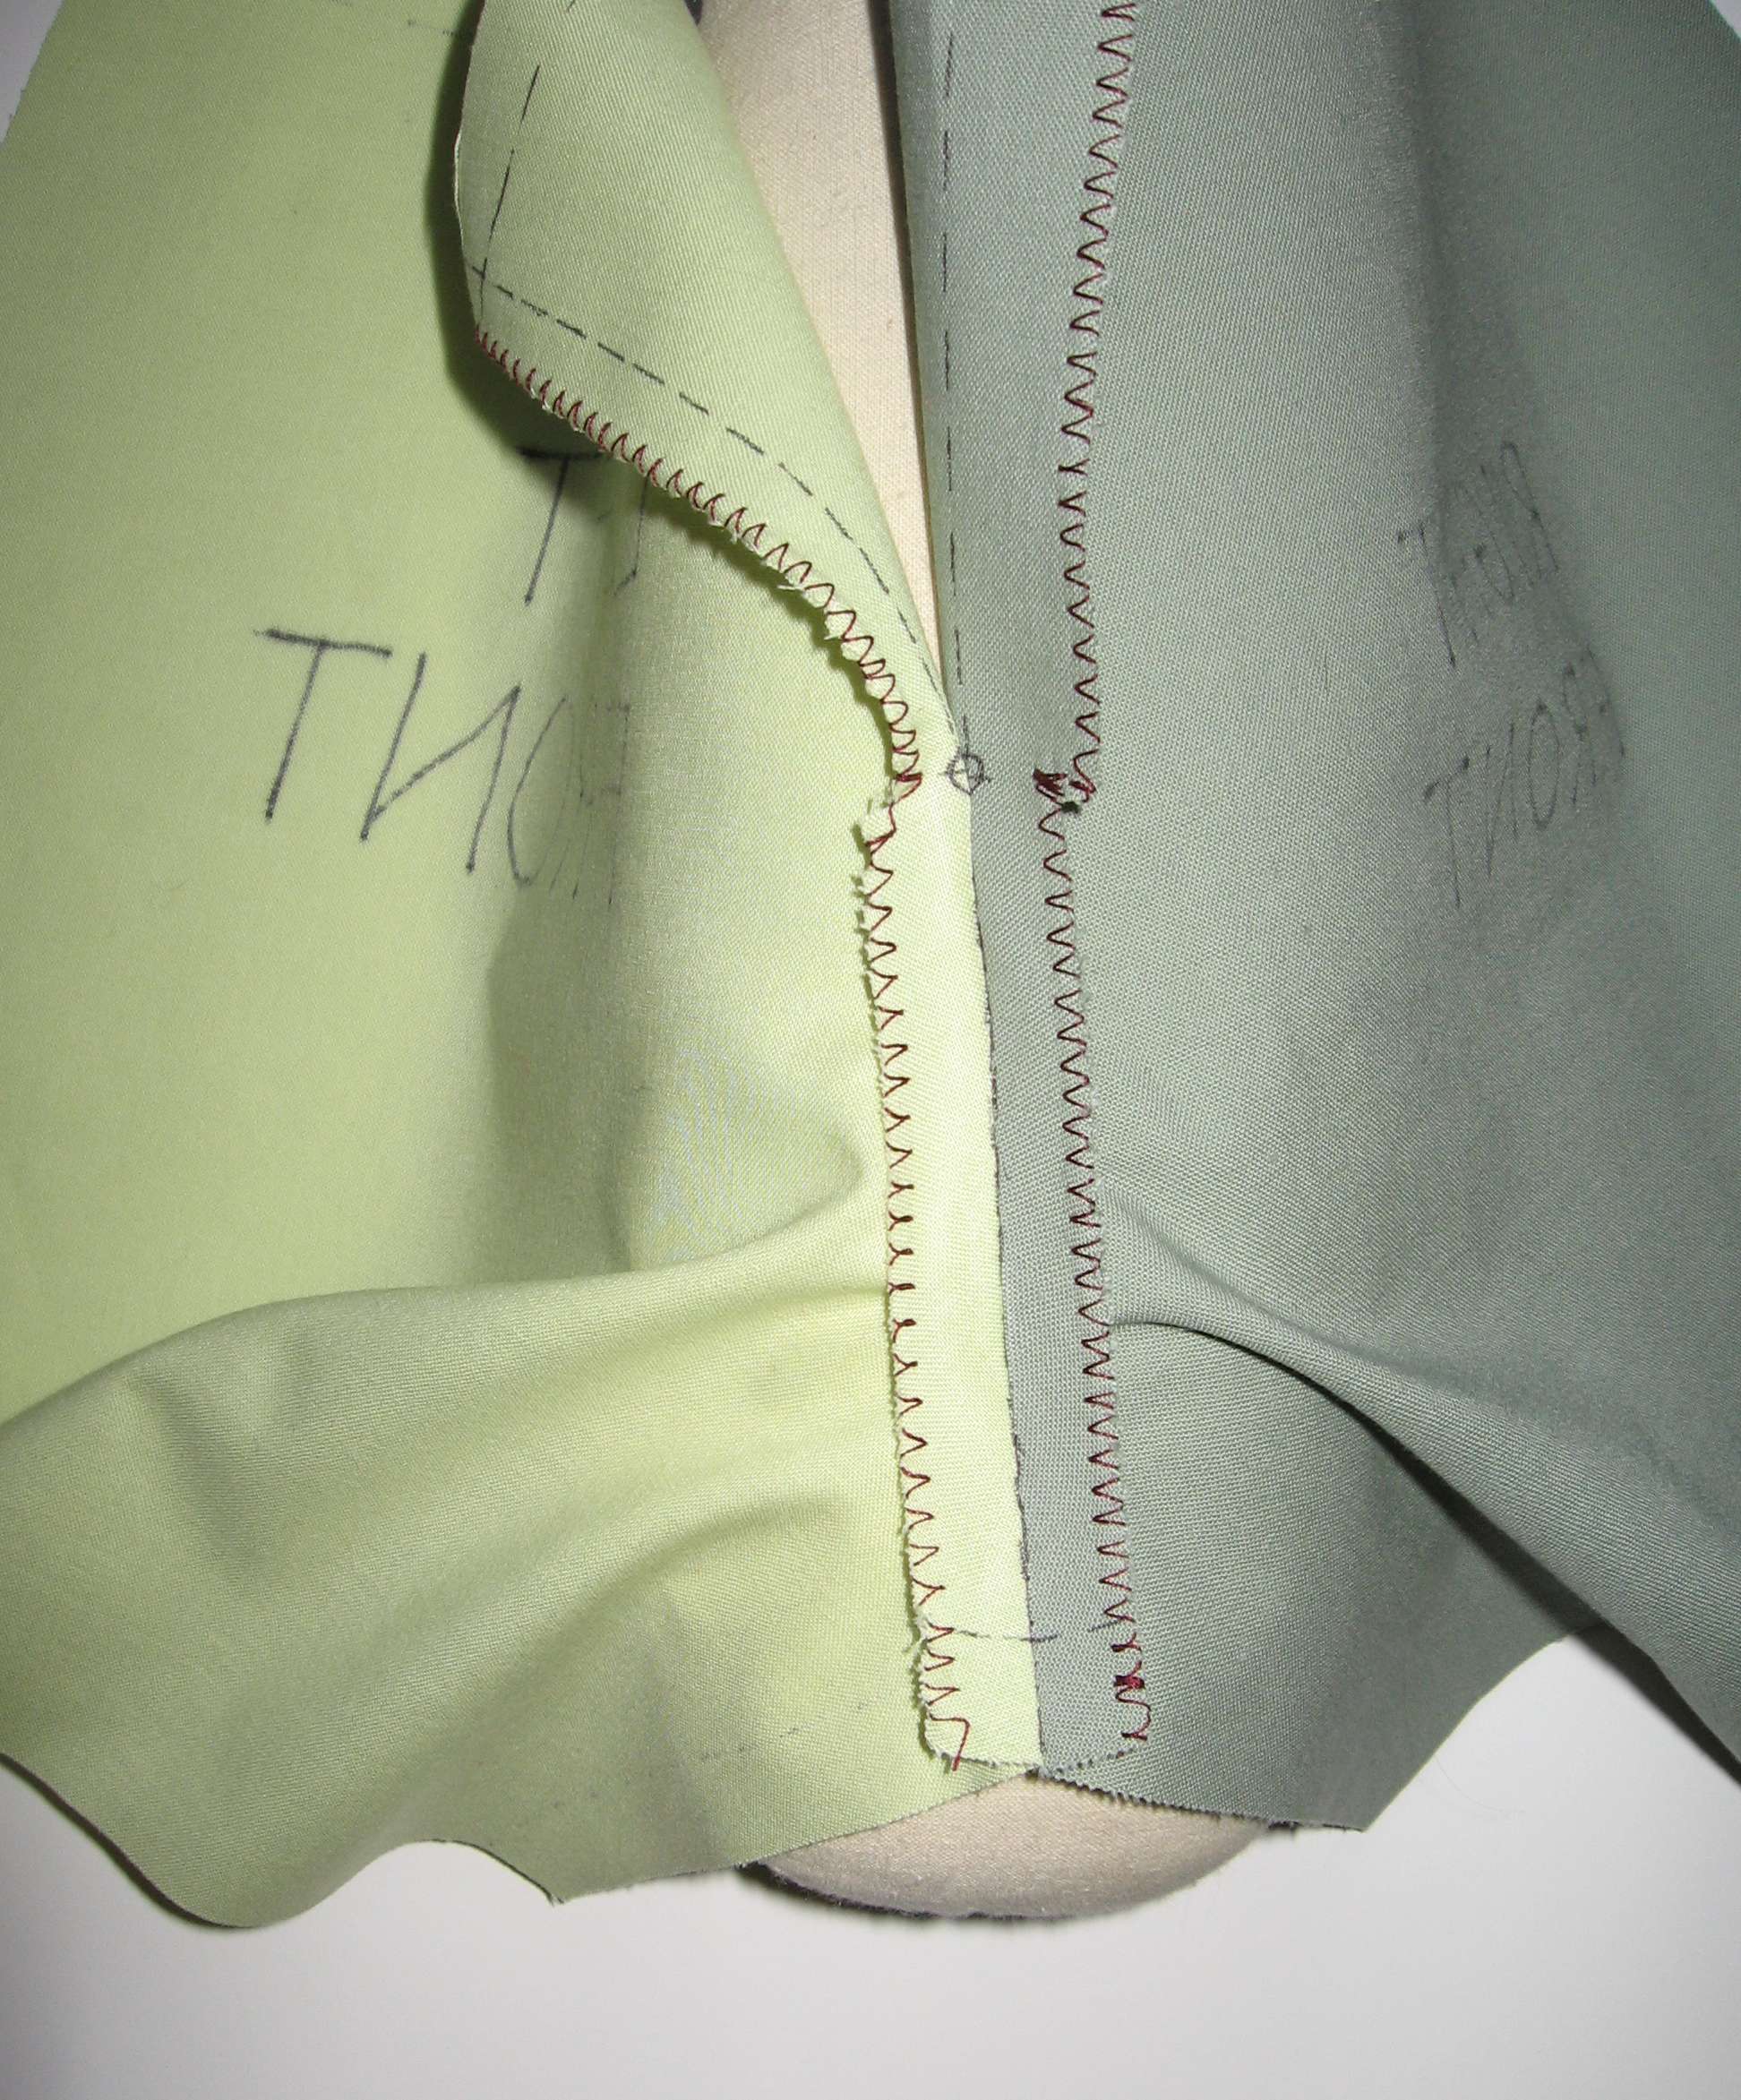
If you will not be edgestitching the left front edge later, understitch the fly facing. Actually, I like to understitch even if I’ll be edgestitching, since it only takes a few seconds and keeps the seam nicely in place. Here’s a view of both the front and back of the understitching.
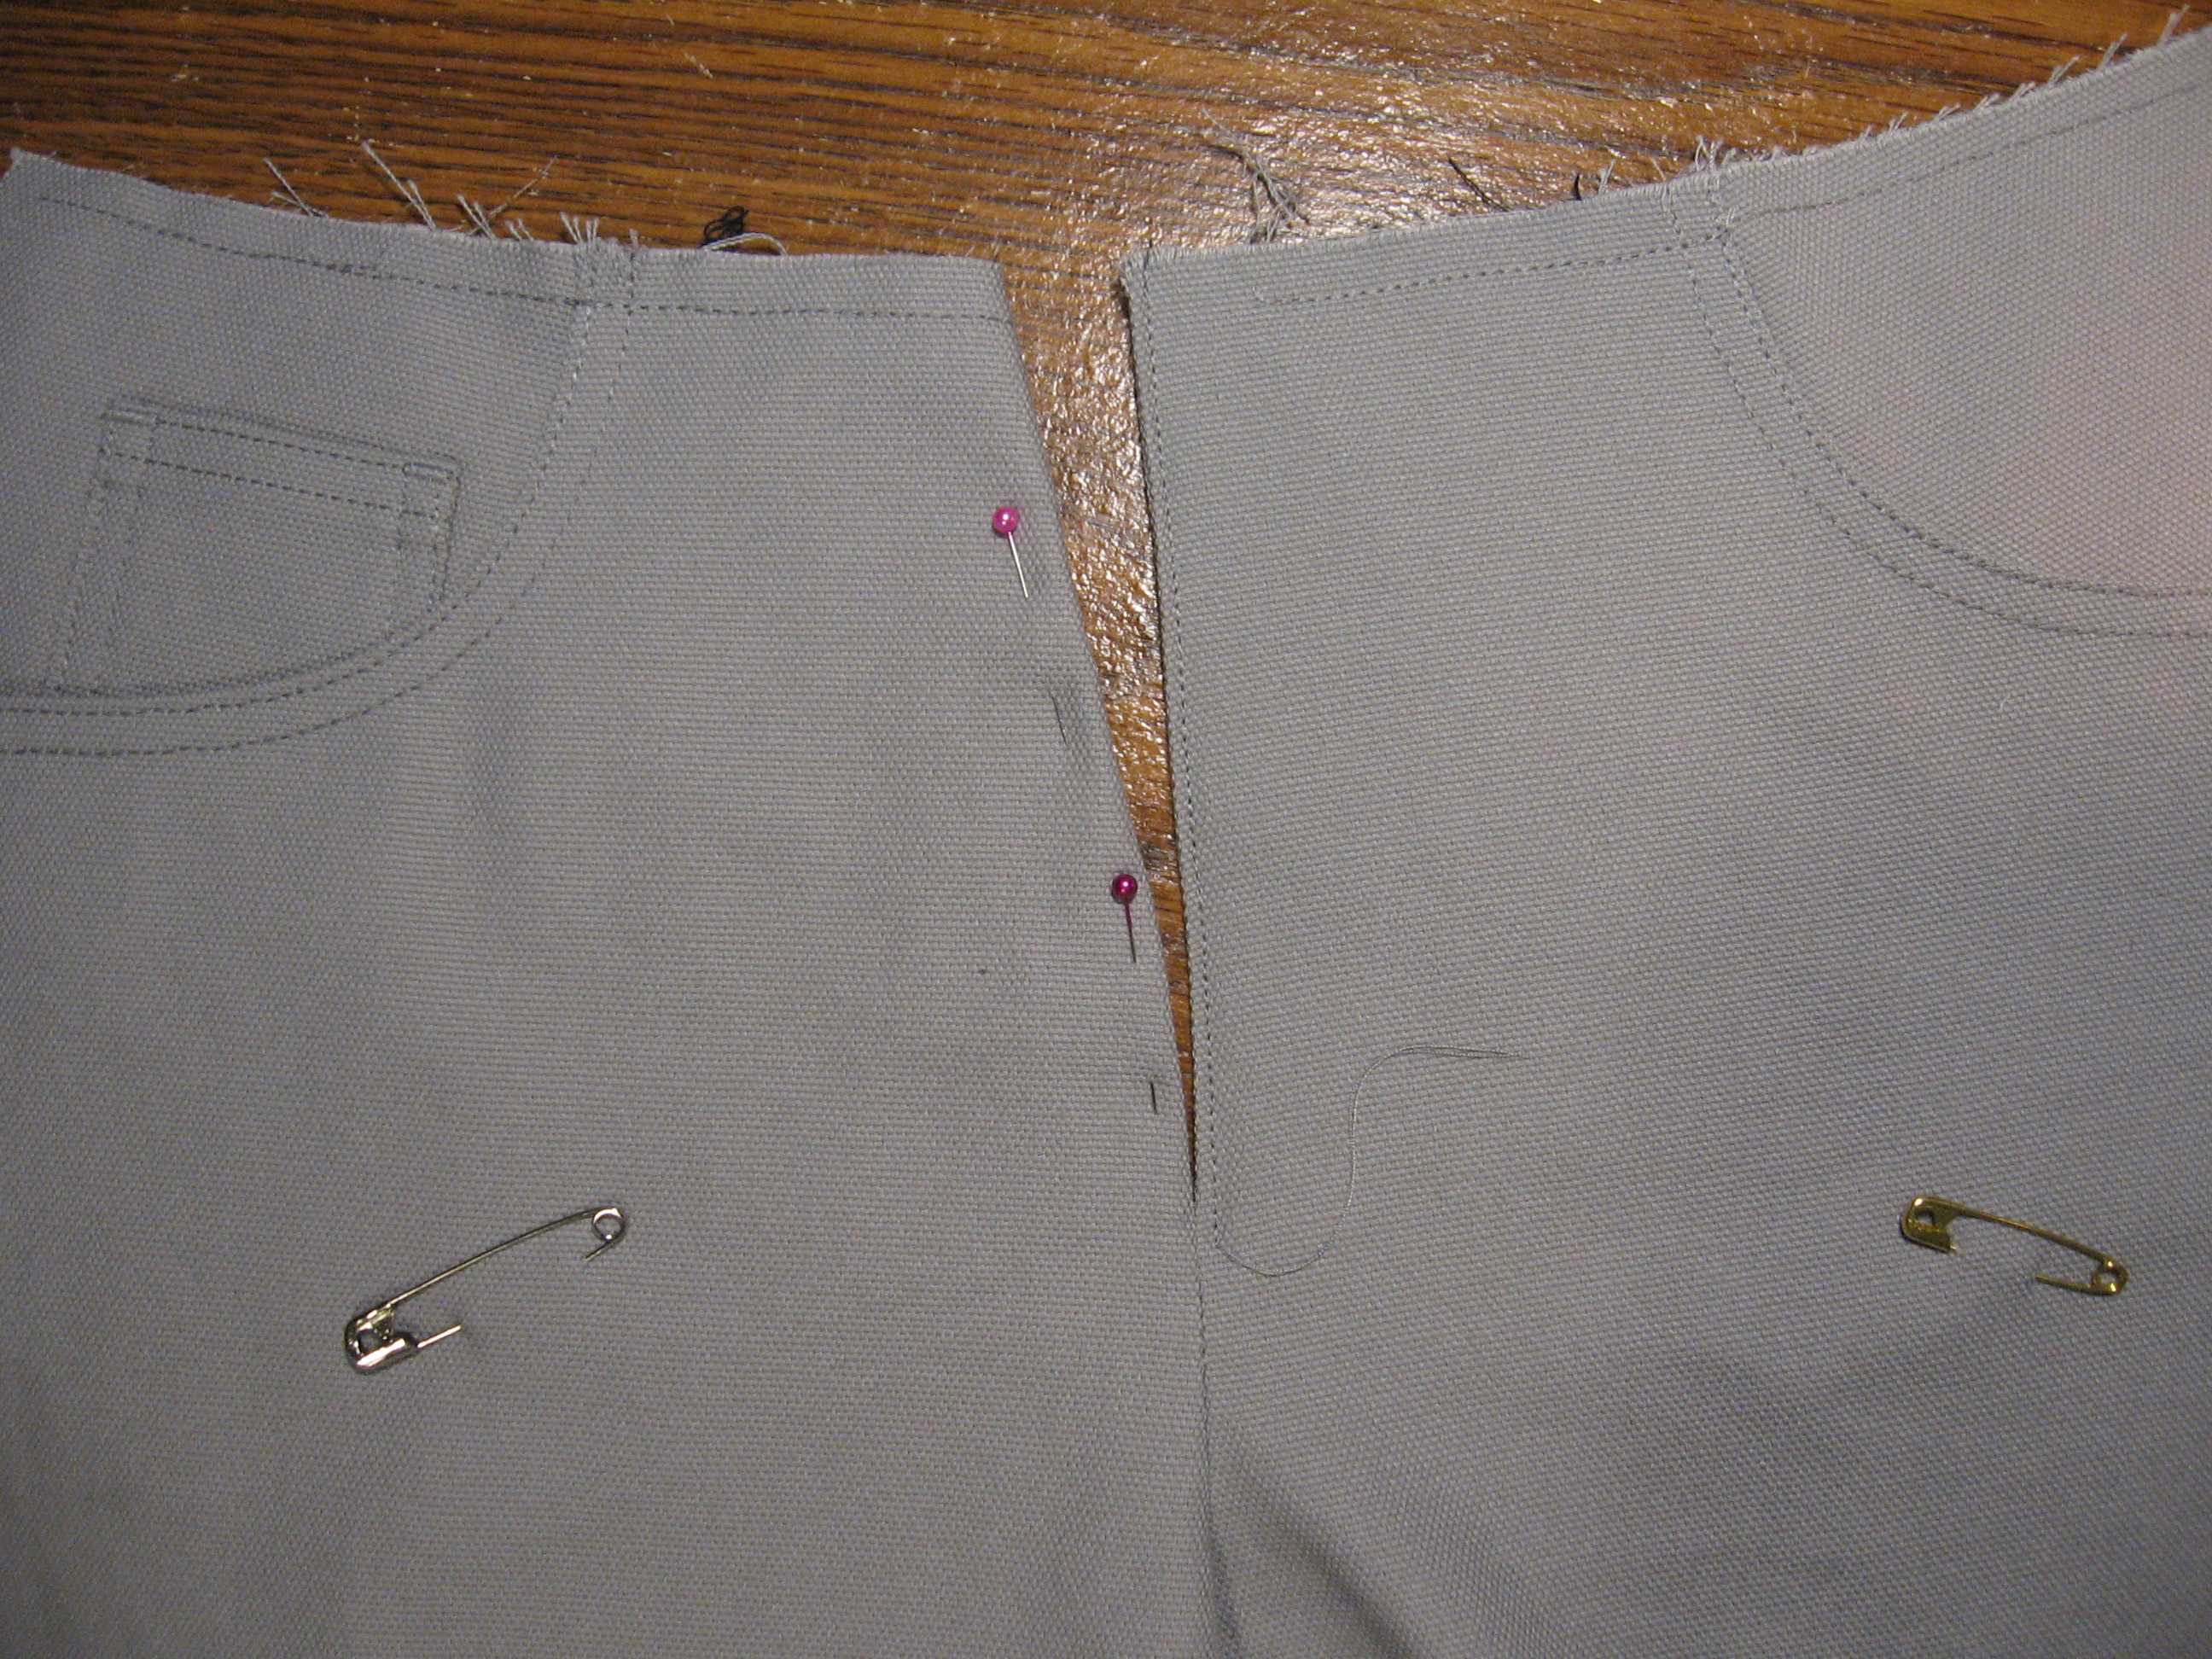
If you want to edgestitch the left center front, fold the fly facing to the inside and press along the center front line. Stitch 1/8” (3 mm) from the folded edge, from the waist edge to the dot. If you fold and pin the right front to the left along the center front line to get it out of the way instead of folding it down like I did, you can avoid the dimple you see below at the bottom of the edgestitching.
Here is a picture of another pair of jeans showing what I mean about pinning the right front out of the way:
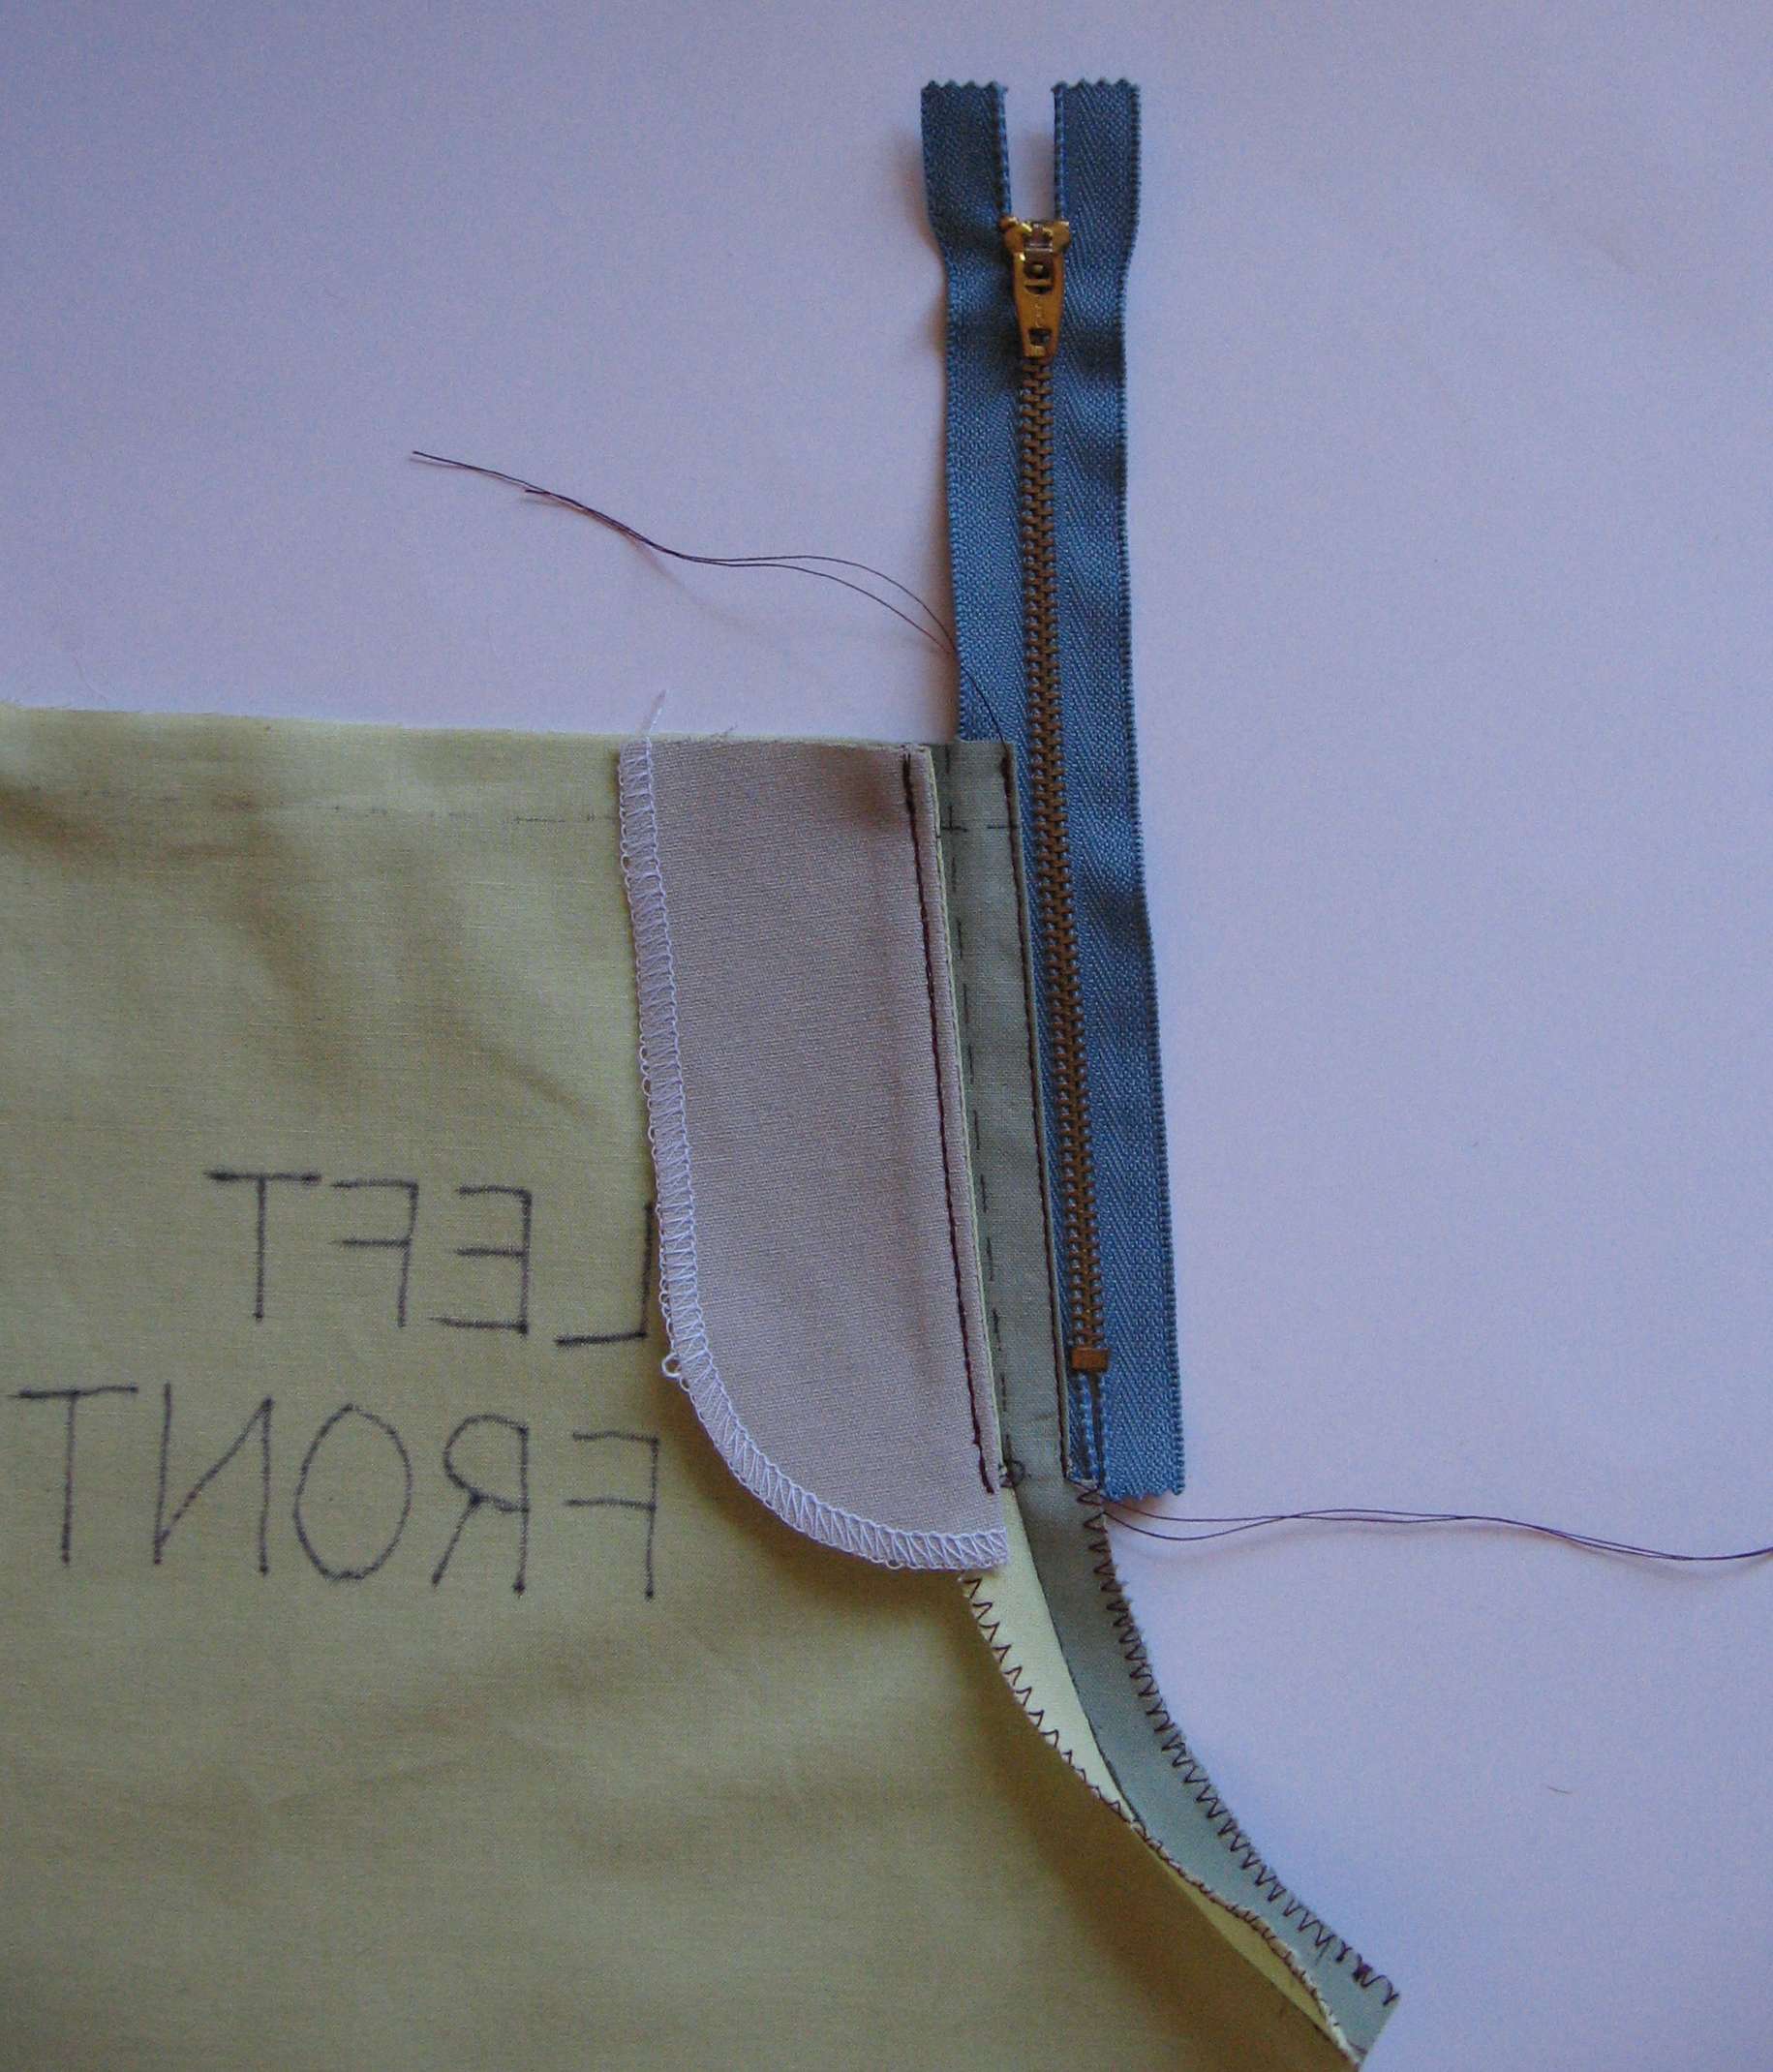
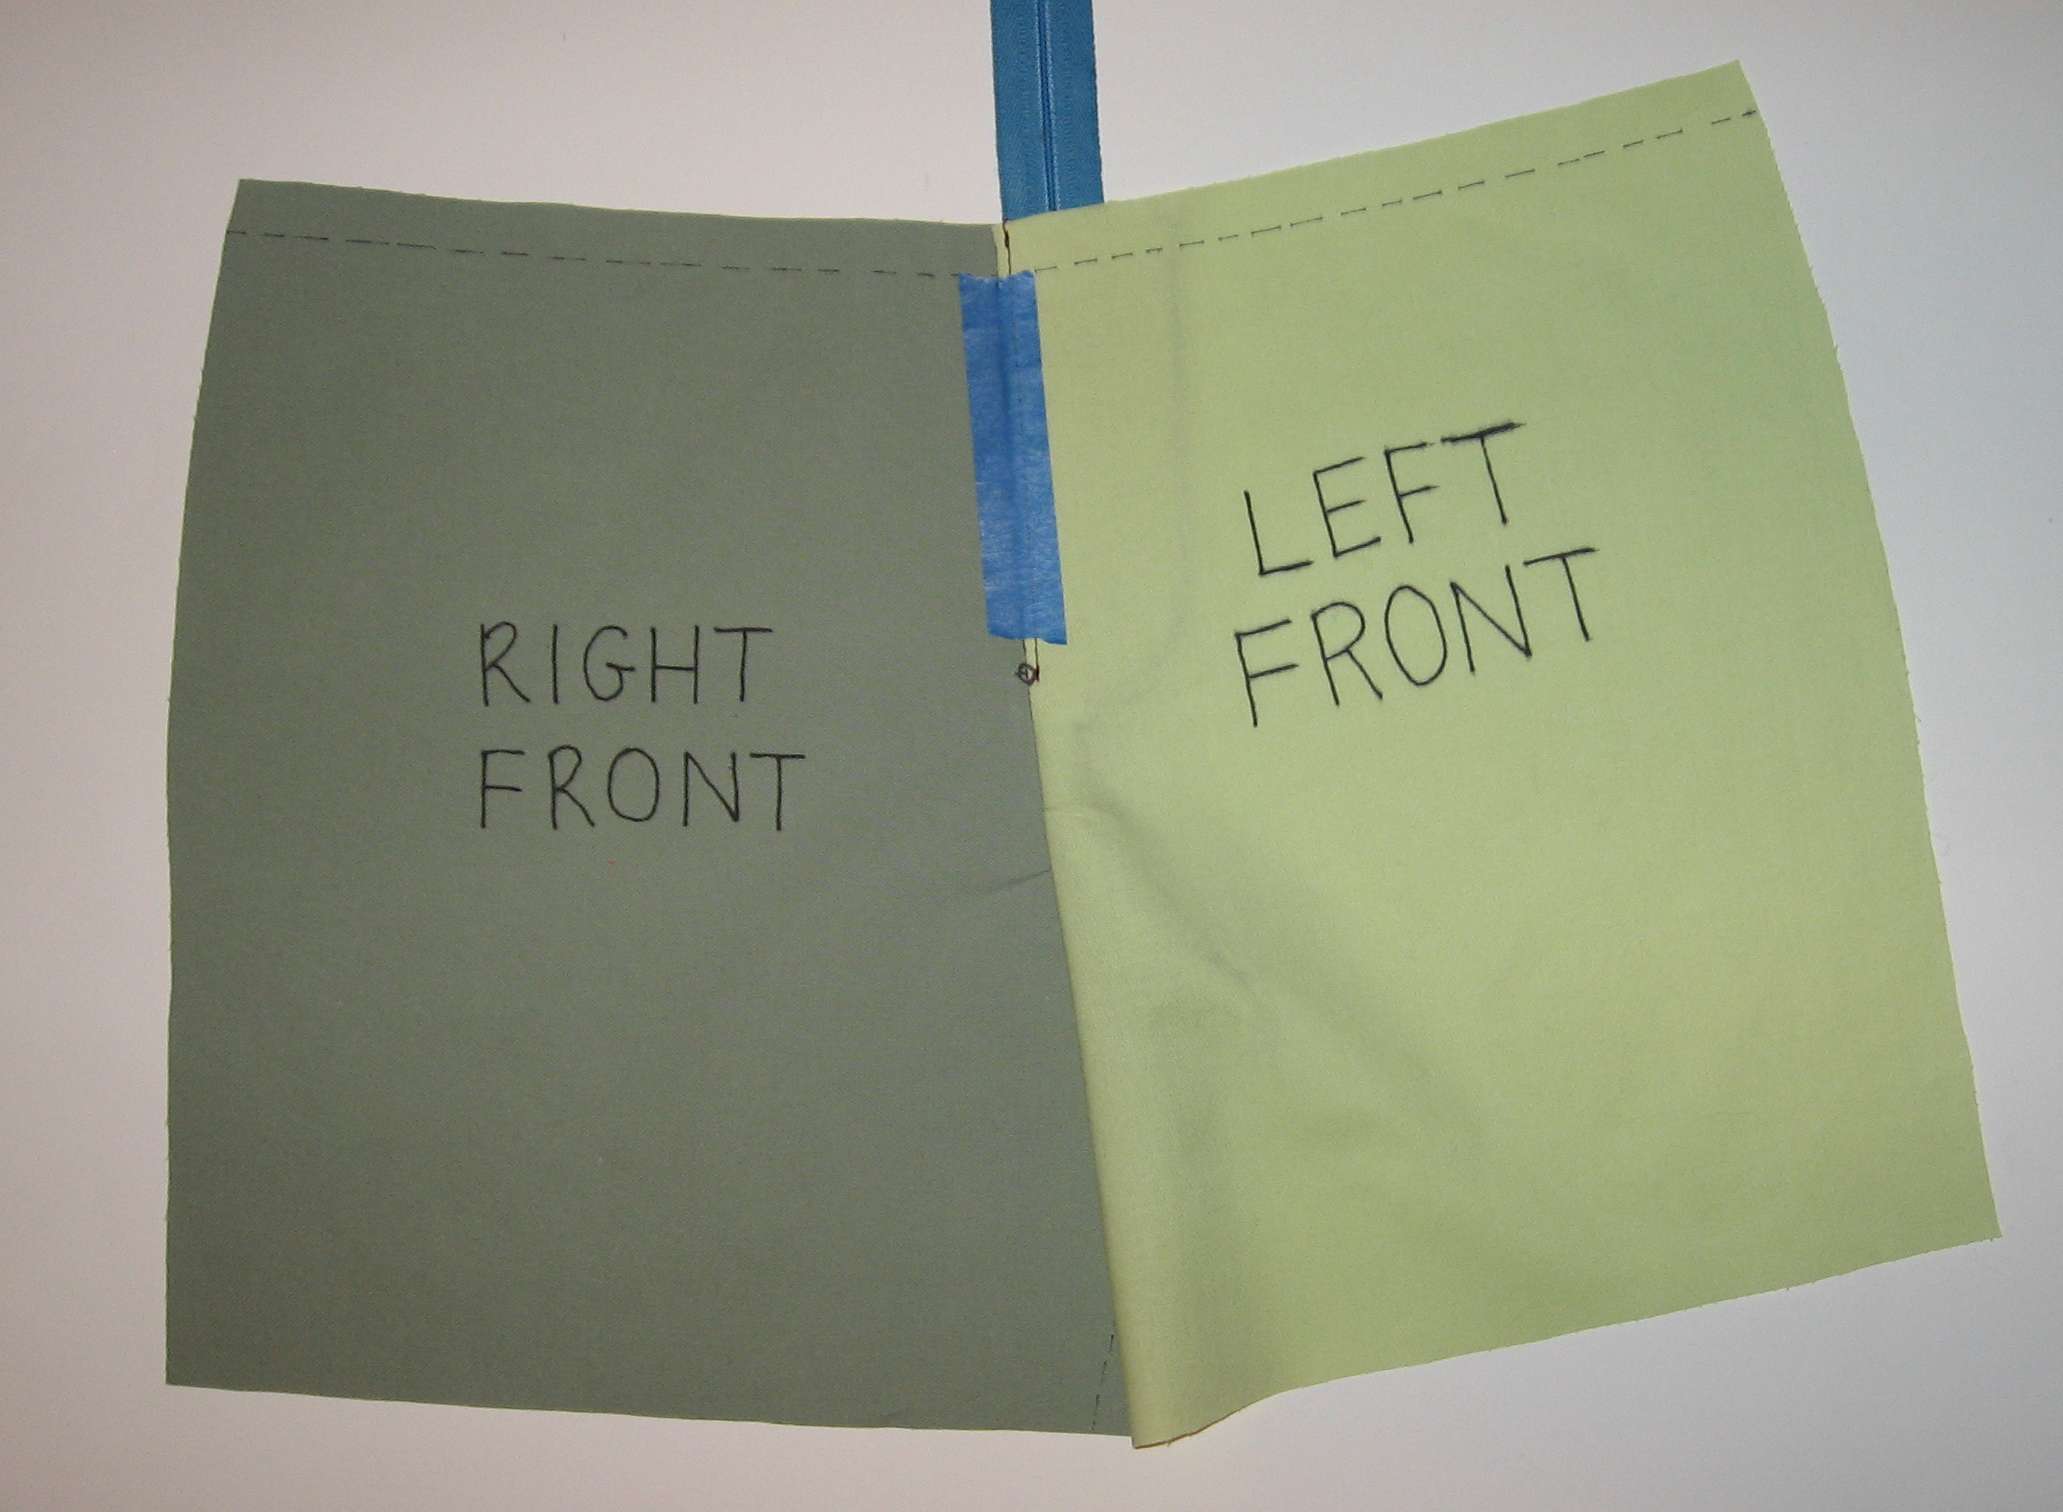
Place the zipper behind the right front where you pressed down the edge. Position the bottom of the zipper stop 1/2” (1.3 cm) above the circle. The zipper teeth should be about 1/8” (3 mm) away from the folded edge of the fabric. Pin or tape the zipper in place. Wonder Tape makes this easy.

Stitch close to the edge of the fold using a zipper foot.
With the zipper closed, lap the jeans left front over the right front, matching center front lines. On the right side, place a piece of tape along the center front to hold the left and right pieces together. Leave this tape in place until you sew on the zipper shield.
On the wrong side, tape or pin the zipper tape to the fly facing only. This is another place you may want to use Wonder Tape.

Fold both the left front and right front away from the fly facing. Using a zipper foot, stitch the zipper to the fly facing with two rows of stitching – one near the zipper teeth and one near the edge of the zipper tape. Here are views of what that looks like from the front and back.

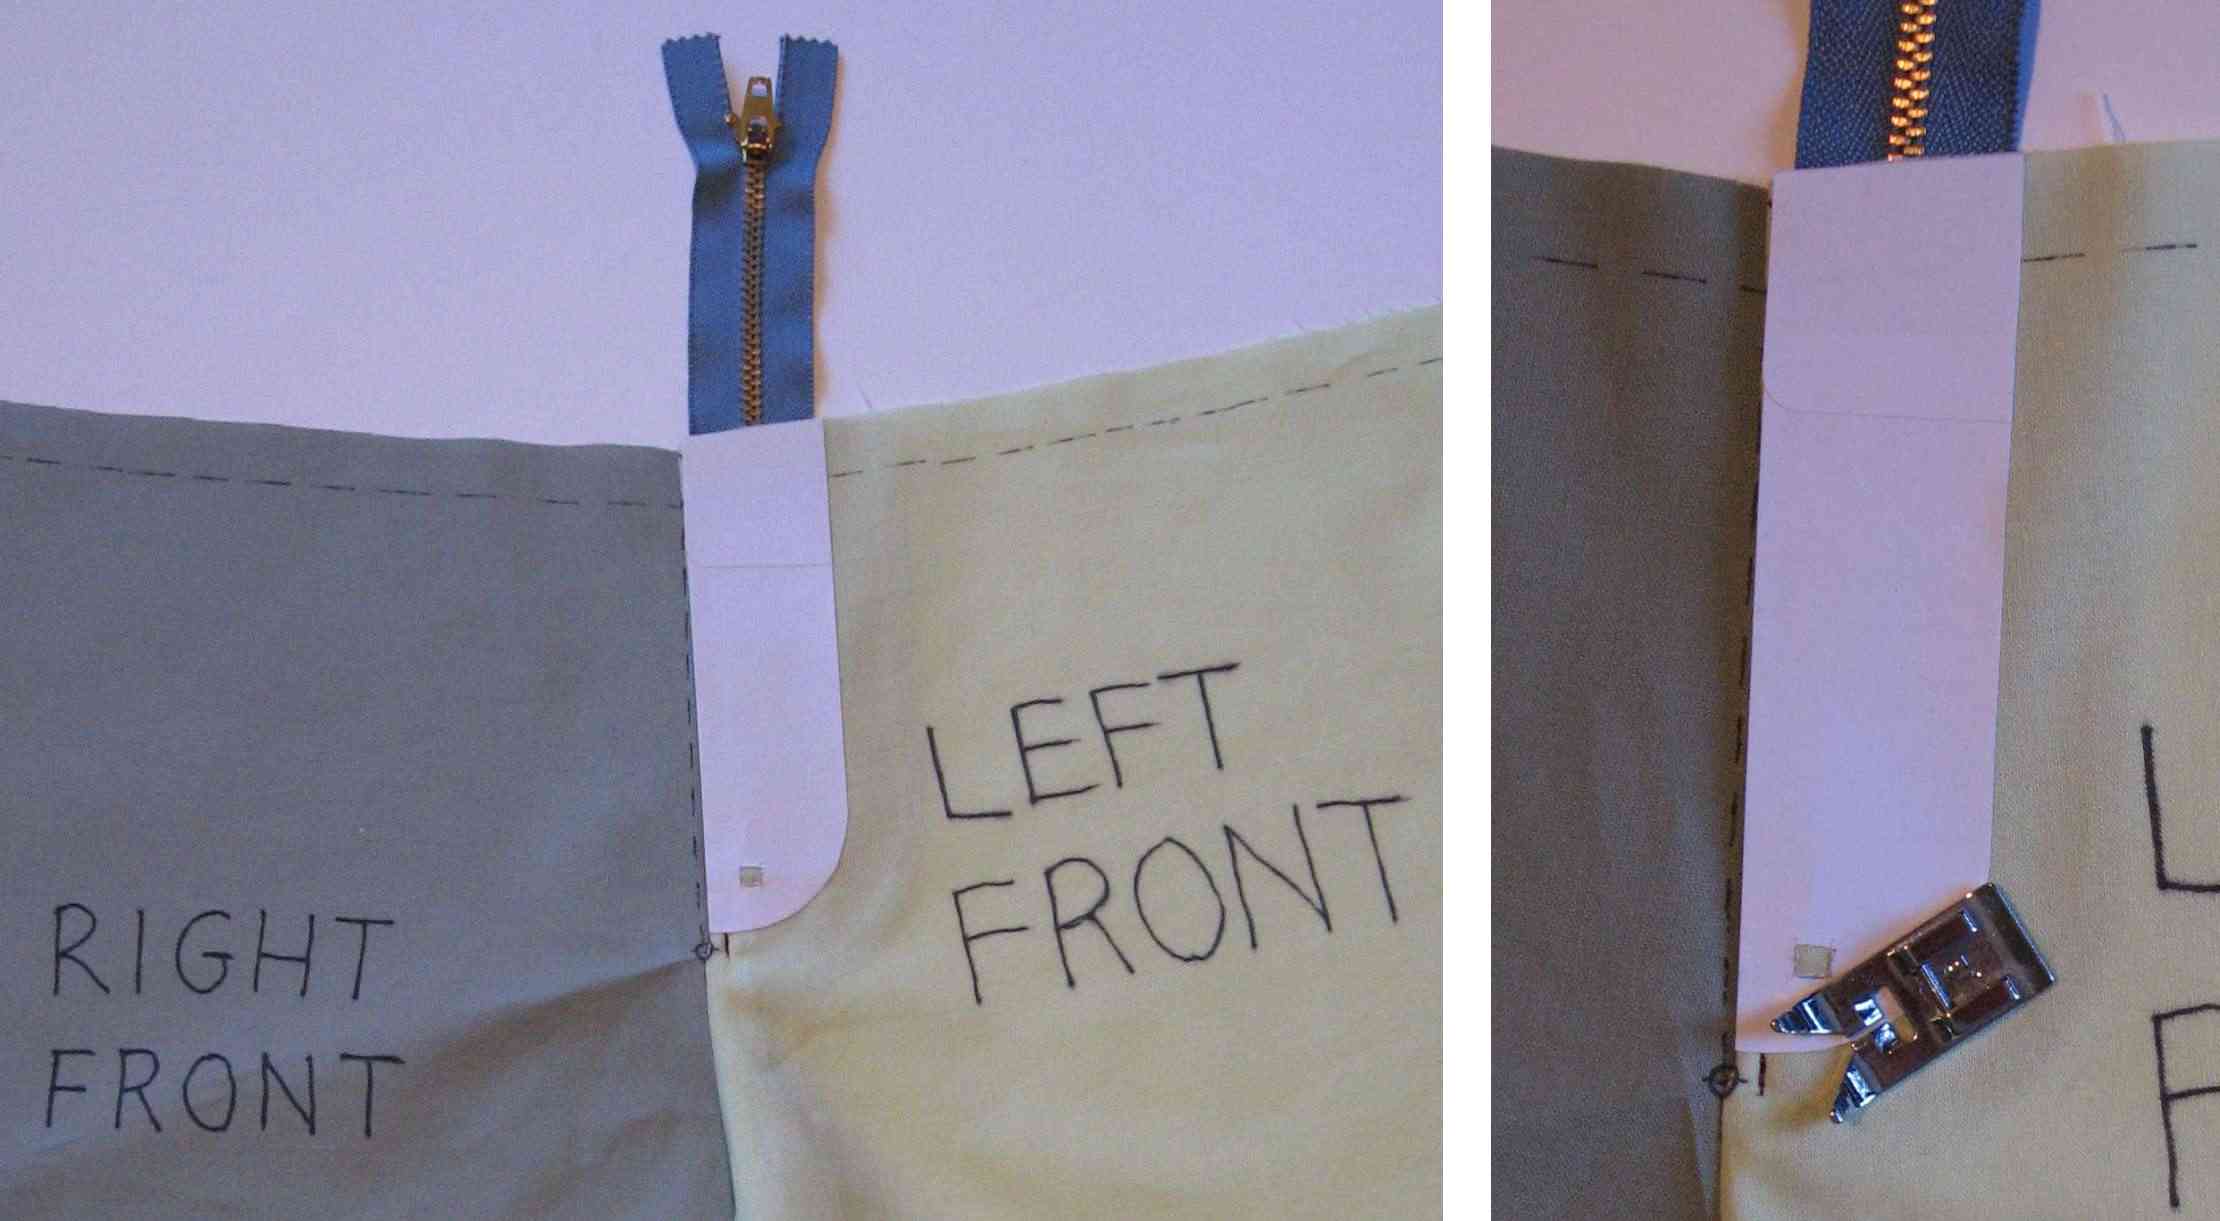
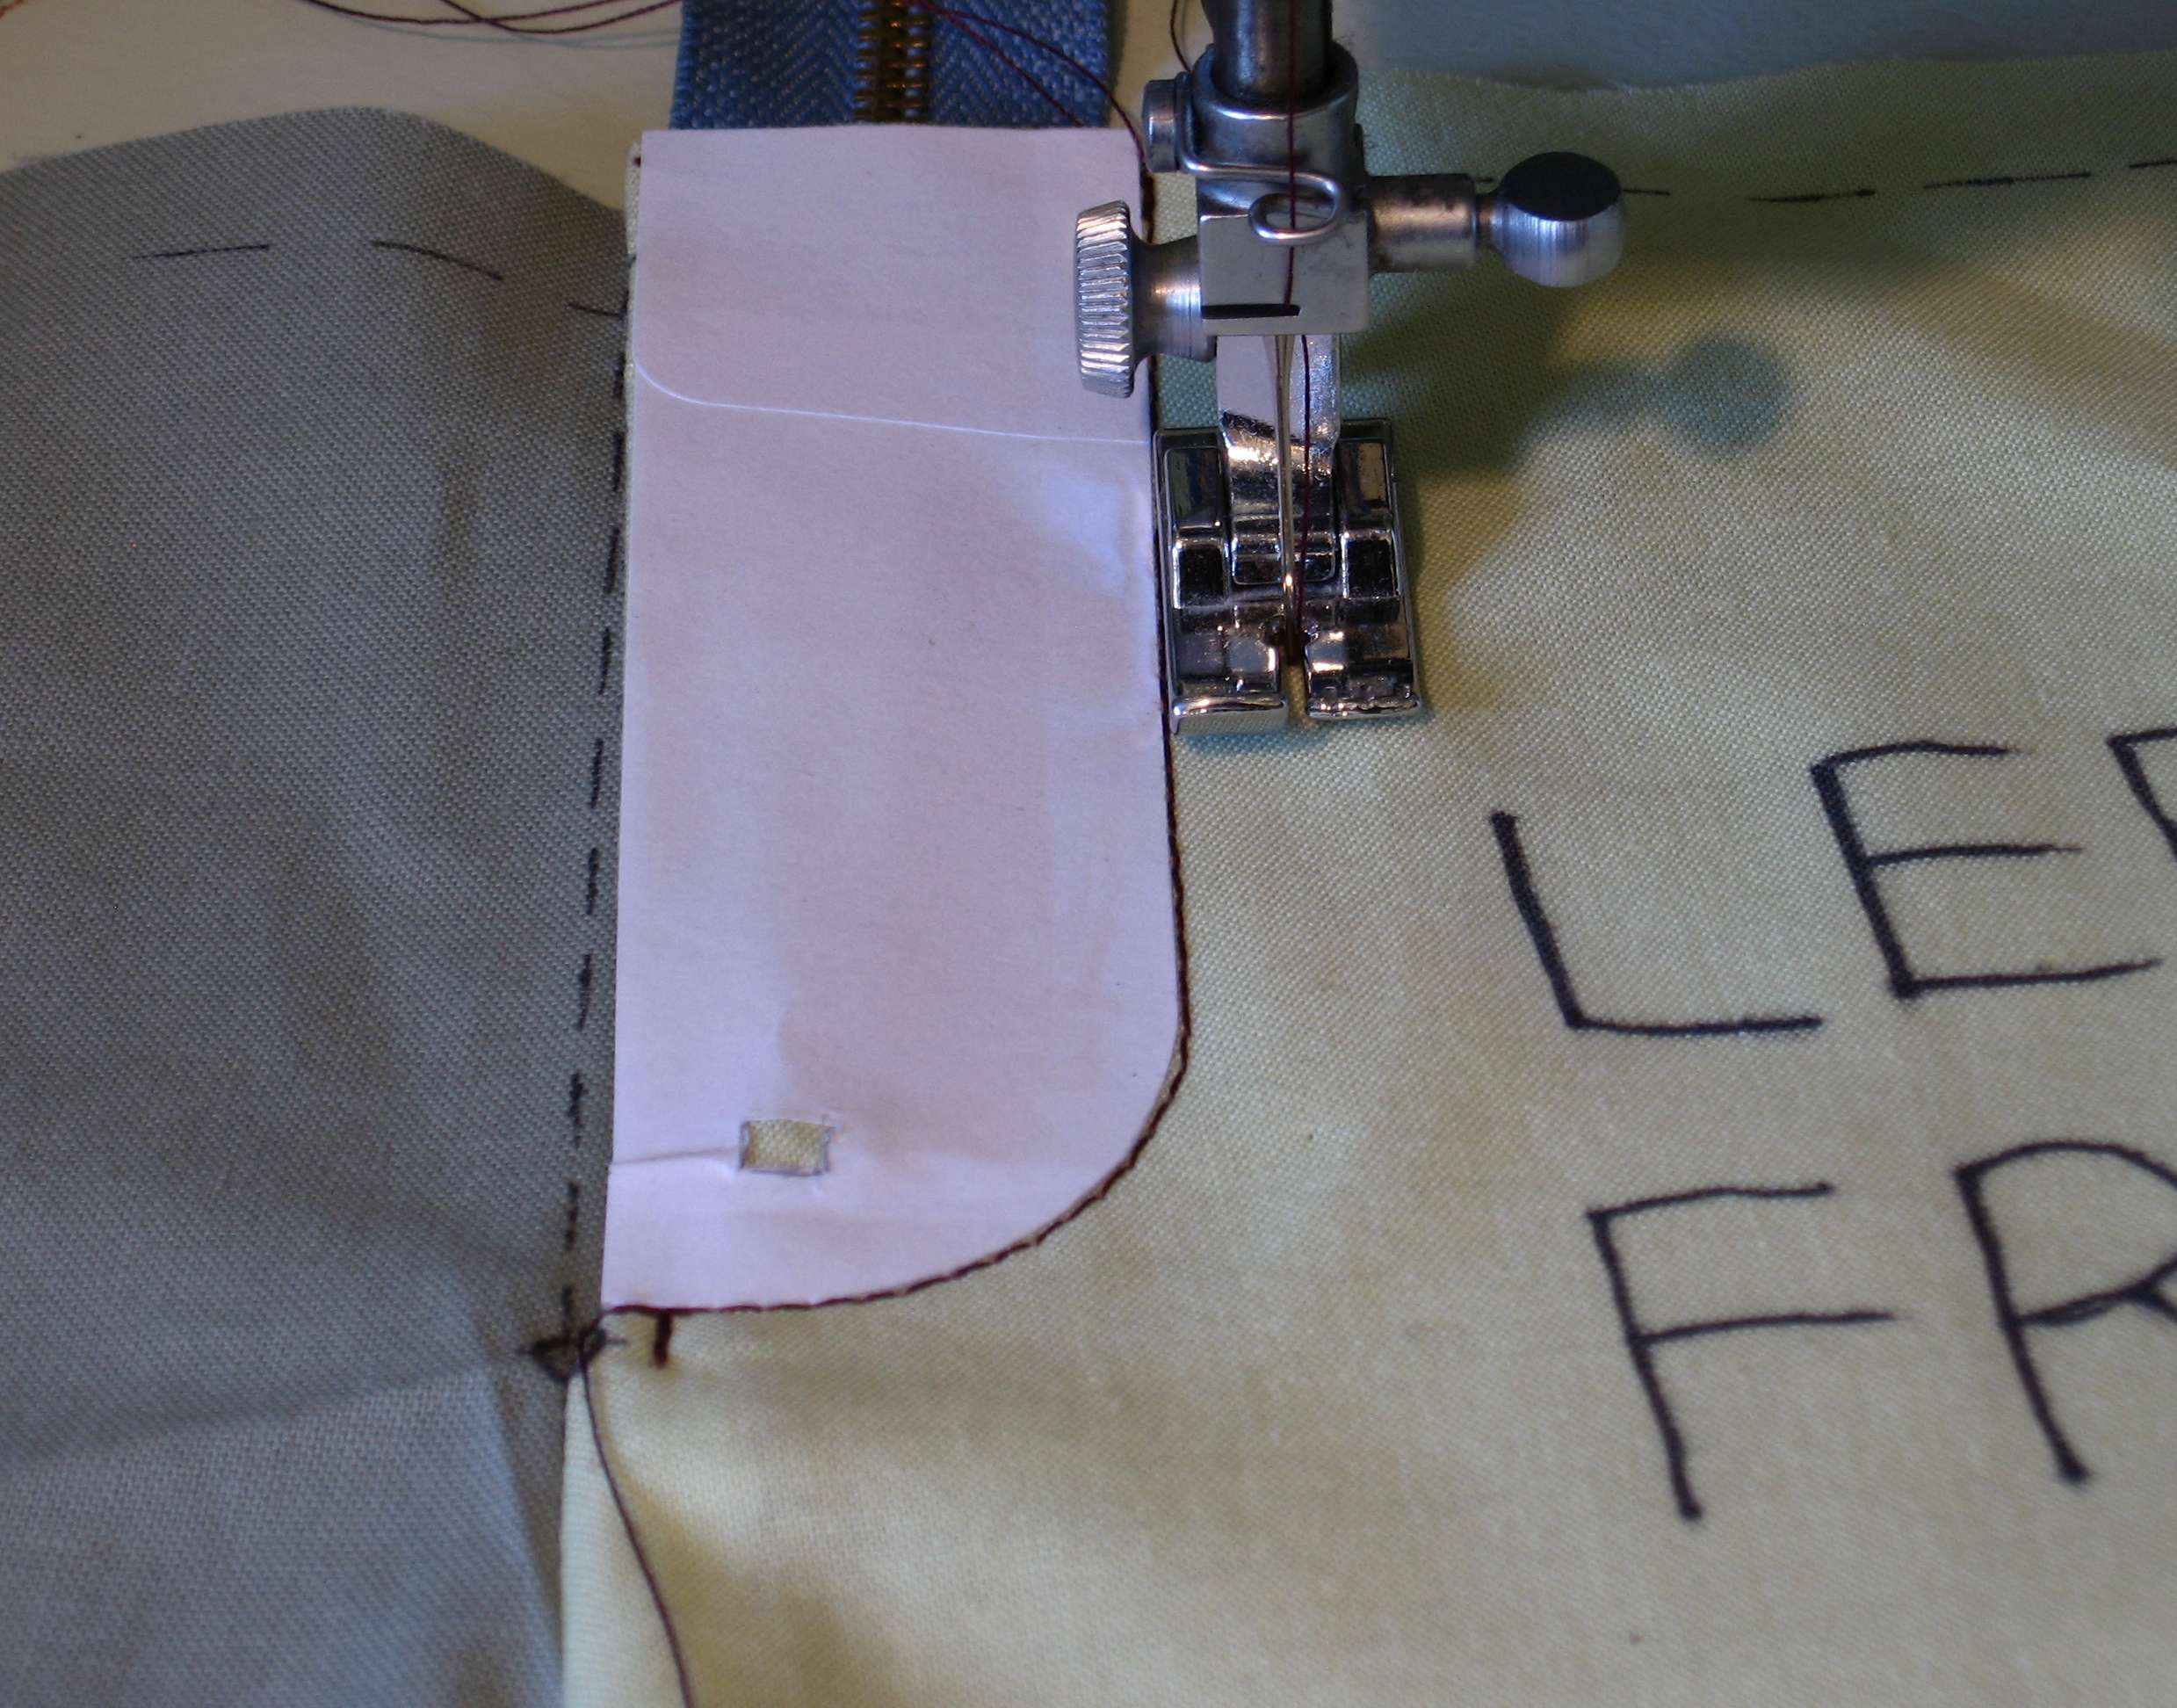
I made two different topstitching templates in the pdf. Decide whether you want one or two rows of topstiching around the zipper and choose the appropriate template. Trace the guide onto tape or office labels. Make a hole in the guide at the position of the zipper stop. Stick the guide onto the jeans front with the hole over the zipper stop. Poke a pin through to make sure you have located the zipper stop correctly. Make sure your presser foot will not hit the zipper stop.
Note: I didn’t use tape over the center front on this sample (the tape you put on a few steps ago). You can see that the center front lines don’t quite line up right because of that. Leave your tape in place over the center front line for this step and stick your topstitching guide over the tape to keep the center front lines lined up as you topstitch.
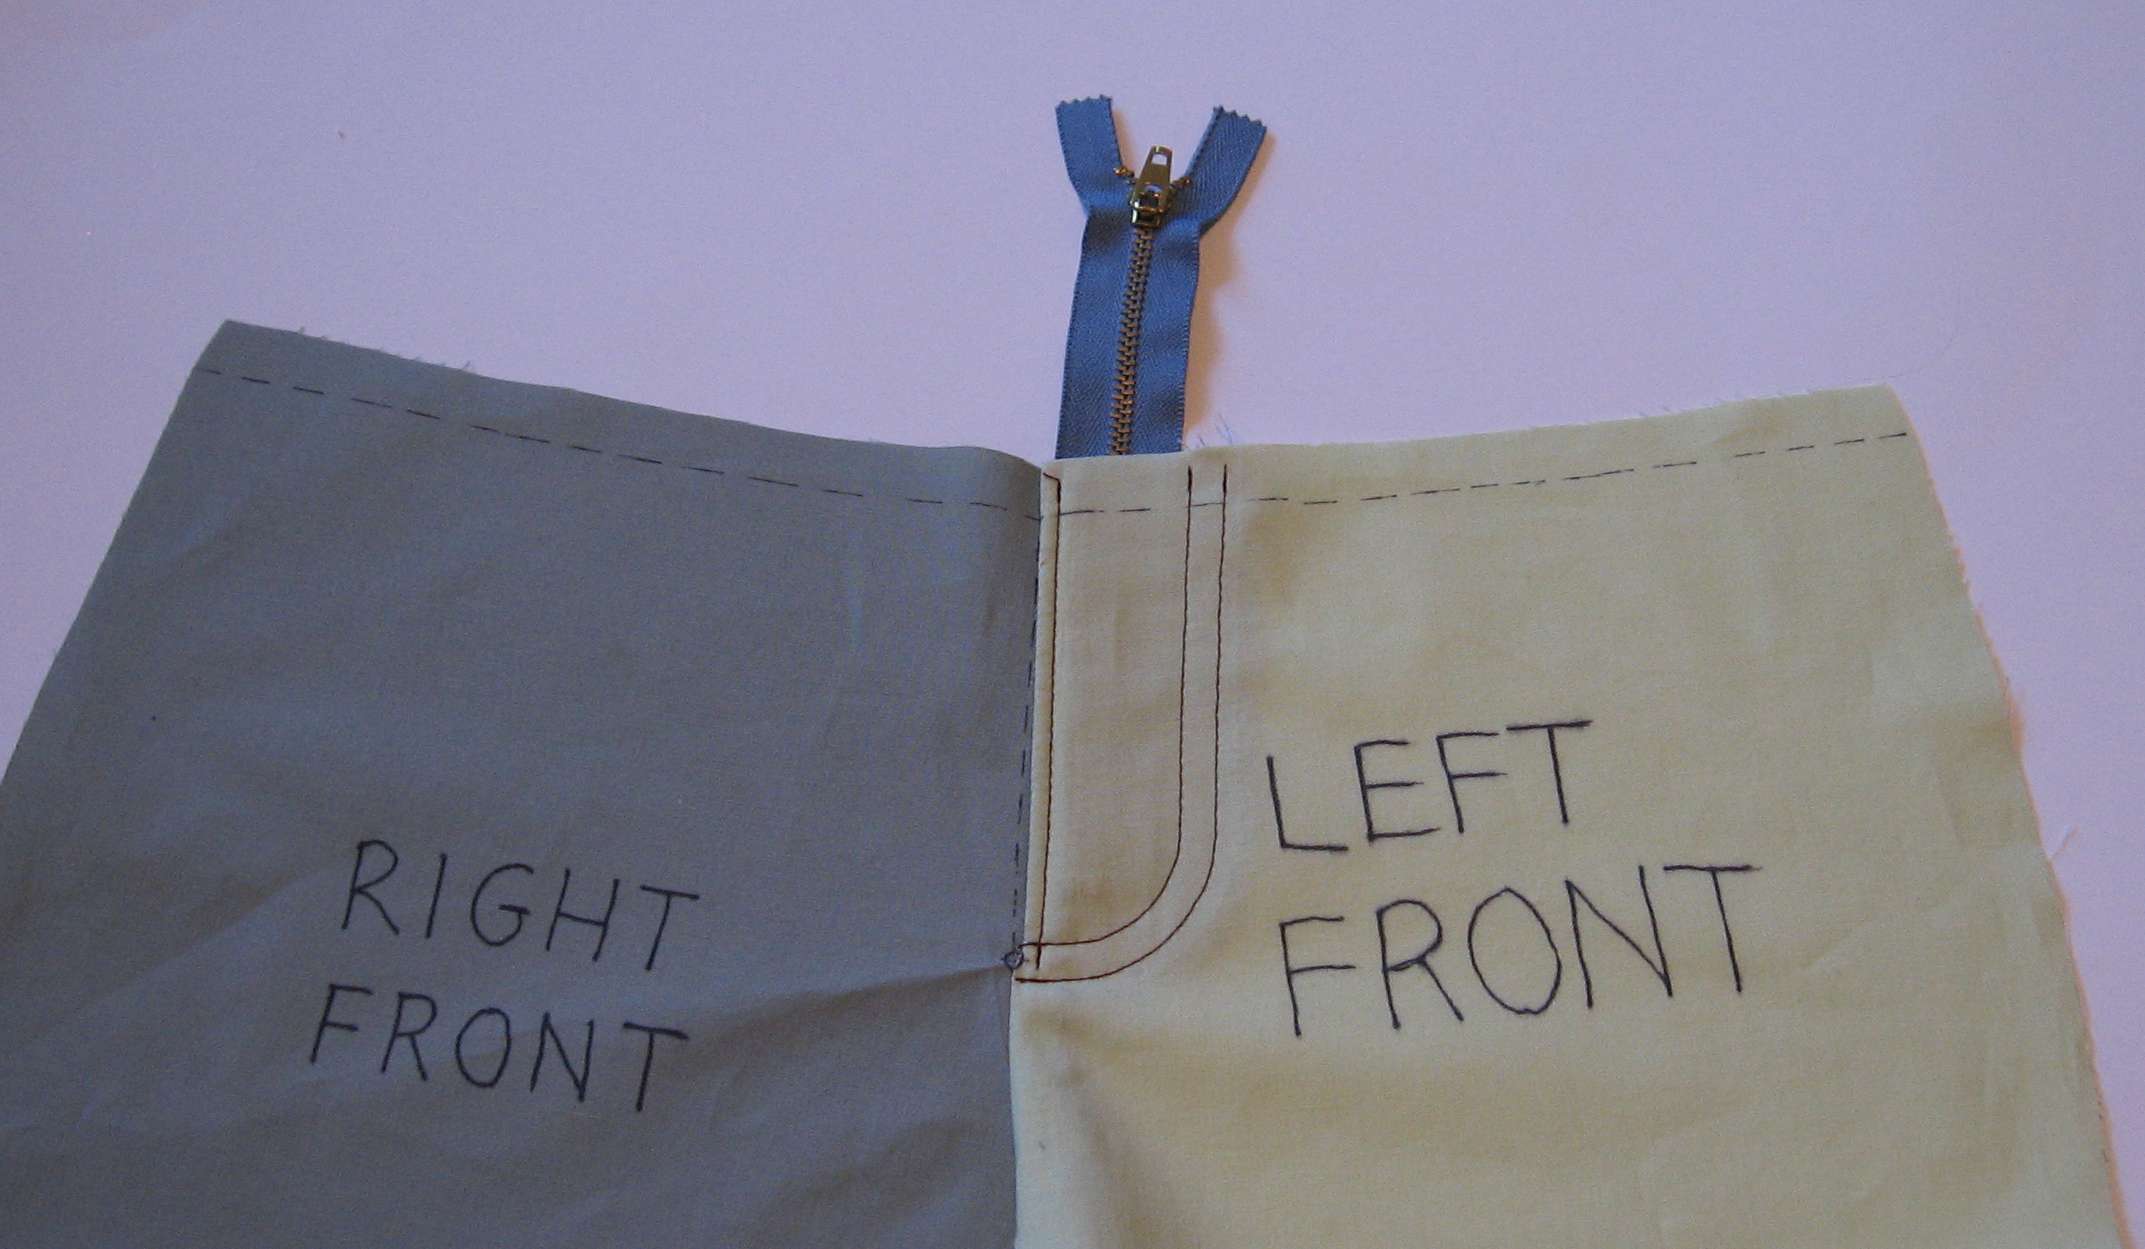
Topstitch along the edge to the guide. Take your time here. It’s a focal point, so it’s worth taking a little extra time to get it perfect. For double topstitching, stitch again 1/4” (6 mm) away. Take off the sticker and save it for the next zipper fly you sew.
Note: On lighter weight fabric (up to 12 oz denim), I like to topstitch the lower front crotch seam after I sew on the zipper shield, so the stitches help hold the zipper shield in place. You will have problems stitching through so many layers in heavy denim though, so you should sew on the zipper shield last if you are using thick fabric.
Position the zipper shield behind the zipper. Line up the overlocked edge with the center front. Tape the edge of the zipper shield to the right front. Wonder Tape works well for this.
Using a zipper foot, stitch right next to or on top of the first line of stitching on the right front next to the zipper. You won’t be able to stitch all the way down to the end of the zipper, which is fine. When you start to run out of room, stop and backstitch.


Here’s what it looks like from the back:
Press the lower front crotch seam allowances toward the left front. On the left front side of the seam, topstitch 1/8″ (3 mm) away from the seam, then 1/4″ (6 mm) away from the first line of topstitching. At the upper end, stop stitching at the upper row of the fly topstitching.

With the zipper closed, make two bartacks through all layers as shown. Use a zig-zag stitch 2.5 mm wide and 0.5 mm long. It helps to use a buttonhole foot to keep the bartacks straight with even stitches. If you are using heavy weight denim, you will need to flatten the area at the bottom of the fly with a hammer before you make the bartack. Just be sure not to hit the zipper.
The bartacks go through the zipper shield to hold the lower edge in place.

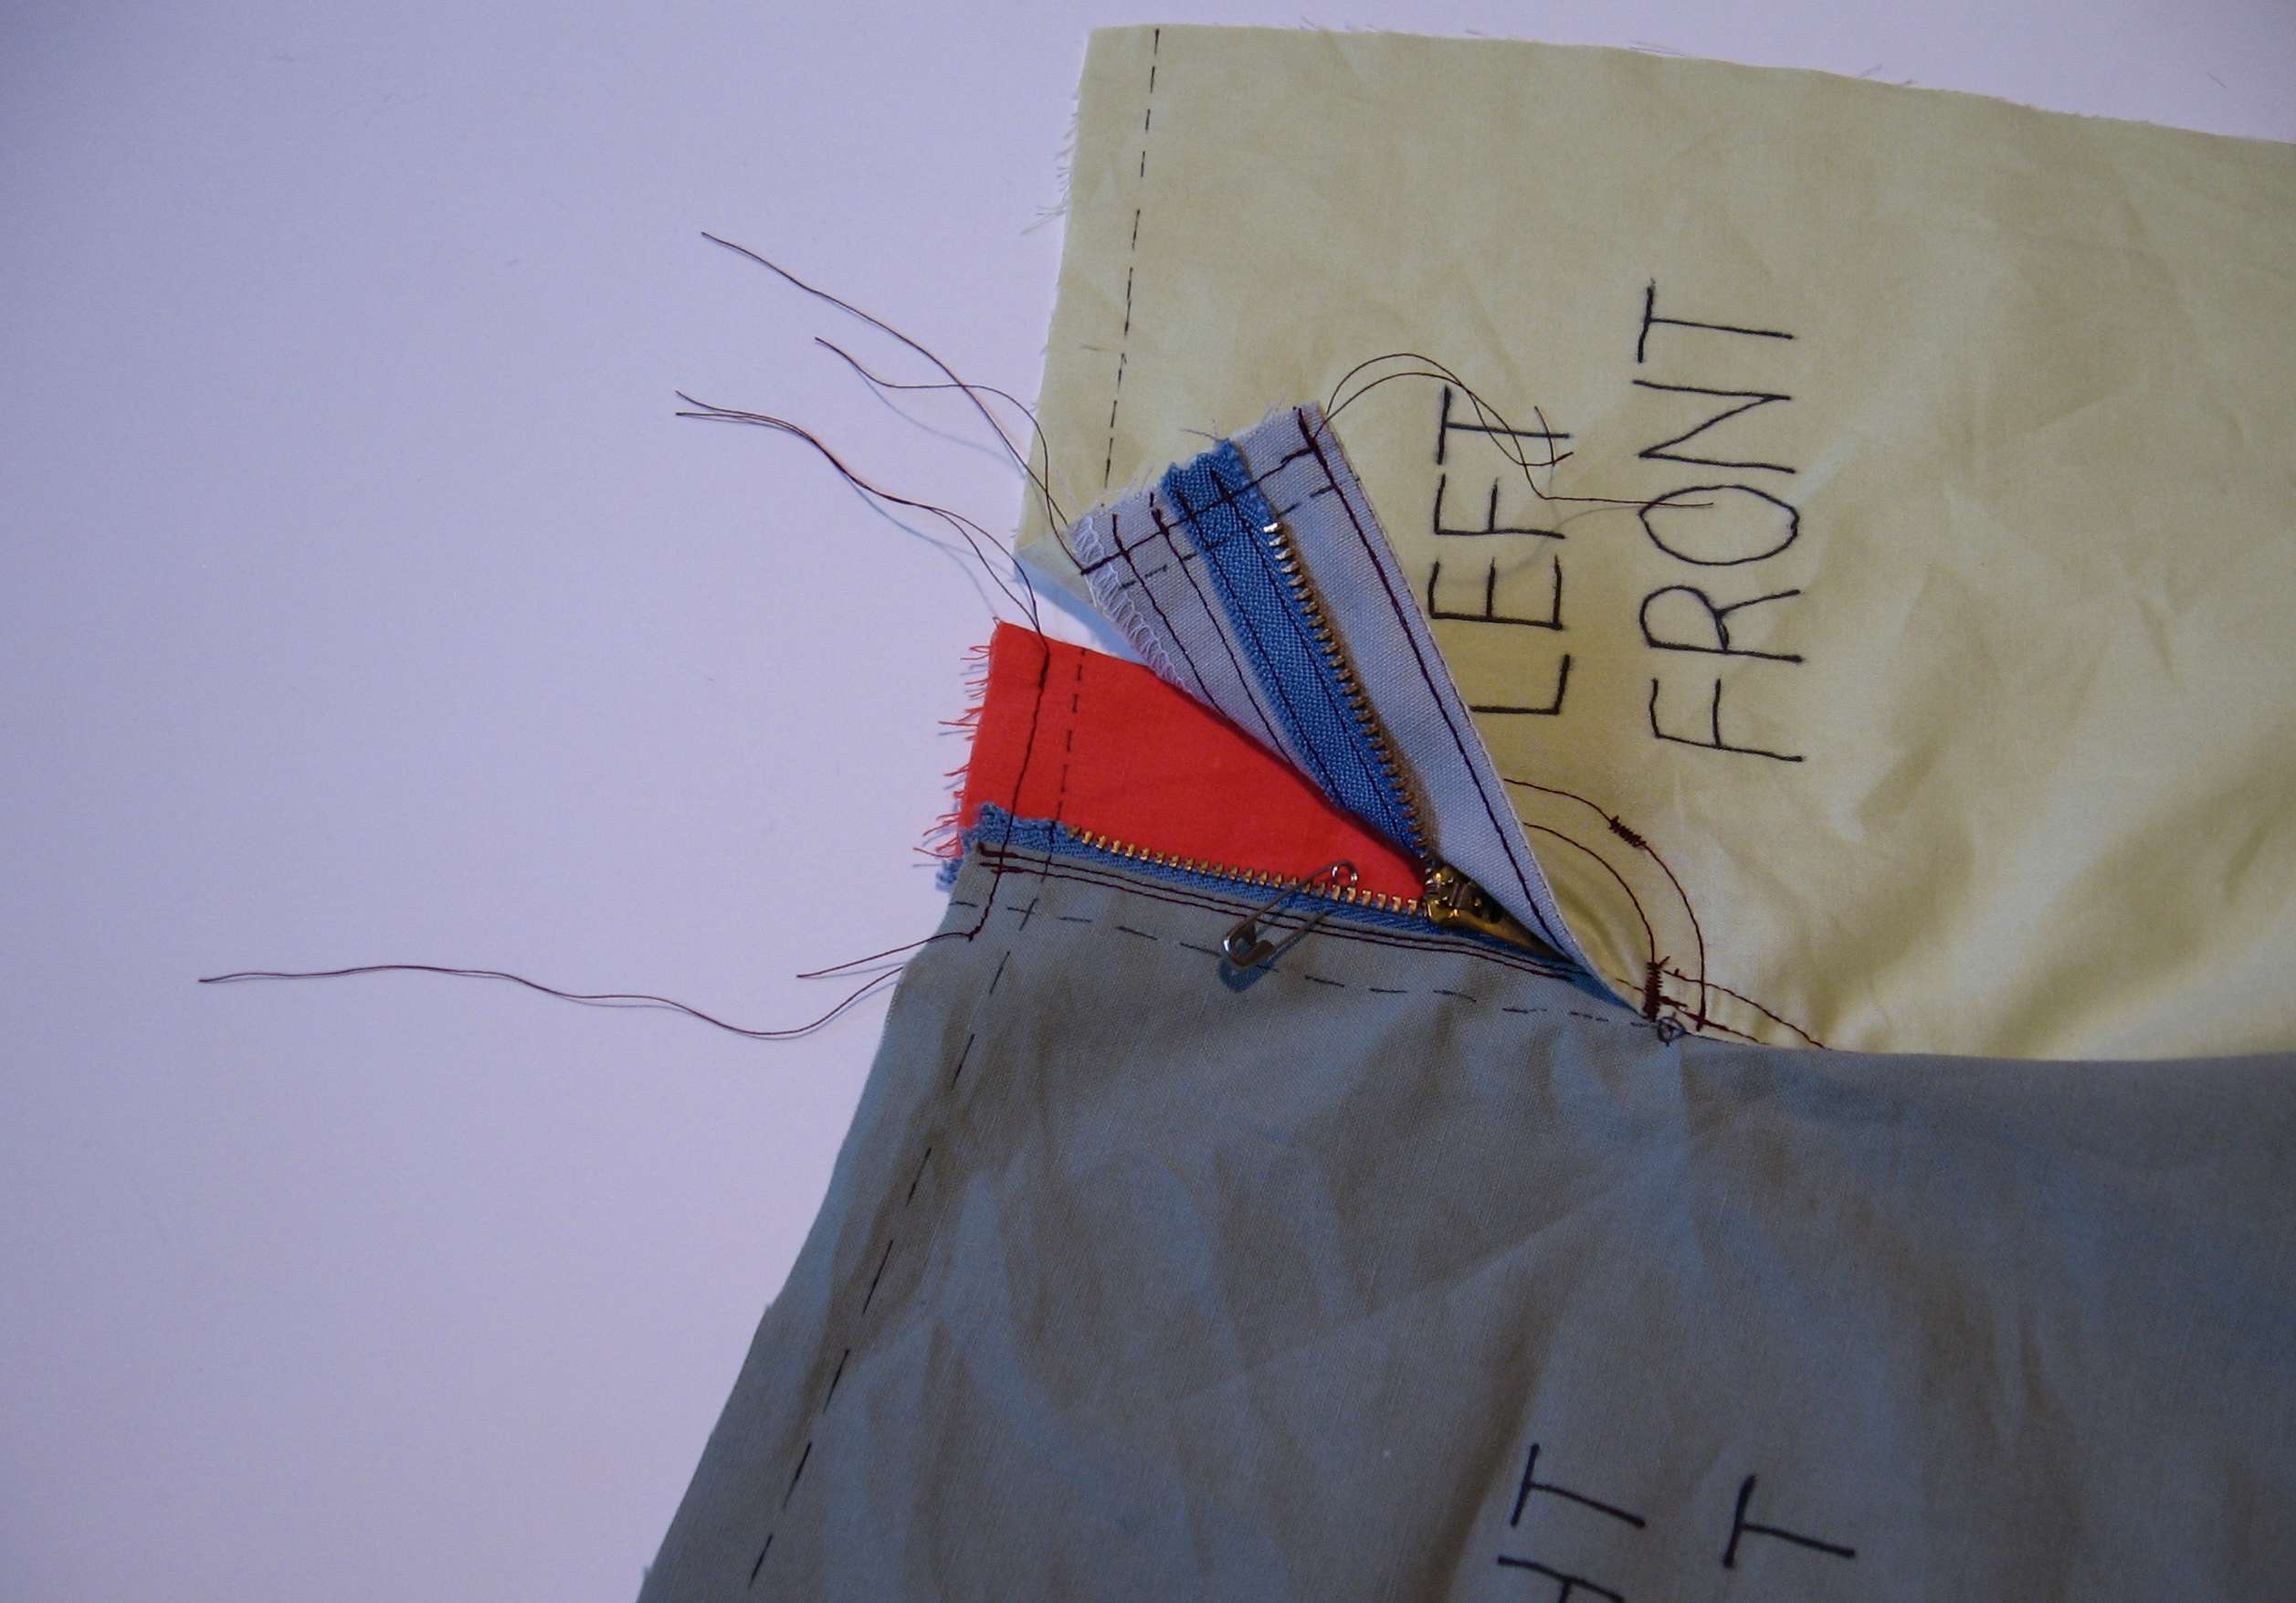
Open the zipper. Pin a safety pin over the zipper teeth to make sure the zipper slider does not come off as you are finishing the jeans. Leave the safety pin in place until the waistband is sewn on.

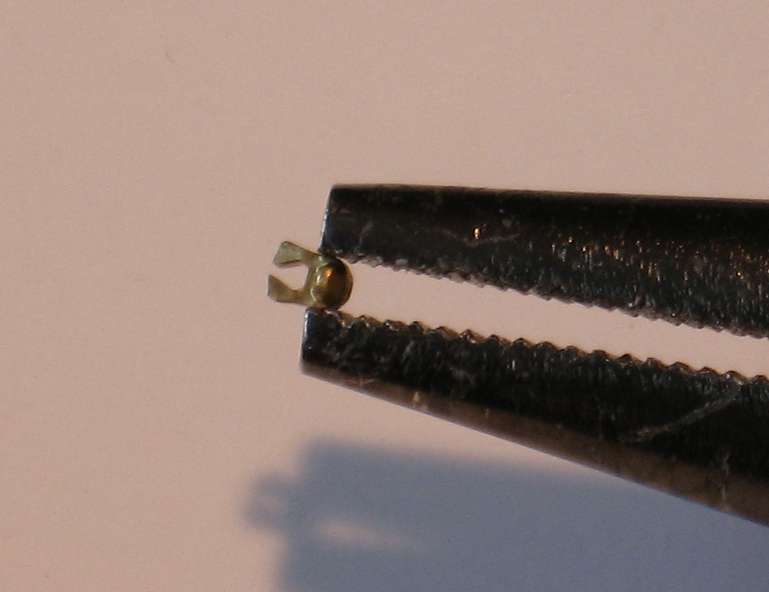
If you are using a plastic coil zipper, just cut off any excess zipper tape. If you are using a metal zipper that needs to be shortened, you will need to pull out some of the zipper teeth before shortening the zipper. Starting just below the seam line, grip a zipper tooth near the edge with needle nose pliers and pull straight out. If it is not coming out, you may be gripping too much of the tooth and squeezing those pointy bits together. When you have the extra teeth pulled out, cut off the excess zipper tape.

Here’s a close up of a zipper tooth in the pliers. You can see that if you had more of the tooth in the pliers you would pinch it closed and keep it from coming off.
Stitch across the top of the zipper on each side, within the seam allowance.
Now sit back and admire your zipper fly!
 GrowYourOwnClothes Etsy Shop

[…] I couldn’t find instructions for one. So what did I do? I figured it out myself and wrote a tutorial, of […]
LikeLike
[…] Jeans Zipper Fly Tutorial […]
LikeLike
Intense, but perfect. I will go over this tutorial a few more times to build up the courage. Thanks 🙂
LikeLike
Best instructions I’ve ever seen, and I’m a professional dressmaker. 🙂 Good job!!
LikeLike
Best instructions I’ve come across so far and the pictures are great. I liked that everything is labeled and different colors were used to indicate different pieces. Everyone should take some notes on how to make a tutorial. This is the first one that is clear to me.
LikeLike
I was struggling with the directions for the fly opening on a pair of pants (which have no illustrations or pictures). This helps immensely. It’s so clear. And it also makes me see that there may possibly be a mistake in the other pattern/directions, hence my struggle. The left front AND right front have that long narrow rectangle extended out past the curve of the crotch, and what’s more, the center front is not marked on either. But the cutting directions say to note the difference in cutting out the left and right pieces at the center front. So I feel like they’re supposed to be marked/cut different from each other, but it was forgotten. I’m going to have to take a close look at it again to make sure it’ll work out, but I think I have to cut a rectangle away on one side, going in past the seam allowance line from the crotch curve. It just makes way more sense that way. Thanks for this awesome tutorial. I’m saving it.
LikeLike