
I needed to make some new sweaters or sweatshirts to wear around the house. After considering several different cardigan and sweatshirt patterns, I decided on the popular Helen’s Closet Blackwood Cardigan pattern. This pattern had the features I wanted, but I also chose it because I’m a fan of the Love to Sew podcast, which Helen co-hosts with Caroline of Blackbird Fabrics, so I like to do what I can to support the hosts’ businesses.

When I first saw the Blackwood cardigan pattern, I dismissed it as something I would never wear, since I mostly saw people making the long version. I’m 5’2″ tall so, a long cardigan would be overwhelming on me. I also don’t like a lot of weight hanging off my shoulders. I had looked at the shorter view, but I thought it looked too boxy.
However, I finally tried the short version anyway, and once I saw the finished garment on myself, I don’t think it looks boxy. I also wasn’t sure that a cardigan worn open would keep me warm, but I found that it does keep me warm enough, and I like how it shows off the top you have on underneath. So I’ve been a little slow to join the Blackwood fan club, but now I’m a convert.
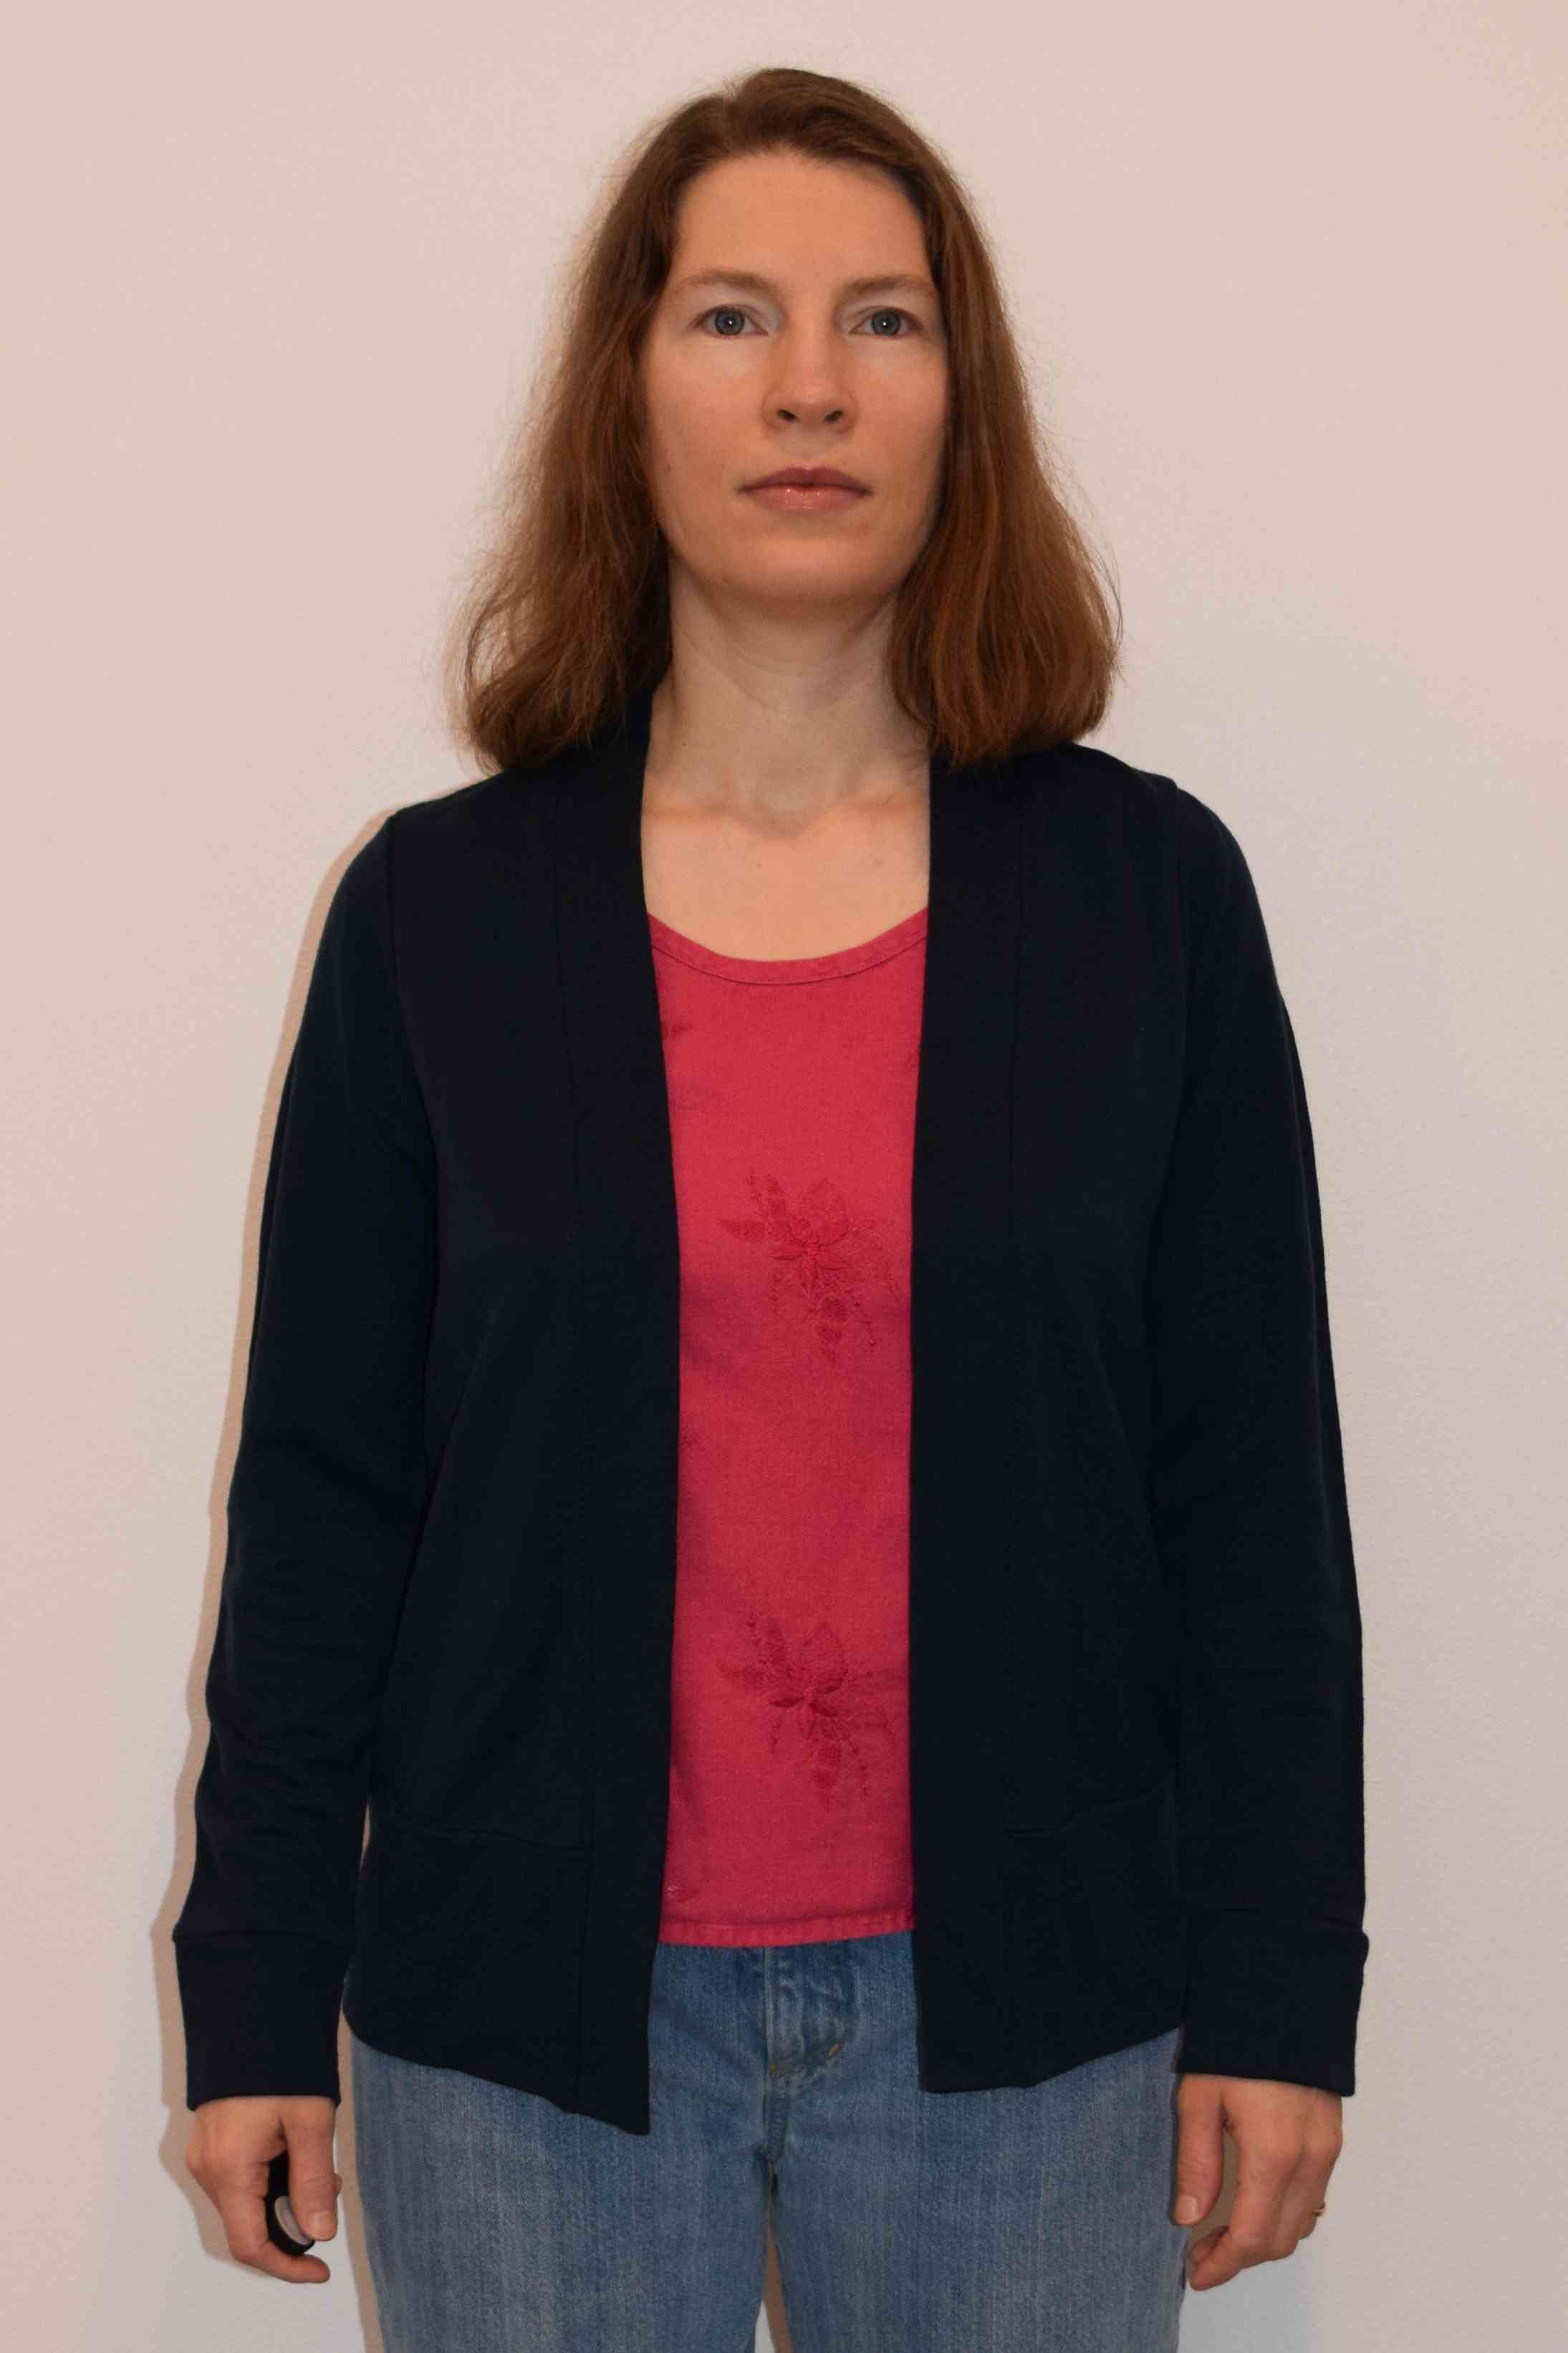
I decided to live dangerously, and I made my first Blackwood out of some navy blue wool French terry that had slightly less than the recommended amount of stretch. I started with one size up from what my measurements called for, did a full bust adjustment**, a full butt adjustment, my usual amount of shortening, and straightened the sleeve seam to give me a little more elbow room. I also made some pattern corrections to the armholes and sleeves, which I describe later in this post.
**Helen includes a copy of her guide to FBA’s on knits with the pattern. I chose to combine two of the methods (the two shown in this blog post) which worked quite well. I converted half of the bust dart to ease at the side seam, and then used the method that curves the lower hem to get rid of the rest of the bust dart.
You can’t see much of my navy cardigan, since it’s such a dark color, but here it is. The bottom edge hits me just below hip level, which is longer than I was anticipating, but I guess longer keeps me warmer, right?

I was quite pleased with my first Blackwood, but I don’t like to wear wool sweaters except on really cold days (they make me break out in a cold sweat, and then there’s the scratchiness) so I made two more in cotton fabrics. For the next two, I went a size narrower at the shoulders, which I think looks better on me. Plus I used fabric with more stretch, which made them more comfortable.
Links in this post identified by an asterisk (*) are affiliate links. If you click on these links and purchase something, I will earn a small commission.
For the second cardigan, I combined three different scraps of unbleached cotton. The body of the sweater is made from some thick, cozy fleece, the sleeves from a waffle knit, and the bands are made from 2×2 ribbing from Organic Cotton Plus*.


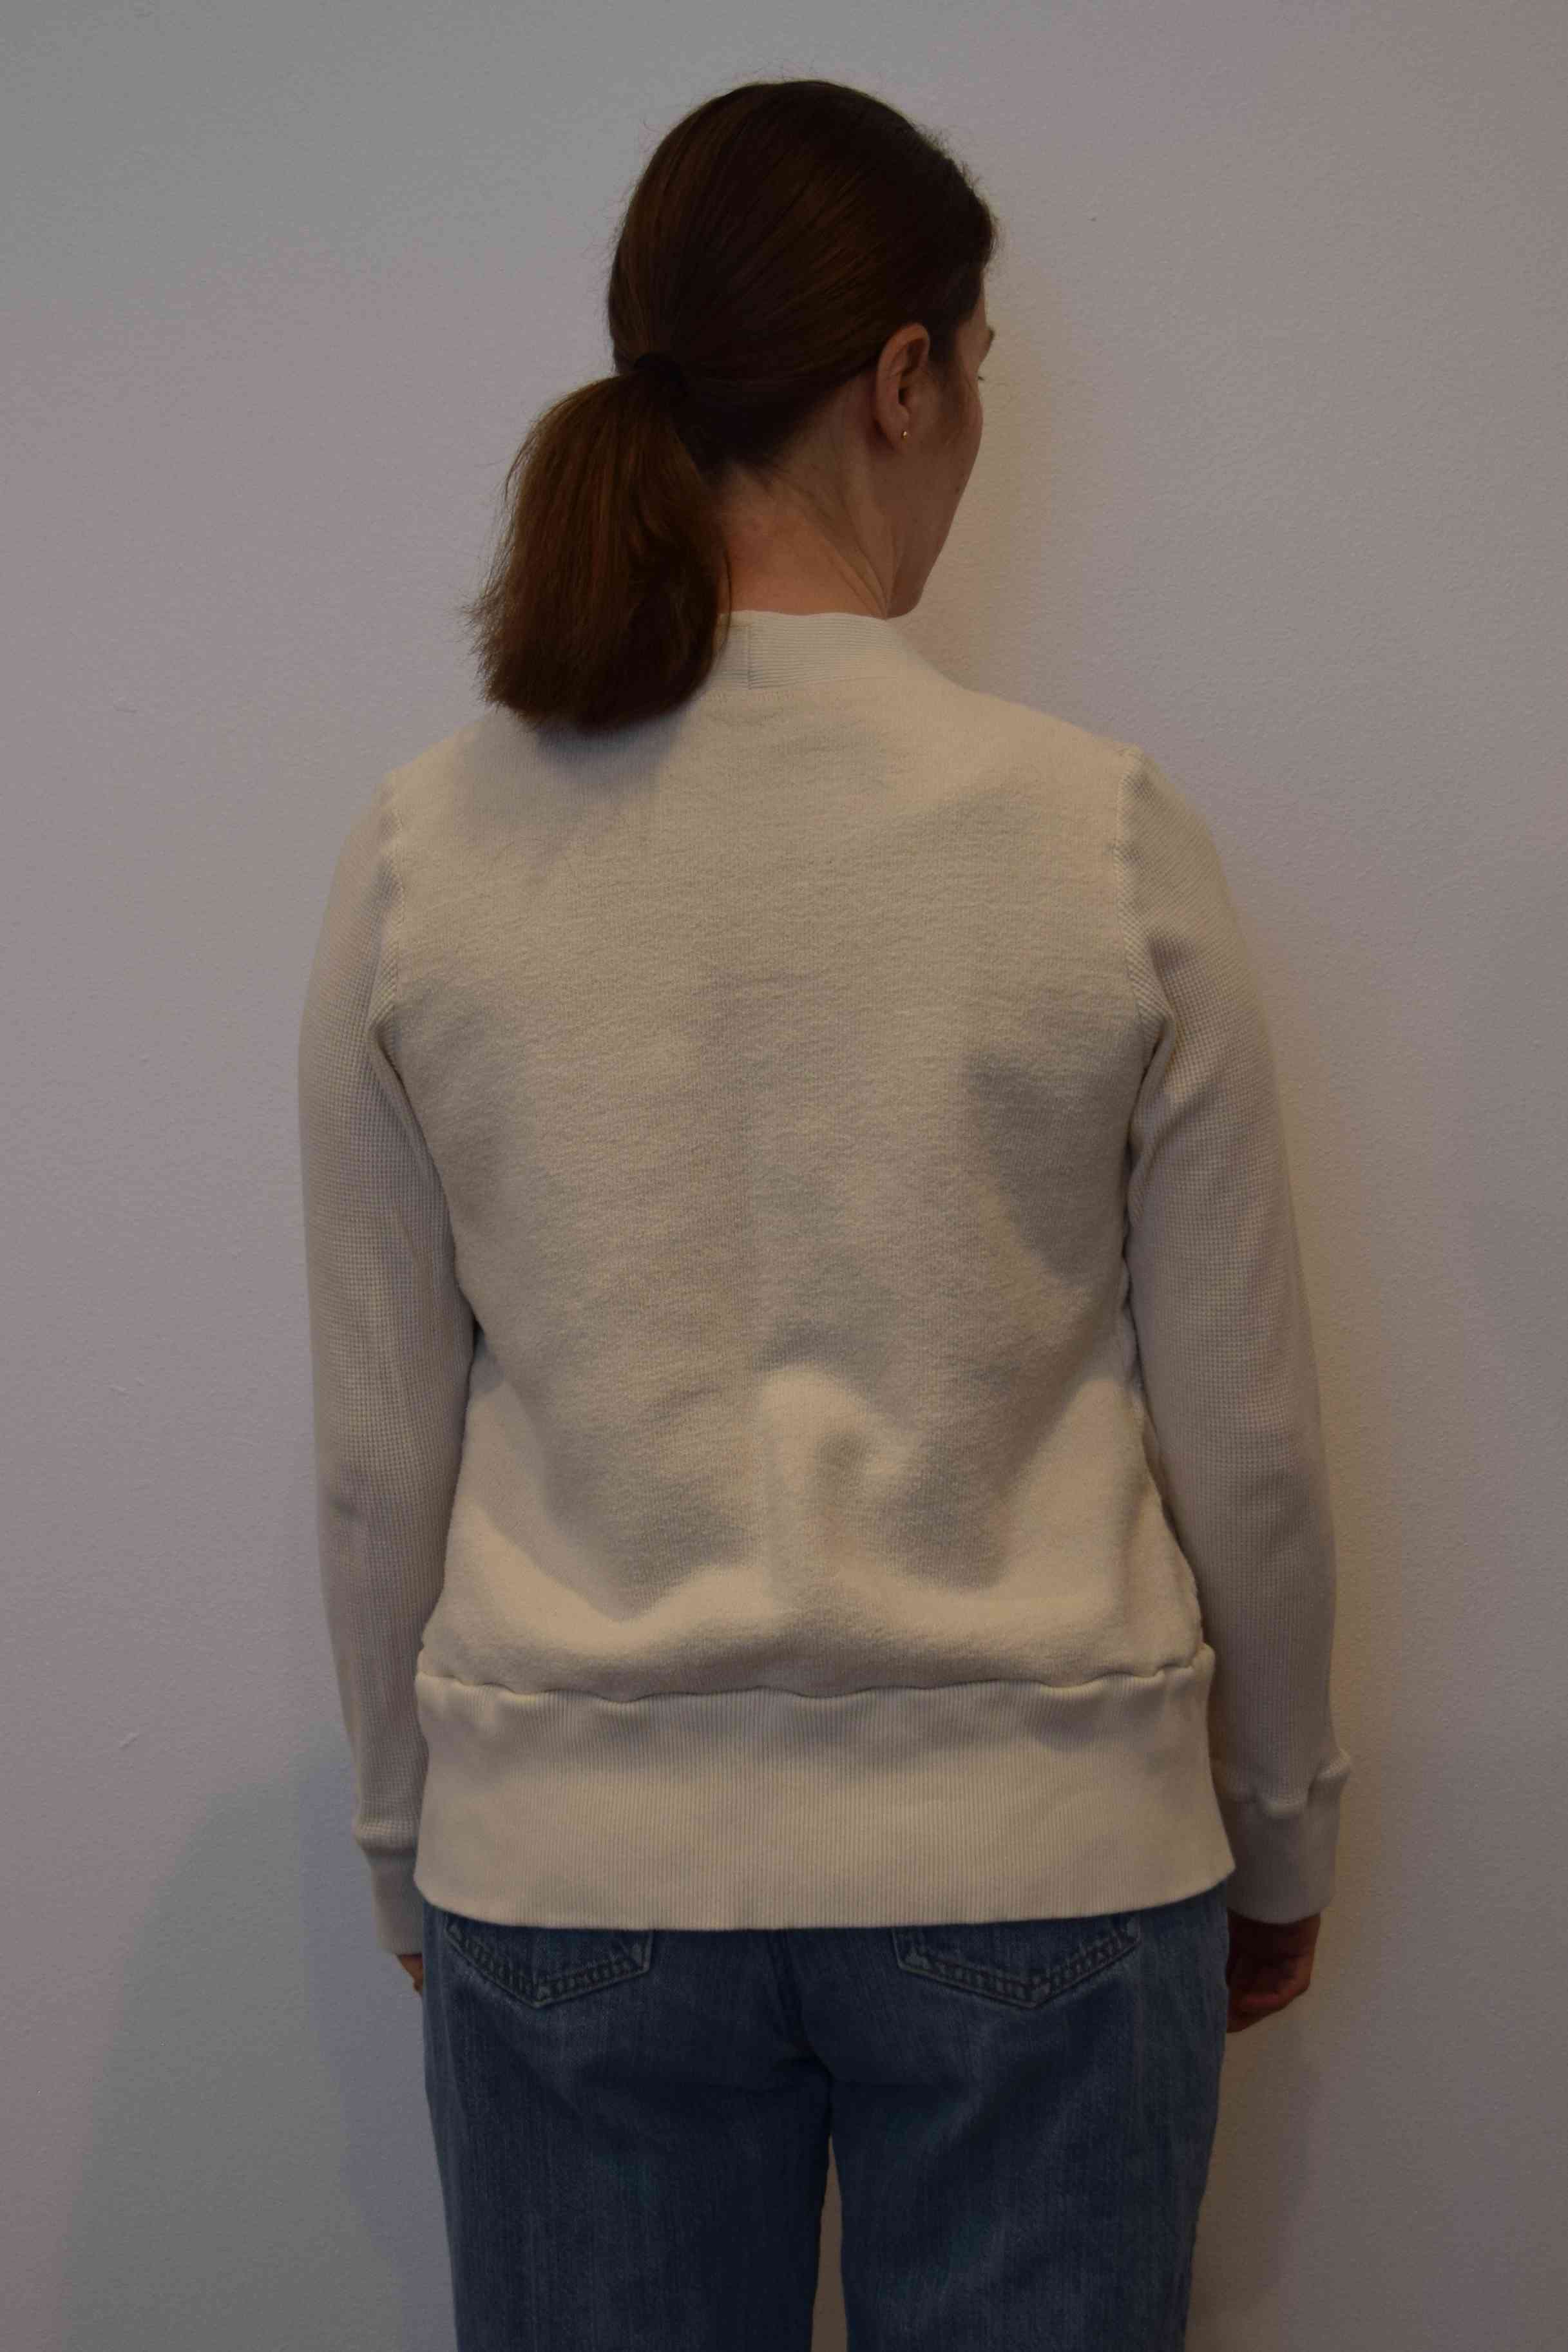
Here’s a close-up of the three different fabrics I used. This cardigan is so softy and cozy I want to wear it every day.

For my third Blackwood I used some pink cotton velour. I shortened this one to hit me above the hip, and also shortened the lower band. This one is cute and would look nice over a dress.
Sewing velour is pretty frustrating, but it’s worth it in the end. I had to glue baste with washable glue stick in several places, and I had to hand baste the sleeve bands, because I couldn’t get the fabric to stay in place with pins or Wonder clips. Even though sewing velour is a pain, I sort of want to make a cotton velour Blackwood in every color.
Hmm . . . and now I’m wondering how a three-quarter length sleeve or short sleeve version would look. Just a little something to wear over a sleeveless summer dress. I’ll have to re-visit that idea in a few months when the weather warms up.


I felt a little guilty making my cardigan out of this velour, since I originally intended to use it to make a dress for my daughter, but I did manage to squeeze a T-shirt for her out of the scraps.

There is this weird nicey-nice culture around sewing blogs, where people tend to gloss over pattern issues and glowingly praise every pattern, no matter how poorly drafted it is. Frankly, the pattern drafting on most home sewing patterns, whether they are big 4 or indie patterns, isn’t that great.
I’ve found myself not writing blog posts about some things I’ve sewn, since I had so many problems with them, and I hesitated to say anything negative here, because I don’t like reading negative stuff, and I’m guessing you don’t either. I’ve decided that from here on I’m going to honestly and frankly point out the problems I run into with patterns, and if I can, show you how to fix them.
I’m not doing it to be mean, but to help people. If you ask me, it is mean and hurtful to NOT point out problems you find in a pattern, because you might lead a beginning sewer to try a pattern that needs significant pattern corrections to even sew together. Plus, you never know, the pattern designer might read your review and do a better job on their next pattern.
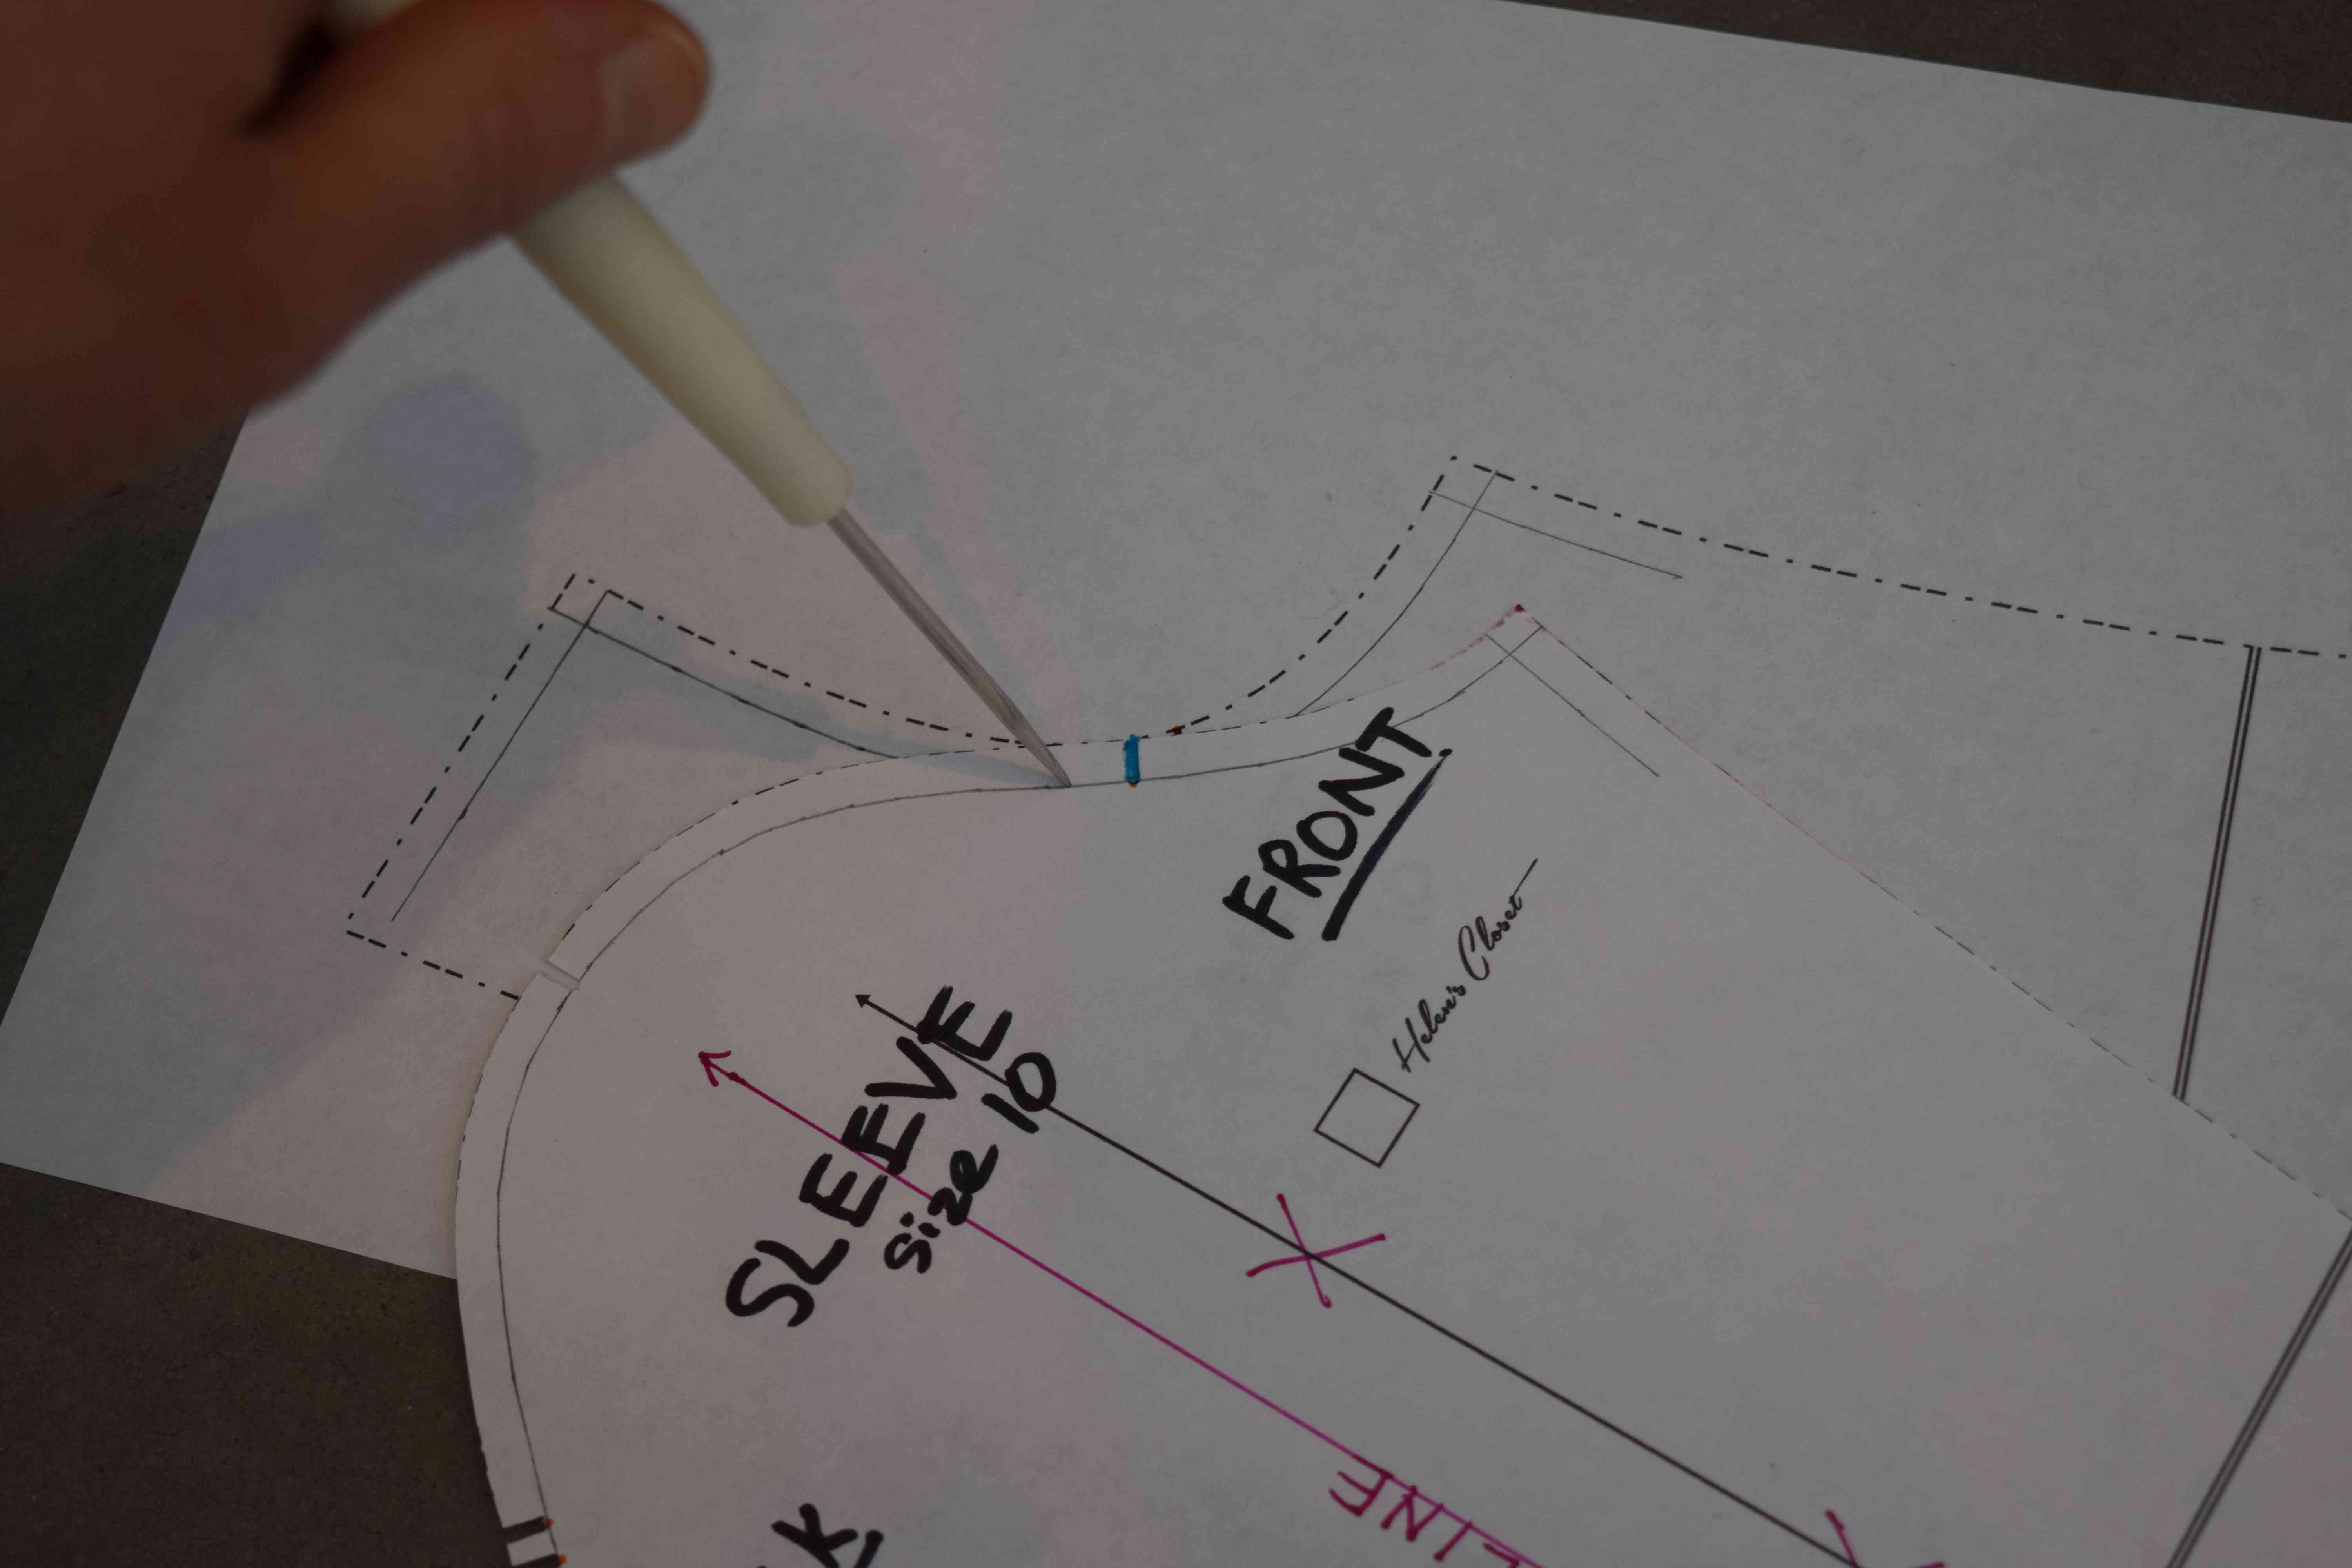
Since learning to draft sewing patterns, I always check the sleeves and armholes on commercial sewing patterns. There is almost always something wrong with them. Luckily, with this pattern, the shape of the armhole and sleeve cap are very nice (probably the best I’ve seen on a pattern for a knit top, actually), but there are some things that need to be corrected. The sleeve is twisted, the front armhole is too large, and the front armhole notch is in the wrong place. I checked this on size 10 and on size 20, and I found the same problems on both sizes, so there’s a good chance that all sizes have these problems.
Helen, the pattern designer, recently re-released this pattern with a larger size range. She mentioned removing some excess fabric width in the front armhole area, and this must have been a last minute alteration, because she apparently did not make alterations to the notches, etc. after doing this, which I am guessing caused some of the problems with the sleeves and armholes. These are relatively minor problems, but I think they are worth correcting, especially the front armhole notch issue.
I should add that I am not specifically picking on this pattern designer. Overall, this pattern is drafted better than most home sewing patterns I’ve tried. I’ve just decided I’m tired of all the dishonest praise fangirls post on their sewing blogs, and I’m going to start pointing out the issues I find on every pattern that I review, even those I really like.
Here’s how to correct the issues I found with this pattern. Ideally, you should make these corrections before you make any other fit alterations to the pattern, but they can also be made later if you’ve already altered your pattern.
Note: I printed out half scale versions of the pattern to save paper and to make photography easier.
Draw in the seam allowances accurately around the front and back armholes and the sleeve cap.

Here’s how to correct the sleeve twist.
First, lengthen or shorten the sleeve if you need to. If you changed the sleeve length, draw in a smooth line for the front sleeve seam, but don’t worry about the back seam yet. If you want a slightly looser sleeve, like I did, draw the sleeve seam as a straight line from the underarm to the wrist.
Partially cut out the sleeve along the front inner arm seam and the front half of the sleeve cap.

Fold the pattern in half lengthwise, matching the sleeve seams the best you can, but without twisting or wrinkling up your paper. The underarm and wrist points do not line up, indicating the sleeve has some twist in it. This means that if you sew it up as is, you will get diagonal wrinkles on the underside of your sleeve. Apparently this is a common issue with sleeve patterns, because I saw this correction mentioned in a Craftsy class.
I found that the front underarm point was a little higher than the back. If the difference is small, you can either trim off the extra length on the front, as shown below, or raise the back to match the front. If you have a significant difference, trim off half the difference on the front sleeve cap seam at the underarm, and increase the height of the back at the underarm to match. Smoothly blend into the existing curve.

At the wrist, use a square to draw a new wrist line perpendicular to the fold.

Trace the front sleeve seam onto the back.

Before unfolding the pattern, cut along the wrist line.
Open up the sleeve pattern and draw in a new grainline on your fold line. Cross out the original grainline, then finish cutting out the sleeve pattern along the new lines you marked.

Now cut out the notches on the sleeve cap. Walk the sleeve around the front armhole, using an awl or pin as a pivot point along the seam line. Here’s how to walk the seam, in case you haven’t done it before (or if you’ve only seen the grossly inaccurate methods demonstrated in certain Craftsy classes): Start by matching up the shoulder points, with the awl at the shoulder point right on the seam line, not the edge of the pattern. Pivot the sleeve pattern slightly, and re-position your awl a little further down the seam, making sure to place your awl right on the stitching line each time you move it. Repeat this until you get to the notch.

Mark the notch location on the sleeve onto the armhole (the original notches don’t match up).
Continue to walk the rest of the sleeve cap seam. You will see that the armhole is larger than the sleeve, which is the opposite of what you are used to on a woven garment. On a knit garment the sleeve cap and armhole seams should usually be the same length.

My suggestion is to simply ease the extra armhole length into the sleeve between the notch and the underarm point. Because the knit fabric is on the crossgrain or bias in this area, it will ease so well you will barely notice it as you sew. There’s no need to even sew ease stitches—just stretch the sleeve to match the armhole as you sew.
The armhole ease is essentially acting like a replacement for a small dart, giving you a little extra room in the bust area. I actually did this same thing on purpose as part of a full bust adjustment on my Lark tees, and it worked great. The ease at the lower front armhole is not noticeable on the finished garment.
Alternatively, if you are small busted, you could trim this extra armhole length off of the front side seam, blending to nothing at the waist.
Now you should also walk the back sleeve cap/armhole seam. I didn’t find any problems with the back armhole on size 10, but I didn’t check any of the other sizes.
With these changes, you can make this awesome pattern even better. Yay!

* Links in this post identified by an asterisk (*) are affiliate links. If you click on these links and purchase something, I will earn a small commission.
 GrowYourOwnClothes Etsy Shop

Quite right – what’s the point of a review if it is limited to praise only.
LikeLiked by 1 person
Thank you for your honest opinion, I really appreciate reading a non-fangurl review. I rarely sew Indie patterns because of the hype written by over enthusiastic sewists, I just don’t want to drink the Kool-aid.
Having said that, I recently bought the re-released Blackwood, because I wanted to reward and thank Helen for adding larger sizes, and because I enjoy the Love to Sew podcast. I traced off my size on the pattern, cut out all the pieces, and after I had finished I found that I had misplaced the sleeve pattern, serendipity! Now I get to fix the sleeve issue without tracing another pattern piece. Thank you for telling me how.
LikeLiked by 1 person
Overall it’s a great pattern. I hope you like yours too!
LikeLike
New sewist contemplating the Blackwood, and am so grateful for your detailed review and directions for how to address the issues you found. This is not something I ever would have known and you saved me a lot of self-doubt when things turned out wonky.
LikeLike
Hi
Thanks for the frank review. I was going to buy the pattern but I am not someone who is happy or confident enough to make changes so you have saved me a lot of time, expense and disappointment.
LikeLike
Thanks for this review – have been meaning to make the Blackwood for some time, to replace some RTW merino long cardigans that I have inexplicably misplaced.
I agree fully with your sentiments re acknowledging issues. And add my thanks for sharing your drafting knowledge. I am just about to print of the pattern. Doesn’t appear to much much of a change so I guess little tweaks make all the difference. Will be interested to check other patterns i have as I have long sleeve tee where the twisting is evident in the arms. Never thought it was the pattern!
I will be making a long version. I particularly like your short velour version. It looks lovely and can see it would be great over a summer dress – so will keep this in mind as an option as summer moves closer to us in the southern hemisphere.
LikeLike