
This is the third post in a five part tutorial for making a paper tape dress form that truly matches your measurements and body shape.
Part 1: Introduction and Materials List
Part 2: Preparation
Part 3: Taping the Outer Form
Part 4: Making the Final Form
Part 5: Marking the Form and Making a Cover
Now that you have your T-shirt made and you know how to use water-activated paper tape, let’s get started making your dress form!

First, get everything set up:
Get out a fine point permanent marker, a yard/meter stick or tape measure, large sharp scissors, and a ruler.
Cut a strip of poster board 1 inch (2.5 cm) wide that is long enough to go around the model’s waist with a little bit of overlap. If the model prefers wider waistbands, you can cut the strip to their preferred waistband width instead. Tape together strips of poster board with paper tape if you need a longer piece – just make sure final strip is straight.
Cut two strips of manila folder that are about a half inch (1 cm) narrower than your paper tape is. The strips should be as long as the model’s upper arm is wide (from front of arm to back of arm).
If you have a self-leveling laser level, set it up on a tripod or on something you can adjust to the model’s hip level. If you don’t have a laser level, you’ll need to use a permanent marker taped to a yard/meter stick to mark a level line around the lower edge of the dress form, held at the right level by a stack of books or something (see the picture near the end of this post). Get that setup figured out ahead of time so the model is not stuck in the paper tape while you set this up.
Get your tape ready. Hopefully you have pre-cut a bunch of pieces. Get out two bowls of water (unless you are right by a sink), and a plate to set your sponge on. One bowl is for dipping the sponge in, and the other is for rinsing the sticky glue off of the taper’s hands. You’ll also want some towels handy.
I’m going to demonstrate the taping process on my DIY half-scale dress form with arms that I designed, because it was way easier to get pictures this way. She is a very patient model, and stands still for hours without complaining.

The model should stand with their normal posture. Walking around the room a bit can help them feel less self conscious and remember what their usual posture actually is – it can be hard to stand with “normal posture” on command.
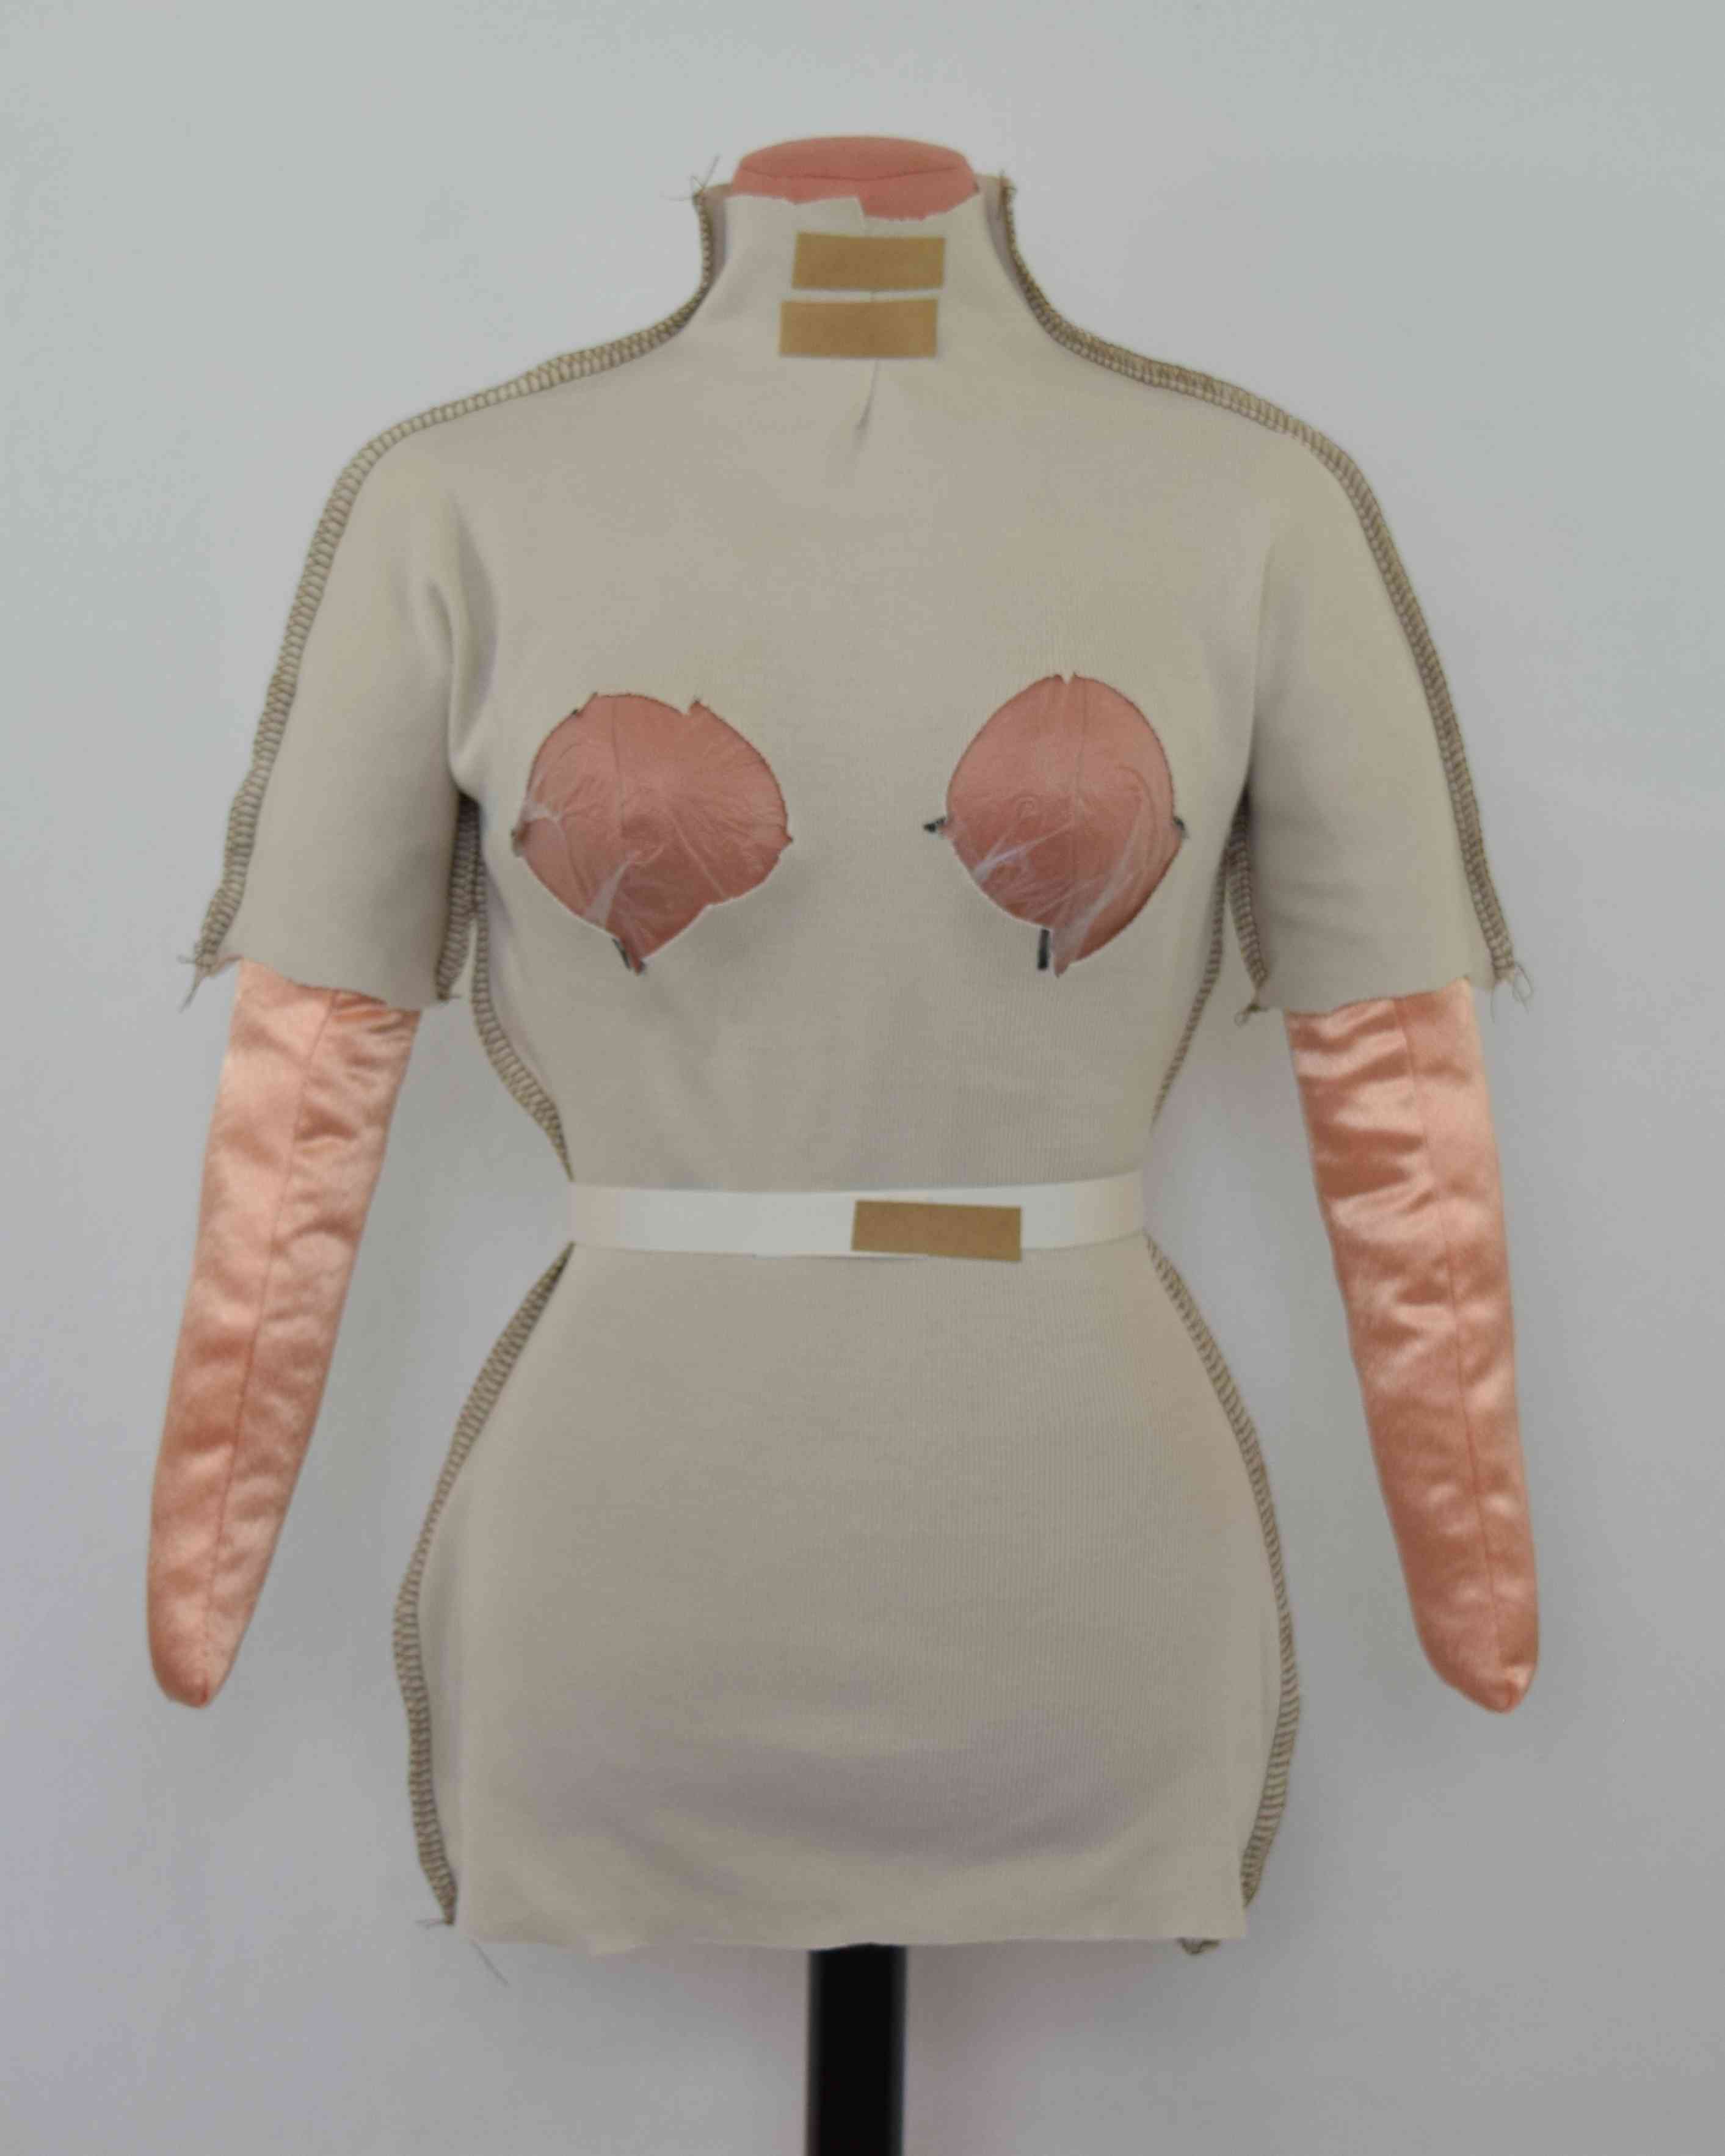
Cover the cups of the model’s bra with plastic wrap taped in place or Press’n Seal. Have the model put on the T-shirt inside out, with the seam allowances on the outside. If the model’s waist is small compared to their chest and shoulders and the shirt will not stretch enough at the waist to be put on, cut open the shirt at one or both sides of the waist. You can just cut off the seam allowance and stitches – there’s no need to pick out stitches.
Cut out holes to expose most of the breasts. This allows you to get better definition between the breasts. It looks funny, though, I know.


Close up the slit at the center front neck with some paper tape. If you had to cut open the side seams at the waist, tape them closed with paper tape, too.
Wrap the strip of poster board around the model’s waist and tape the ends together with paper tape. This strip keeps the waistline from growing, which it tends to do with taped dress forms otherwise, so use it even if the model does not have a defined waist or does not plan to sew skirts or dresses with waist seams. The waistband should be at the natural waist, where the waistband of an elastic waist skirt would sit. Don’t try to force it to be level, just let it settle where it wants to go at the narrowest part of the body.
If the model has soft body tissue and you are getting more bulging than you would like above and below the waistband (bulges are hard to shape the paper tape around), remove the waistband and wrap some plastic wrap around the waist area underneath the T-shirt. Don’t wrap the plastic wrap tightly – you don’t want to distort the body shape too much. Using a wider paper waistband can help, too. Put the paper waistband back on over the T-shirt.
Locate the hip level – the place where the hip measurement is largest – and make a mark on the T-shirt at this level so you can measure from hip to floor.
Measure and record the following:
Heel height of the shoes the model is wearing (if any) _______
Hip to floor _______
Navel to floor ______
Lower edge of waistband to floor at center front _______
Lower edge of waistband to floor at center back _______
Here are some general taping tips:
- It usually works better to apply tape diagonally rather than horizontally or vertically around the body.
- You always want the tape to follow the contours of the body. If you have a piece of tape that is partially stuck down, and you realize that the tape is not going to lie flat, cut the rest of it off or cut a snip into it. Try not to scrunch or wrinkle the tape. You can also hold up a dry piece of tape to the body to see if it will fit a tricky area before you get it wet and stick it down.
- Be careful not to distort the body shape by pulling the tape too tight, especially on soft areas of the body. Keep the tape as snug as you can make it without distorting the body shape.
- Overlap the tape pieces as you put them on, especially on the first layer.
Cut and wet some long pieces of tape. Place the first piece centered right below the bust and wrap the ends around to the back so they cross over each other. Let the tape follow the contours of the body – don’t try to force it to wrap horizontally around the body. Add a second piece of tape over the first.


Fill in the back from underbust level up to the previous pieces of tape with horizontal pieces of tape.

Cut two long narrow pieces of tape. Place them from the underbust tape, between the breasts, and over the shoulders to the tape on the back, crossing over each other between the breasts. Define the area between the breasts as closely as possible. If long pieces of tape will not fit on the body as shown, use shorter pieces and overlap them.


Continue filling in the upper back, upper chest, and shoulders with tape but stay a little way away from the neckline, shoulder points, and armholes. Don’t tape the bust yet. Keep at least an inch (2.5 cm) away from the shoulder points for now.


Note: You may be tempted to extend the shoulders on the dress form to include the curve of the upper arm. If you do this, keep in mind that you will only be able to put garments that have a full length front or back closure onto the dress form, since the shoulders will be too wide to fit inside a top that pulls over the head. Also it is difficult to locate the shoulder points and armholes on a dress form after it has been removed from the body, which is why I suggest being careful about locating the shoulder points and armholes while you make the dress form.
You need to locate the shoulder points. Have the model raise and lower their arm slightly and feel for the dent between the bones of the body and those of the arm. Put your finger on a shoulder point and have the model raise and lower their arm again. Your finger should stay stationary if it is in the right spot, not move with the arm. Mark this spot with a marker.

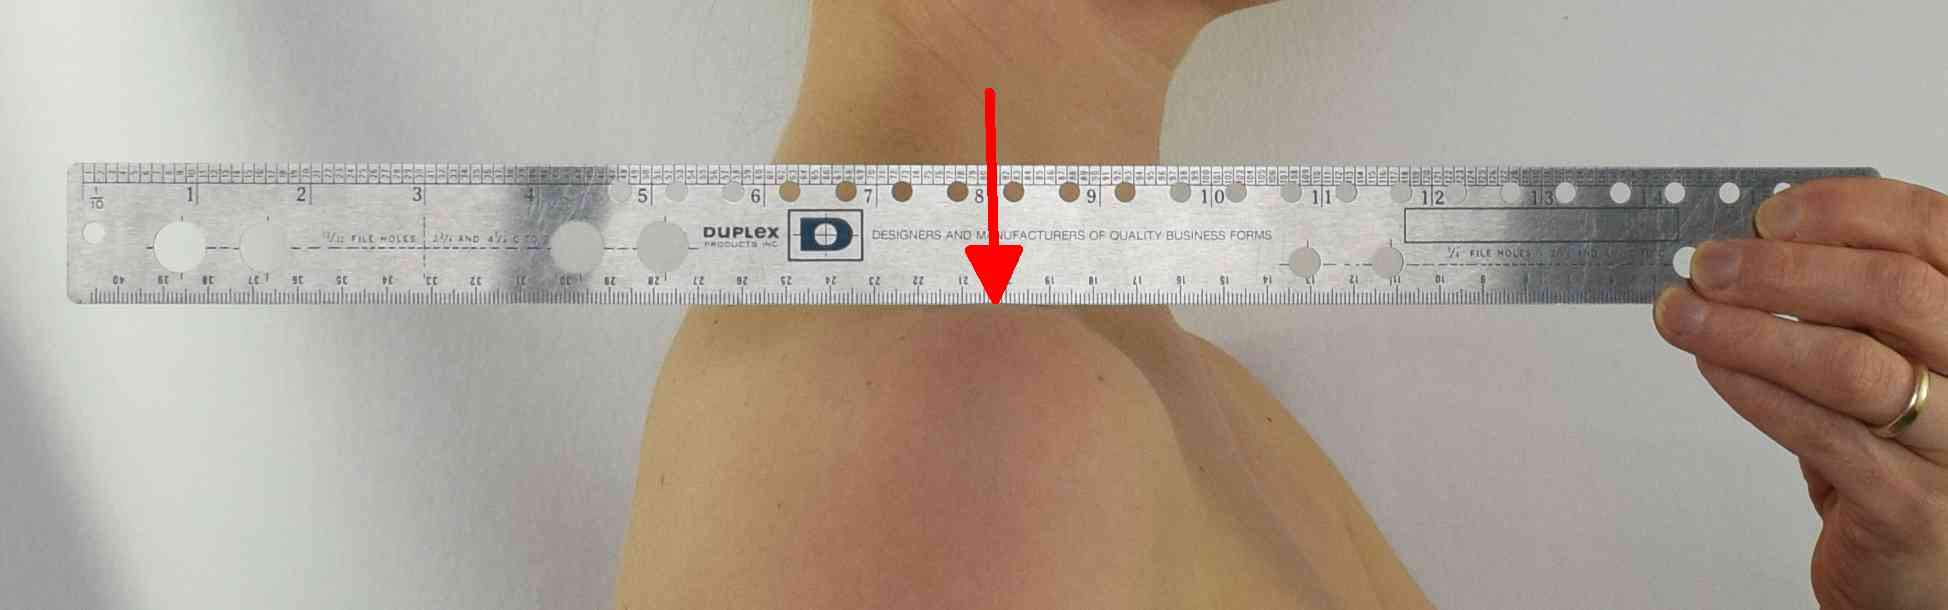
To locate the correct position from the side, place a ruler on the shoulder and hold it level to find the highest point on the shoulder.
Make cross marks to mark the shoulder points on the T-shirt.
Cut two pieces of paper tape the same length as your manila folder strips (the ones you previously cut to be the width of the upper arm and a little narrower than your paper tape). Get the tape wet and stick it onto the manila paper, folding the tape over one edge.

Cut two pieces of tape a little longer than the manila folder strips, and stick the manila folder and tape pieces onto the longer tape as shown, with edge of the paper that has tape folded over it sticking out just past the edge of the longer piece of tape.

Have the model raise their arms just enough to slip these pieces right up to the top of their armpits. The paper edge should be as high as possible without being uncomfortable or painful when the model lowers their arms. Keep the top edge of the paper level with the floor. Stick down the tape, and hold it in place with more tape around the edges as needed.

Now you need to mark the armholes. Place a ruler under the arm and hold it level with the floor. At about a third of the vertical distance between the shoulder point and the top edge of the ruler, mark a point on the T-shirt directly above the ruler.
Do this for both arms on both the front and back of the body.
Sketch in a smooth shape for both the front and back armholes, going through the shoulder points and the marks you just made. Note that if the model has narrow or broad shoulders, the armholes will angle in or out more and will look different than those on my mini dress form.
Tape carefully around the front and back armholes.


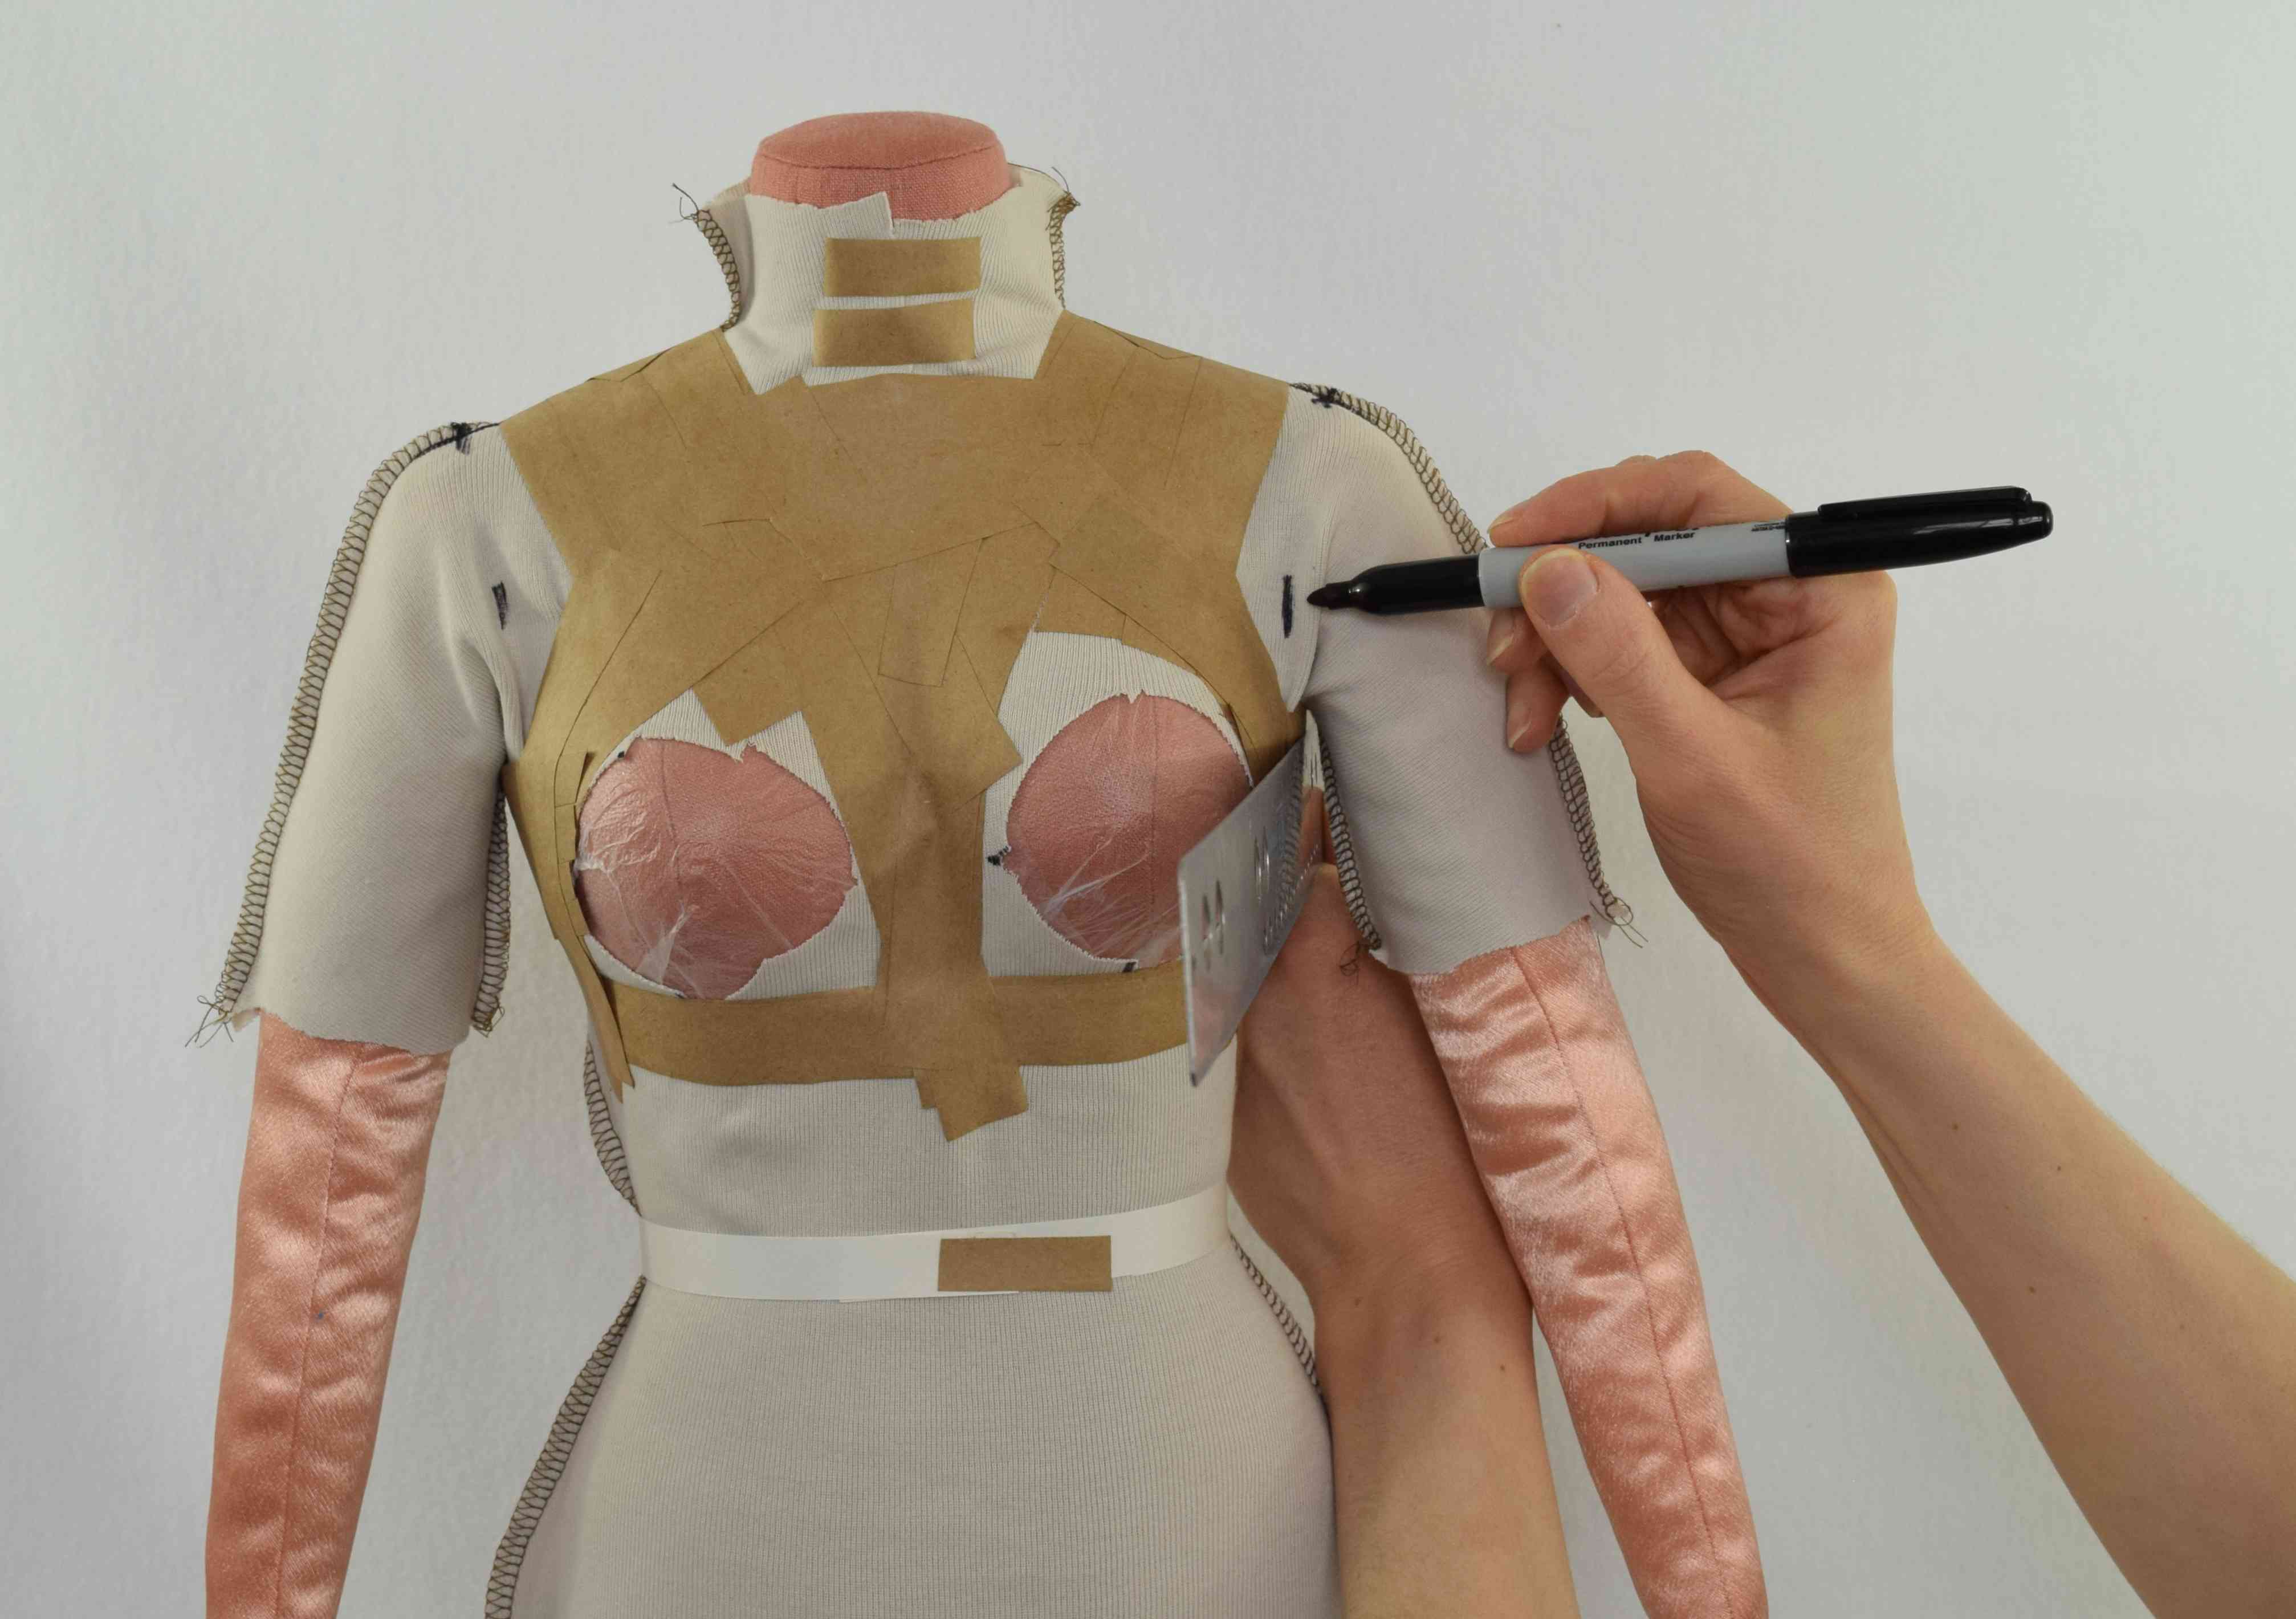
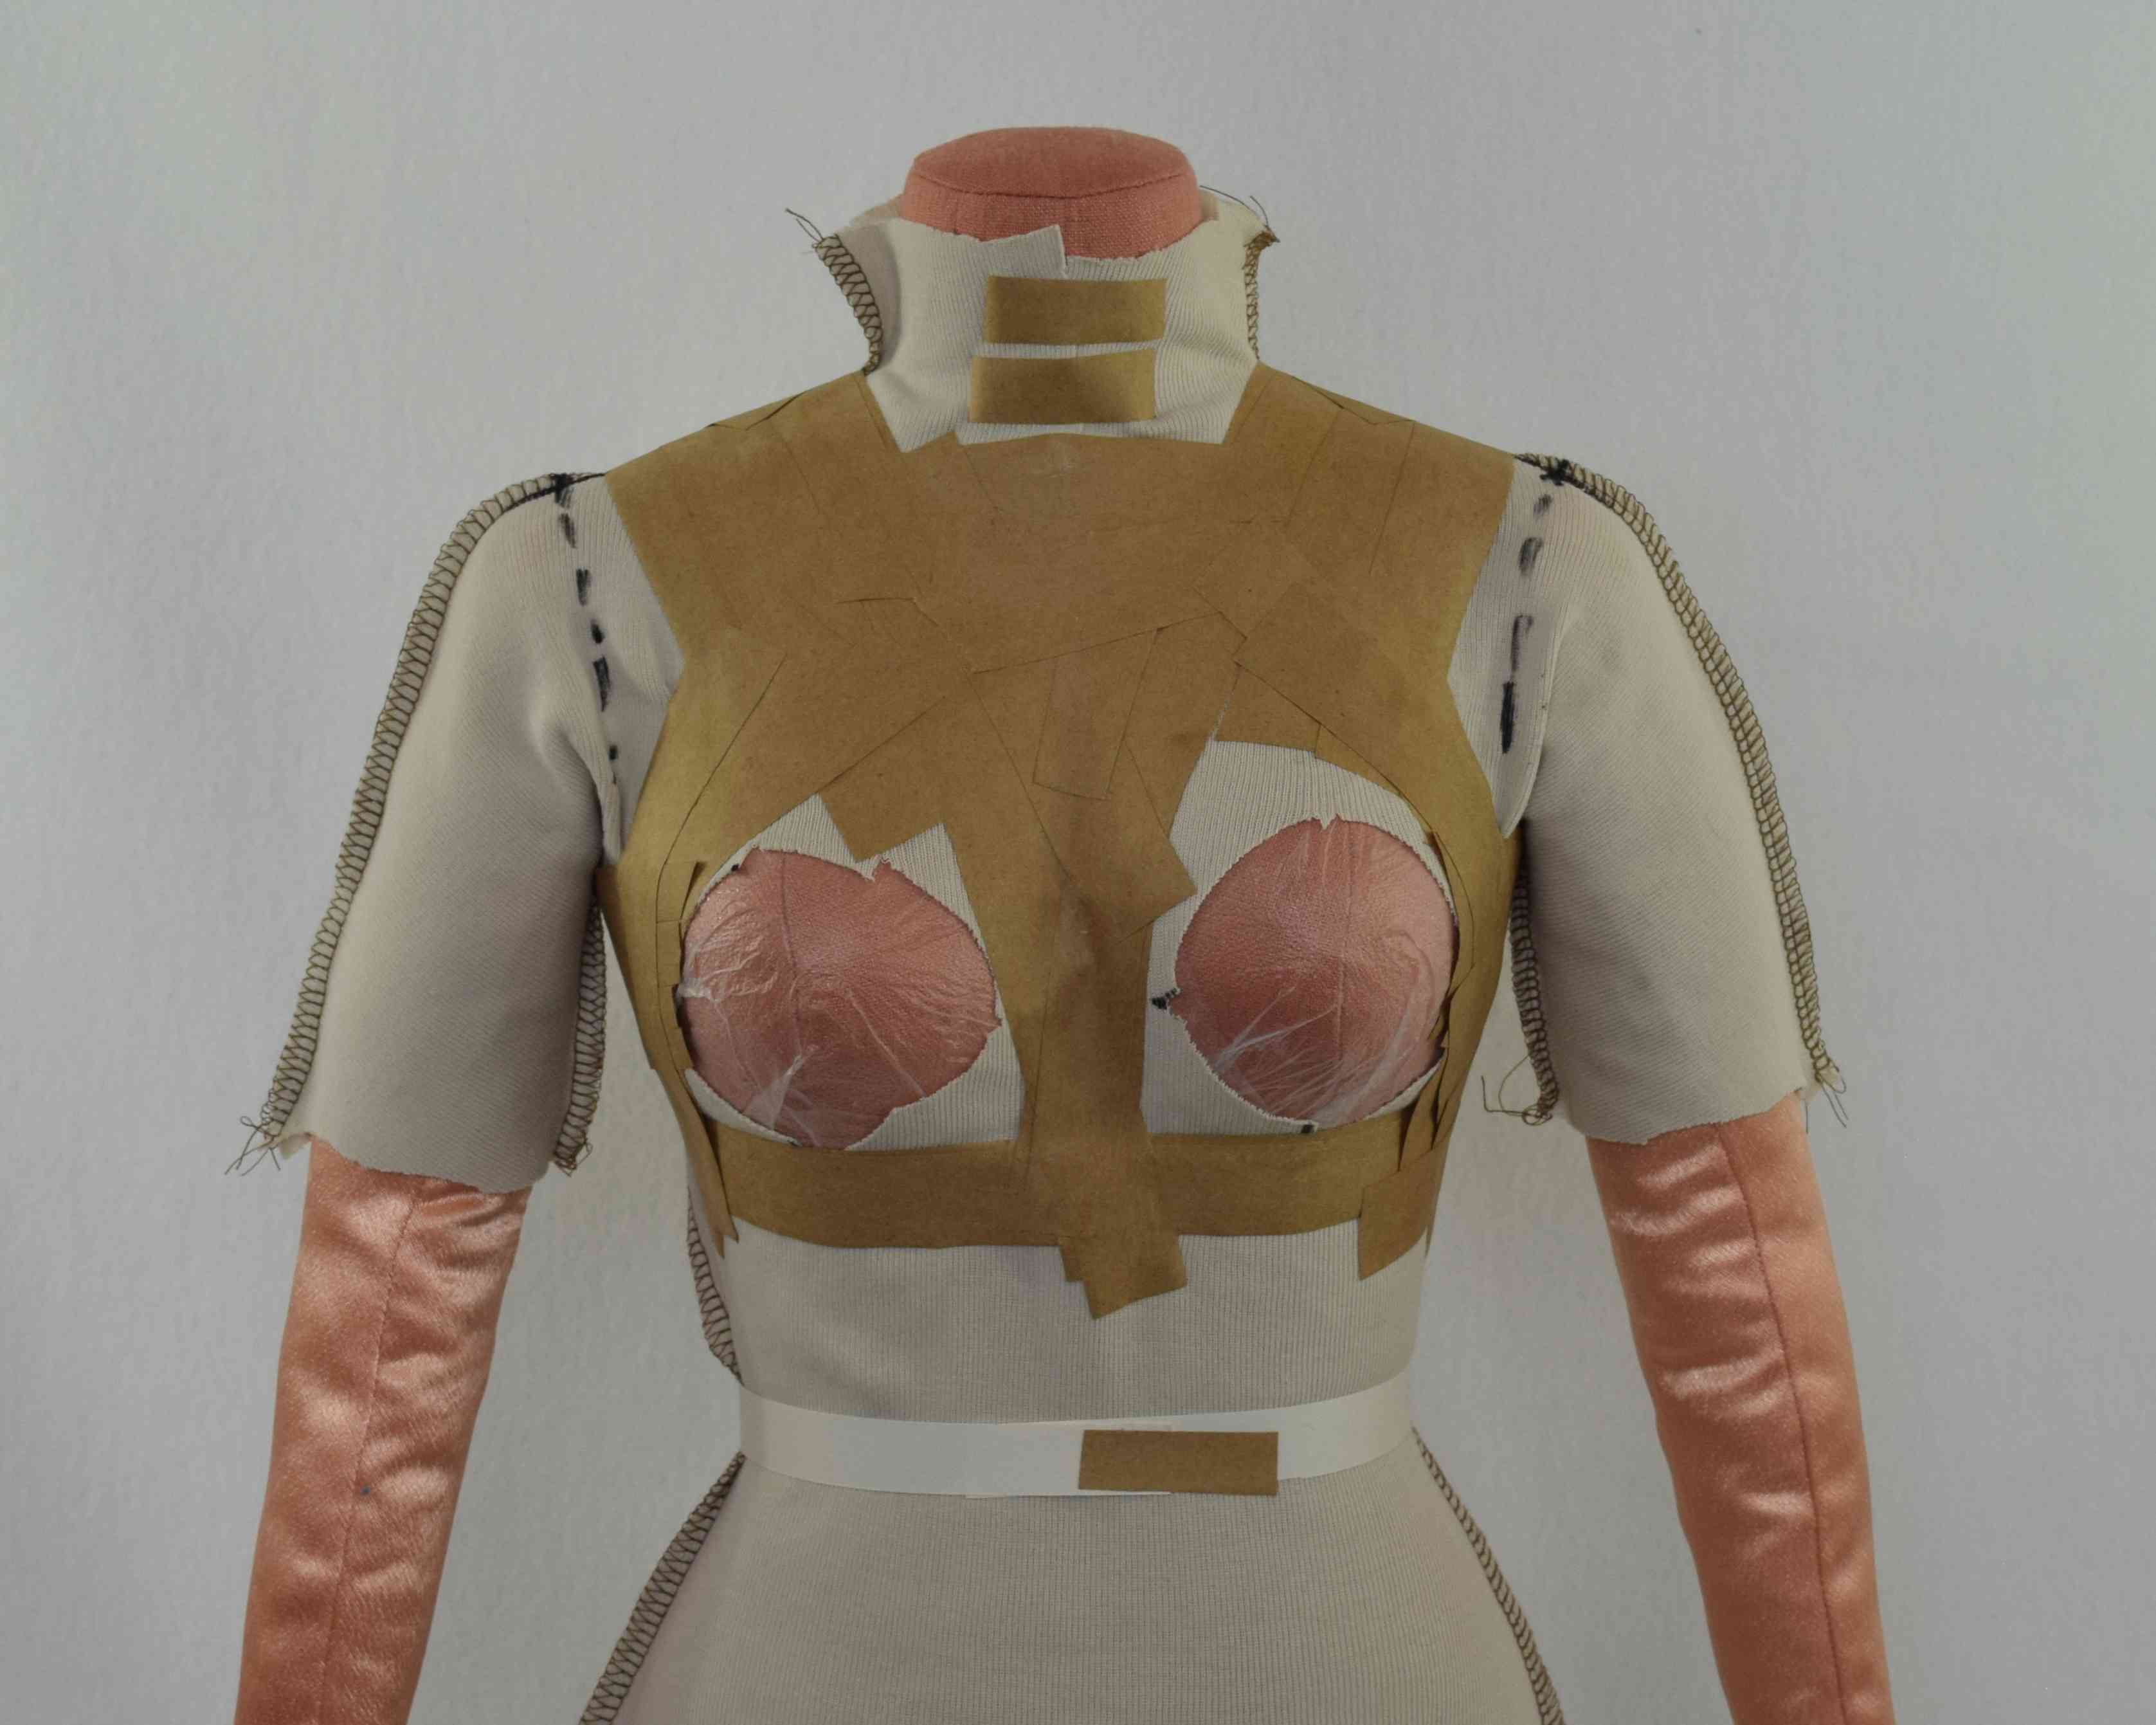
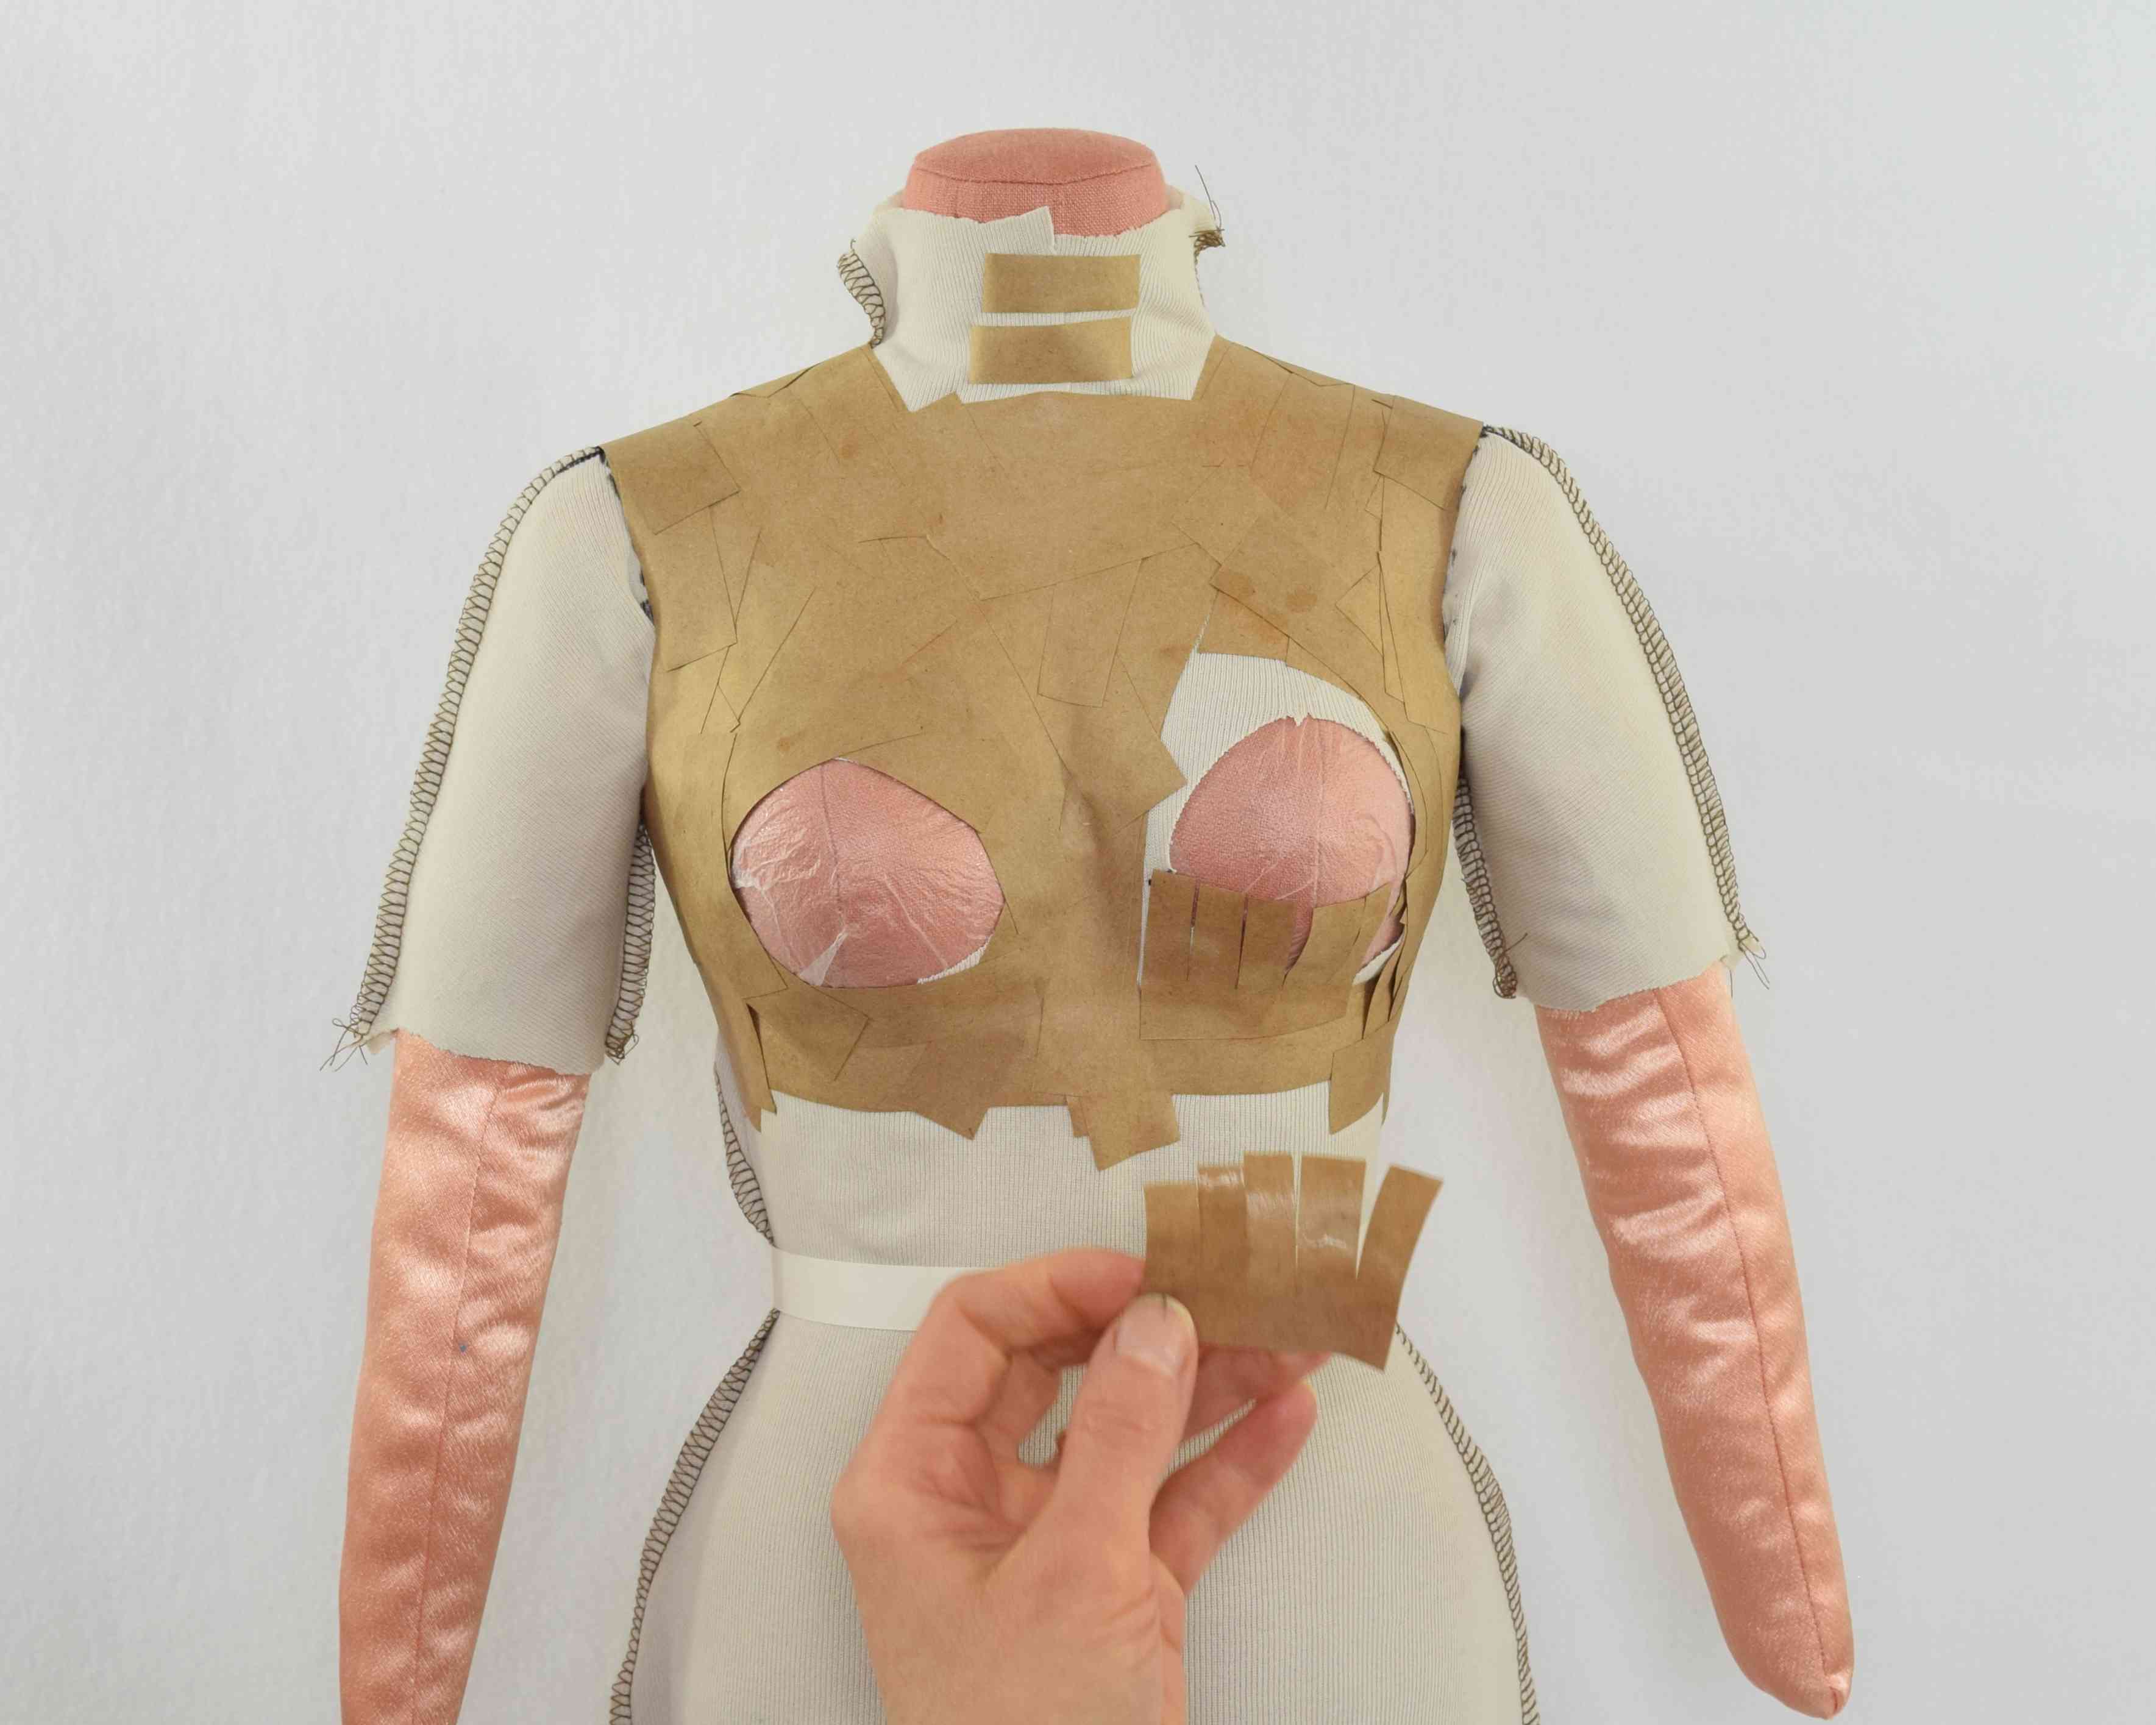
There are a couple of different options for the bust. You may want to simply tape around the edges of the bust as shown on the left (the right breast) in the picture below. After you remove the dress form from the model, you would close up the holes with a piece of cardboard and more paper tape. You would put a foam cup bra on the finished dress form and stuff it to get a smooth, soft bust with the correct measurements. This option would allow you to put different bras on the dress form, so clothing could be sized to fit a specific bra. It can also save time, especially if the model has a large bust. If you are not sure which option you want, tape the bust fully now – you always have the option to perform a double mastectomy on the dress form later.
To tape the bust completely, tape it using pieces of tape cut into a fringe, as shown below. Start taping the bust from the bottom up, with the cut edges of the fringe facing upward. This allows you to quickly cover the curves of the bust without using many small pieces of tape.
Place a narrow piece of tape around the body at hip level, then put some pieces on the front and back in an X, connecting them together at the side seams.

Fill in the rest of the waist and hip area, using diagonally placed pieces of tape. Tape a bit below the level you plan to cut off the dress form at.


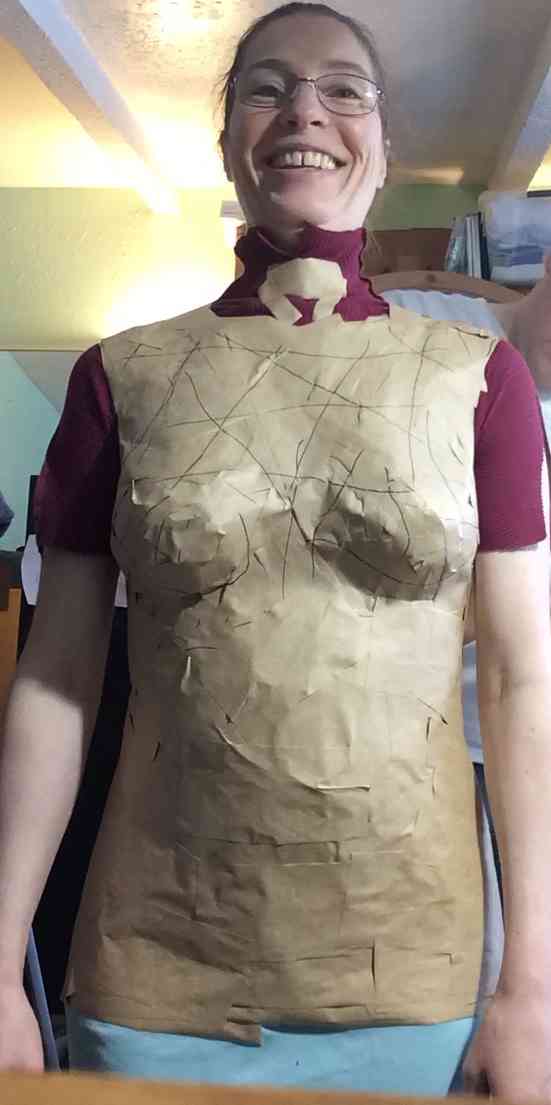
Use a permanent marker to scribble all over the first layer of tape. This will help you cover the next layer evenly, so you don’t have to try to remember where you added the second layer. Try to angle the pieces on the second layer so they cross over the pieces on the first layer. (No, I haven’t forgotten about the neck – don’t tape it yet. The model will be less uncomfortable if you wait as long as possible to tape it.)
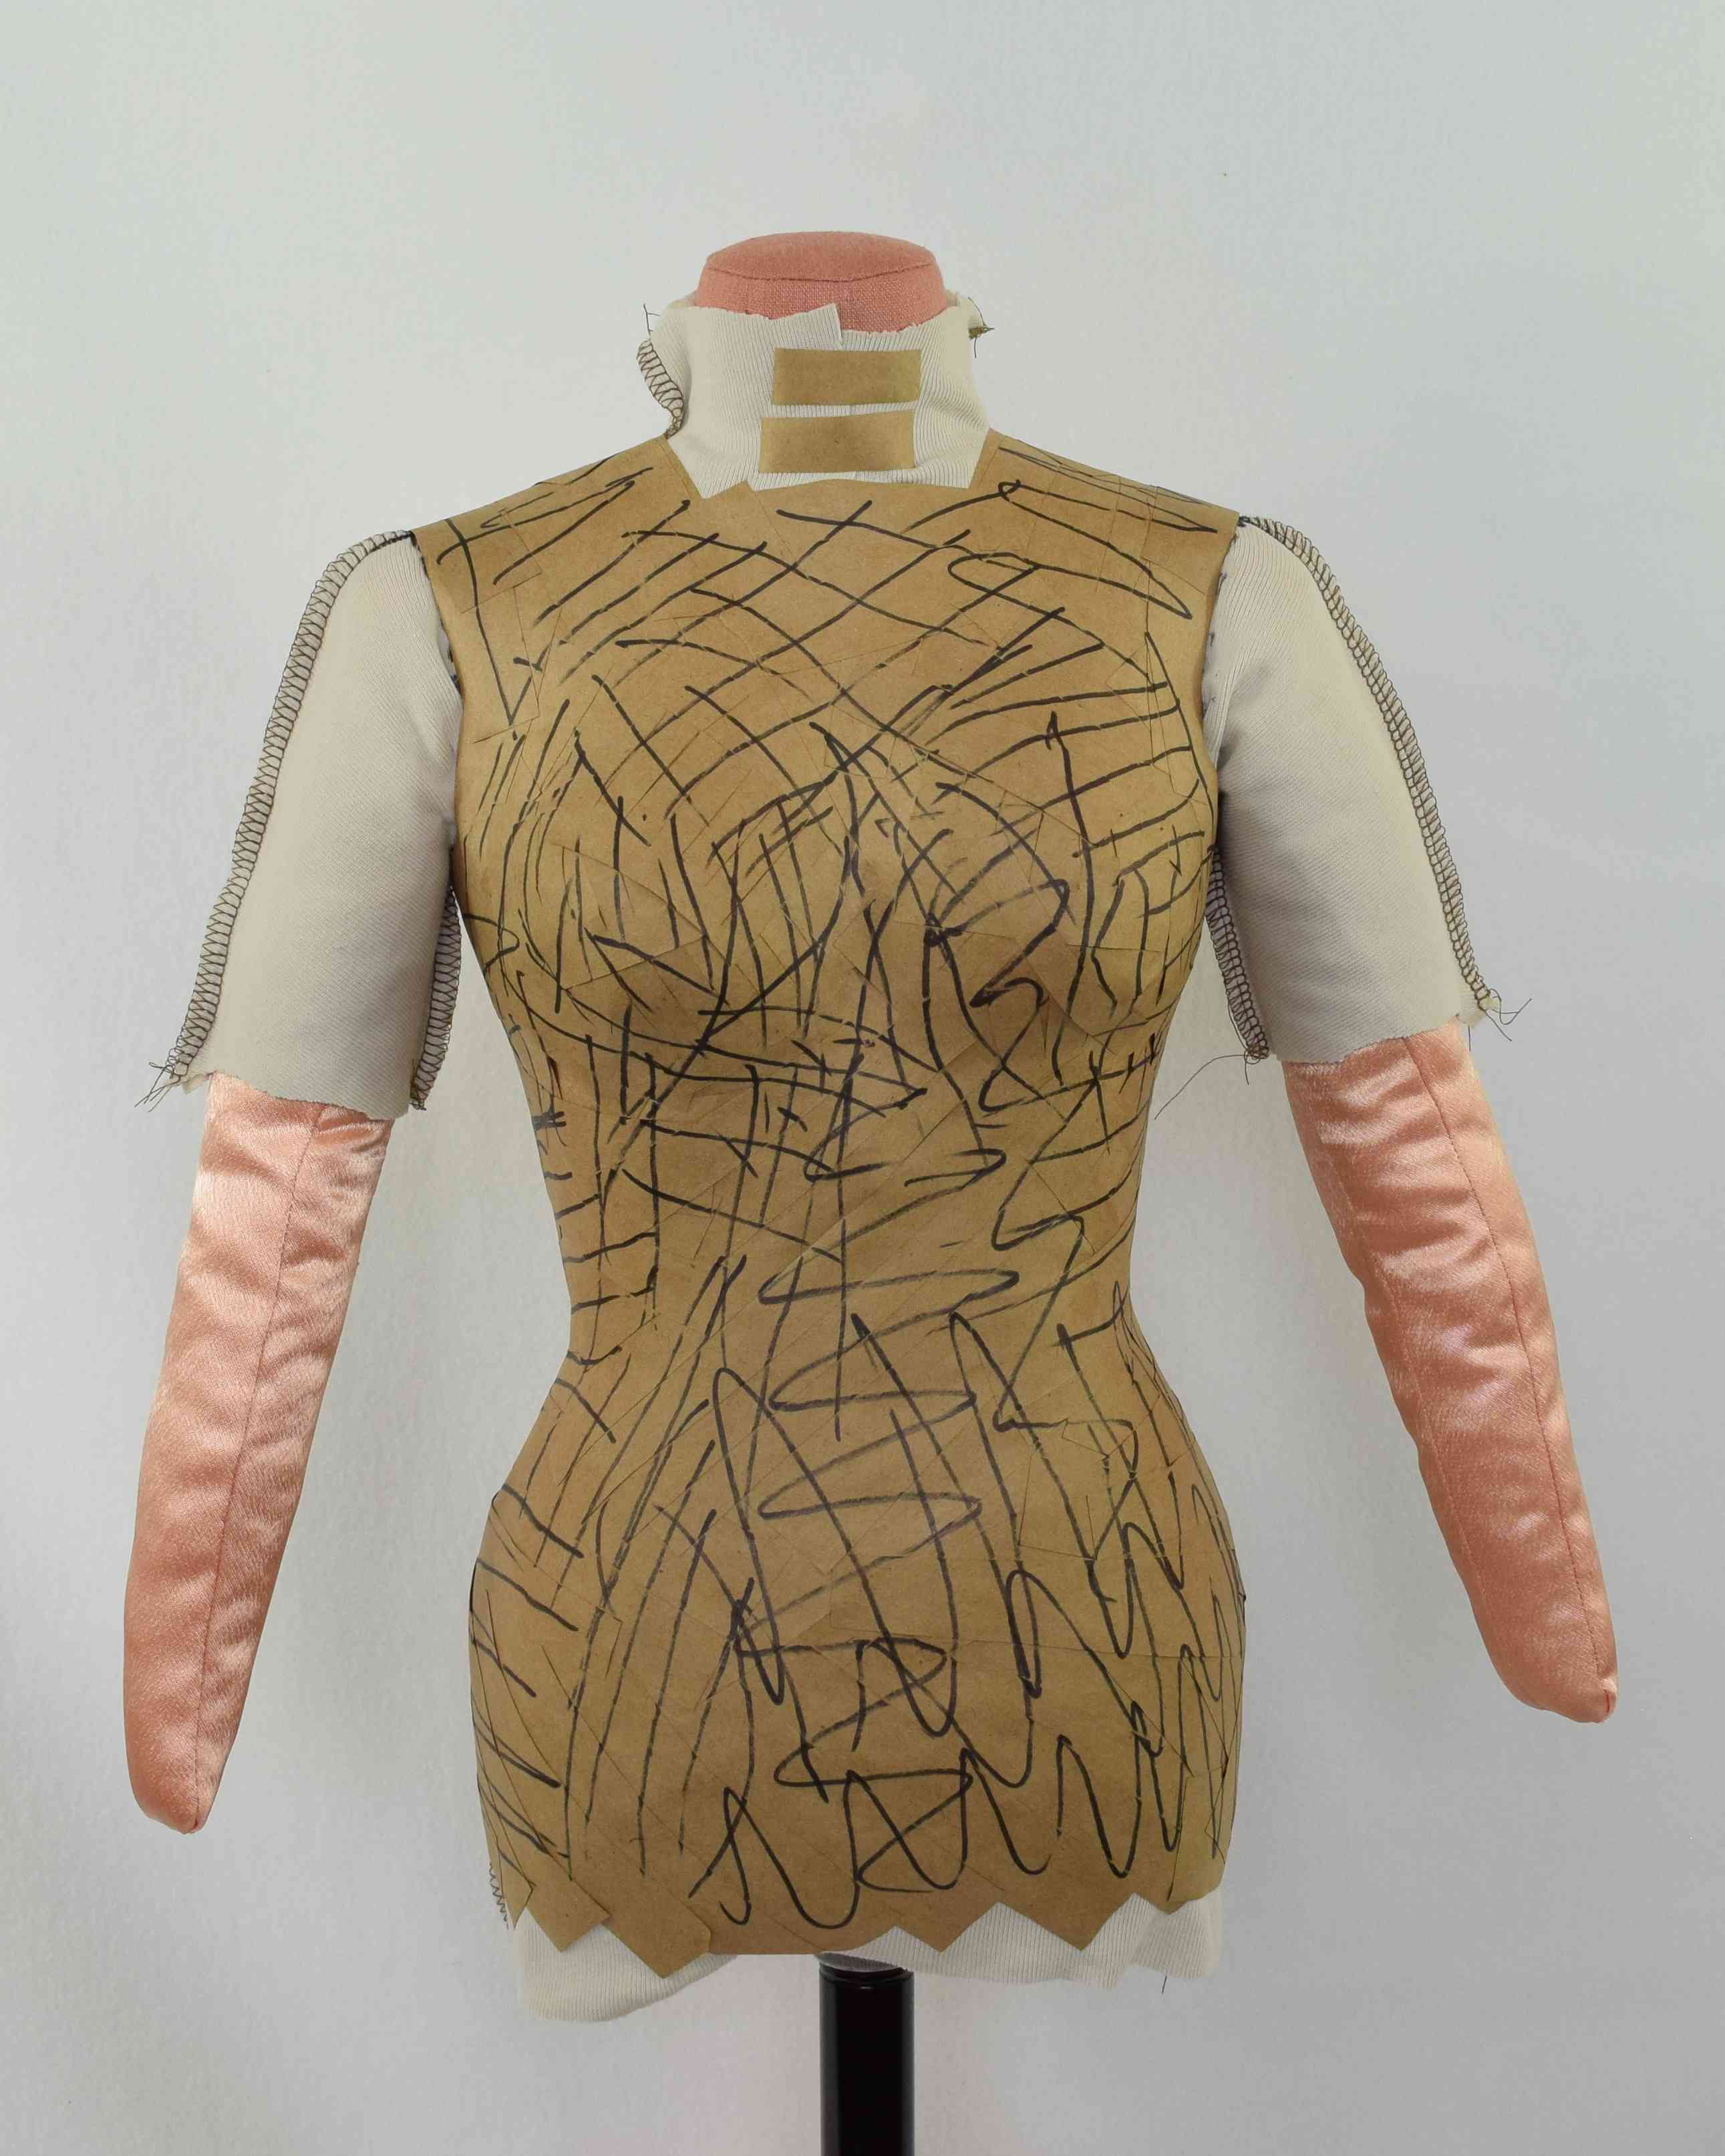
Tape a second layer of tape over the first layer. Add an extra layer around the armholes and around the bottom edge where you will be cutting off the dress form.
If you have done a good job taping, the dress form should feel firm enough to hold its shape after two layers. Tap on it and press on it in various places to see if it feels firm. If it is still fairly flexible, you may need to add a third layer of tape, or it might just need to dry some more. You can use a hair dryer to speed up drying. If only certain areas feel flexible, add another layer in those spots. Don’t add more layers than necessary, or you will have a hard time cutting off the dress form.
*Don’t skip this step – you can’t go back and do it after the dress form is cut off: Use the measurements you took at the beginning to locate the hip, front and back waist, and navel. Use a permanent marker to mark the following on the dress form:
- The shoulder points
- Hip level
- Navel location
- Lower edge of waistband at center front
- Lower edge of waistband at center back
Now we want to mark two level lines – one around the hip, and another below it where you want the lower edge of the dress form to be.
You can’t mark a level line measuring up from the floor with a yardstick, because the shape of the body prevents the yardstick from being able to touch the body when it is held vertically.
Here are two ways you can mark the level lines. A self-leveling laser level is the easiest method and will give you the best level line. Another option is to tape a marking pen to a yardstick and set it up so it is sticking out horizontally. The model needs to carefully rotate, maintaining their posture, while the helper marks the line. Make sure the model is not “helpfully” leaning toward the pen.
The lower level line needs to be very accurate, or the dress form will lean to one side and/or forward or backward. It’s hard to go back after the fact and try to figure out how the dress form should stand to reflect the model’s posture, so take the time to get it marked correctly now.


Finally, let’s tape around the neck. You can either tape only right up to the neckline, or tape all or part of the way up the neck. Be sure to ask the model which they prefer – some people really don’t like having their neck constricted. If you only plan on making an outer paper tape form instead of making another form inside it, only tape up to the neckline, or the neck will end up too large.
If you will only be taping up to the neckline, use a ball chain necklace cut to the right length to help establish the neckline (or if you don’t want to cut your chain, tie a single over hand knot in it at one side of the neck). Mark the neckline with marker, then tape three layers right up to the neckline. Use a hair dryer to dry the tape after each layer.


If you want to tape up the neck, tape the join between the neck and body with pieces of tape cut into a fringe like I showed for the bust, except apply the tape pieces with the fringe pointing downward this time. Tape two or three layers of tape around the neck, drying each layer with a hair dryer before applying the next layer.


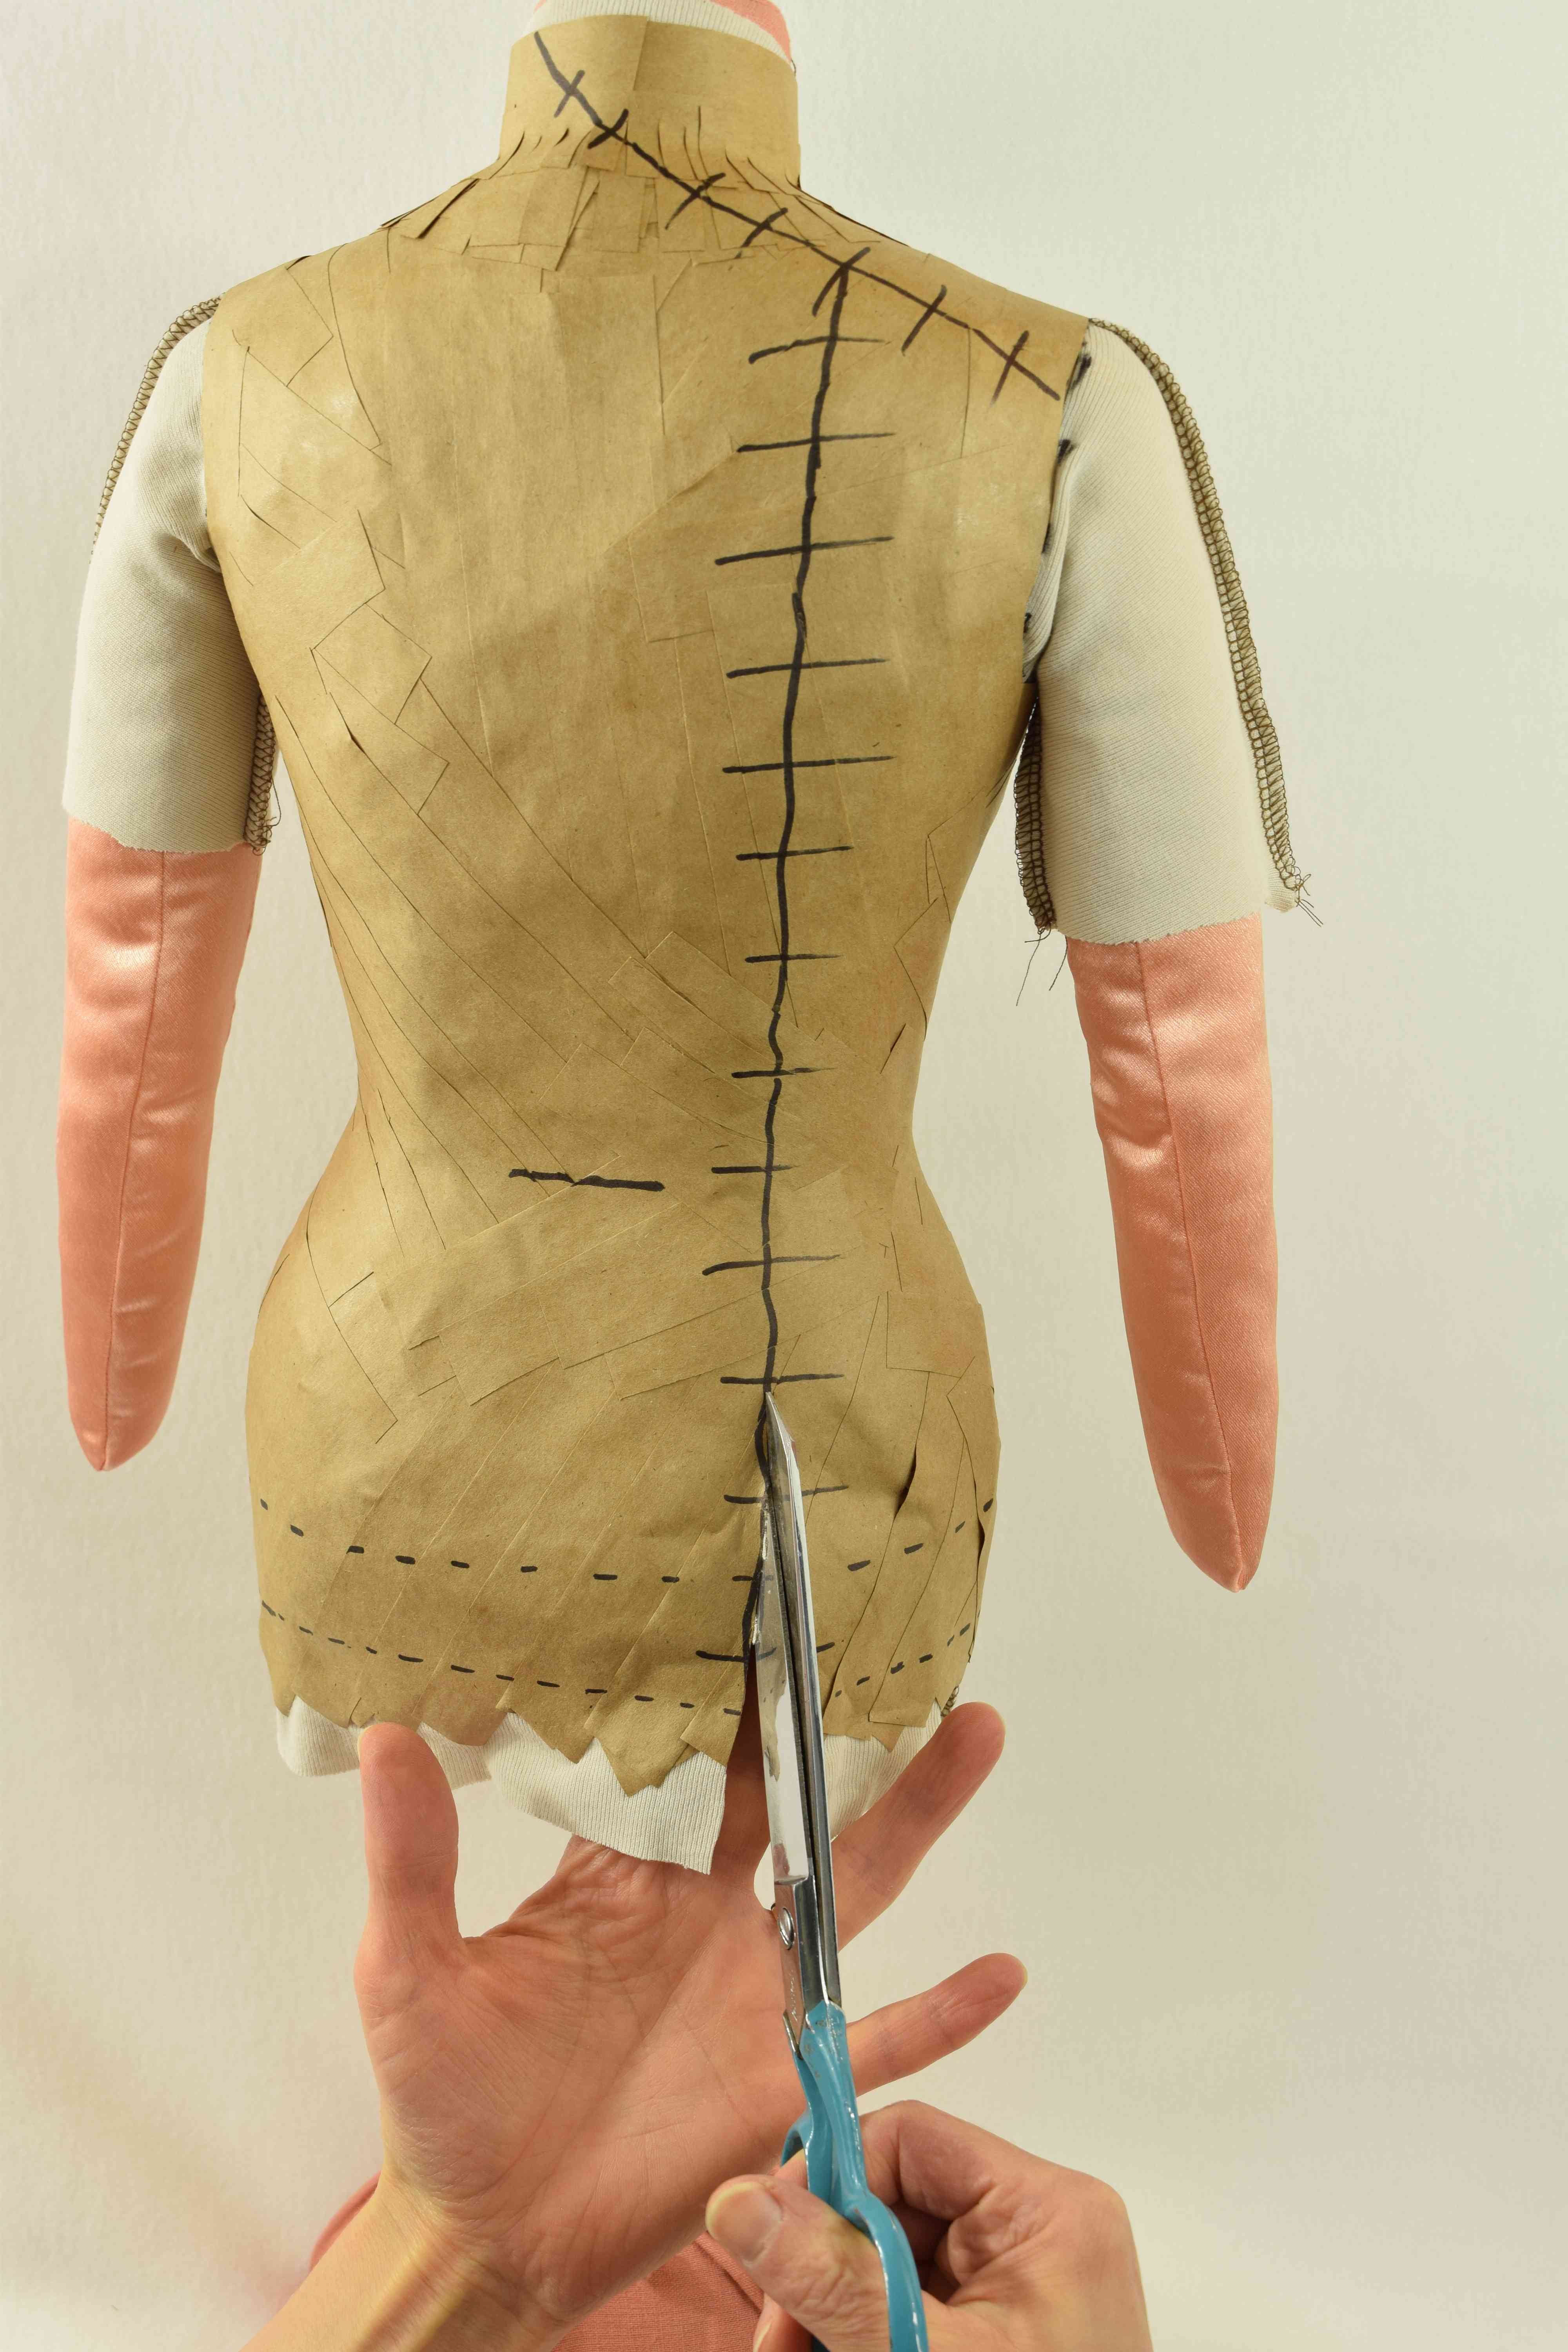
Mark the line(s) where you want to cut the dress form to remove it. Make cross marks on the cutting lines so you can match the edges back up when you tape the cut edges together. You can either cut up the center back or up a back princess line and just below one shoulder from the armhole to the neck. The center back line is a little easier to cut, but you will have to bend the dress form more to get it off if you cut there. It’s easier for the model to get out of the dress form if you use the princess line cut, but it’s a little harder to tape the dress form back together along these lines. I’ve tried both cutting lines, and they both have their advantages and disadvantages, so I’m not sure which I like better.


You need to use large, sharp scissors to cut off the paper tape. When you cut, push your hand up under the dress form under where you are cutting to help make room for the scissors. Feel ahead of where you are cutting to make sure you don’t cut off the model’s undergarments. This gets a bit personal, but it’s better than stabbing the model or cutting off their bra or underwear, right? Tell the model to yell “Ow” immediately at the first hint of pain (now is not the time for them to be stoic), so you can stop cutting before you actually stab them. Cut slowly and carefully.
Start taping the cut edges together immediately after you take off the paper tape form. Don’t even sit there and admire it for a couple of minutes first, or the cut edges will harden into different shapes and will no longer fit together well (ask me how I know). Use a couple of layers of paper tape on the outside of the seam, and a single layer of paper tape on the inside of the seam.
Carefully trim the bottom of the dress form, cutting on the level line that you marked. Trim off excess fabric around the neck and armholes.


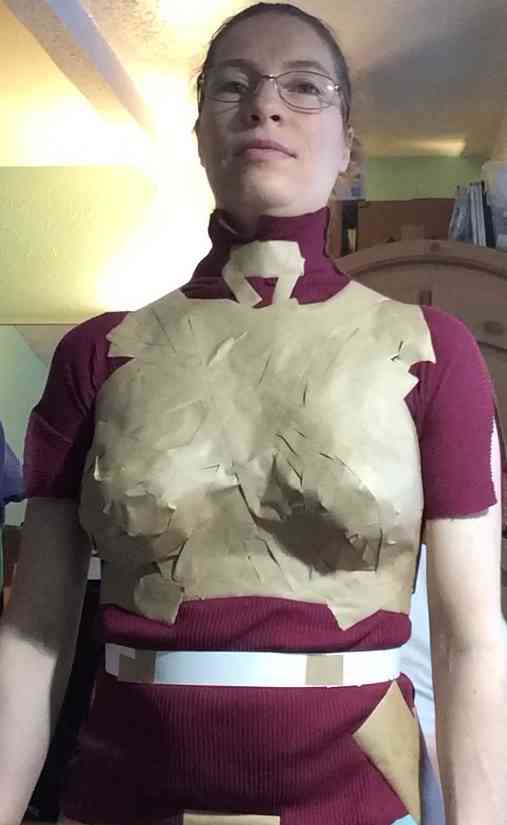
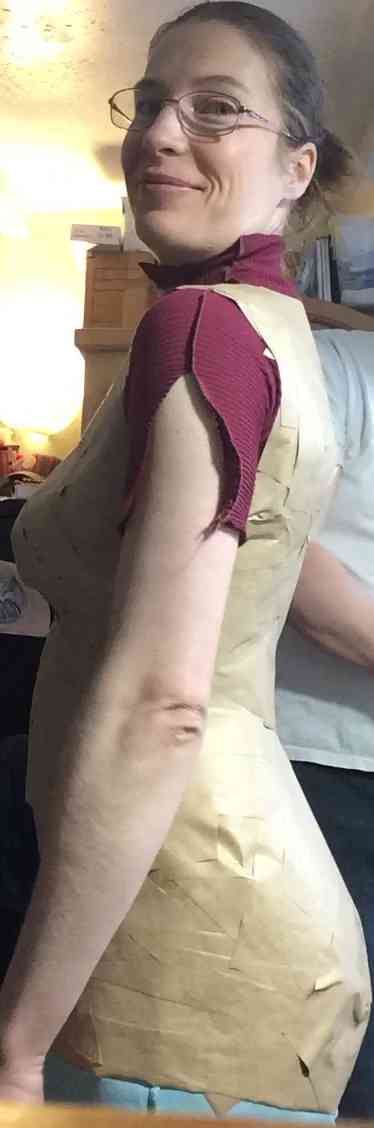
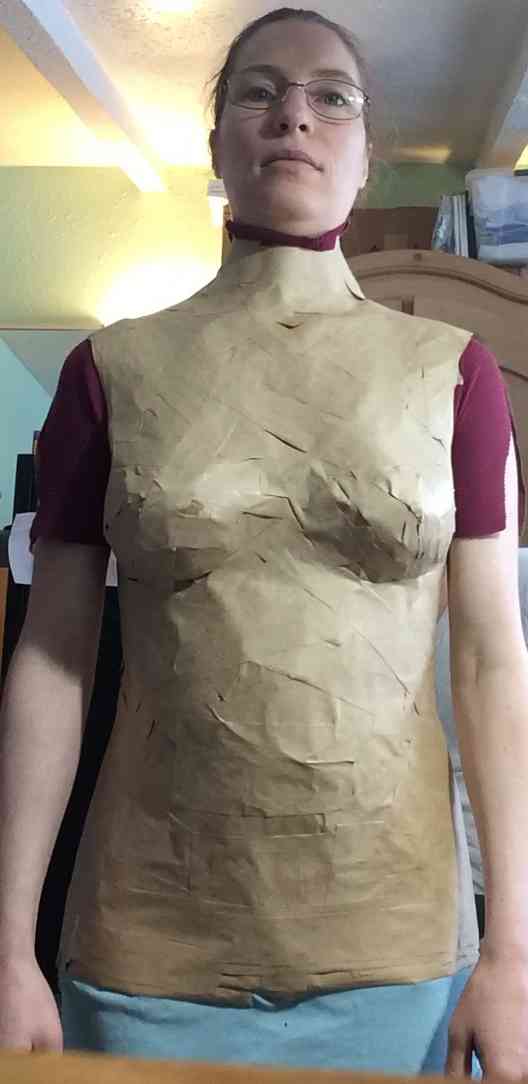
Here are a few pictures of my actual dress form being made:


If you want to use this outer shell as your dress form, which I don’t recommend, add several layers of paper tape to the inside of the form to strengthen it.
A much better idea is to create another paper tape form inside this one, which I will show you how to do in the next post, Part 4: Making the Final Form.
 GrowYourOwnClothes Etsy Shop

Thank you! Now I know why my form didn’t quite work!
LikeLike
hi, just wondering if the form is soft enough to be pinnable?
LikeLike
No, you have to put a cover on it to get something to pin into.
LikeLike
Is there any way to tape yourself even if it’s just the front and you have someone else do your back?
LikeLike