
I tried really hard to convince myself I didn’t need a coverstitch machine. I tried every method I could find to hem, topstitch, bind, and apply elastic to knit fabrics with a regular sewing machine. I wrote lists of pros and cons. I visualized all of the fabric I could buy with that money. Ultimately, I couldn’t stop obsessing about getting a coverstitch machine, so I finally saved up and bought one.
Some of the conventional sewing machine methods I tried actually worked pretty well, though, so before I forget everything I learned, I thought I’d share them. Also take a look at my last post if you need some ideas for preventing skipped stitches while sewing knit fabrics.
There are four main tasks a coverstitch machine is used for on knit fabrics: hemming, topstitching, applying elastic, and binding. Here are some ways to accomplish these tasks with a conventional sewing machine. This is not a comprehensive list, just some of the things I tried.
Hemming
I tried all sorts of methods to hem knits, but this first method is the one I used the most. It produces a strong, comfortable, stretchy hem on just about any knit fabric. From a functional standpoint, it works as well or better than a coverstitched hem; it just takes a little longer and doesn’t look the same. While I didn’t mind the look on my clothes, I thought the zig-zags looked too girly and/or homemade for something I’d sew for my husband or son.
The Amazon product links in this post are affiliate links. If you click on these links and purchase something, I will earn a small commission.
Use a rotary cutter and ruler to cut strips of Sticky Solvy water soluble stabilizer the width of the hem. Peel off the backing and stick down the stabilizer on the wrong side of the fabric close to the edge to be hemmed. If you need to use multiple pieces, overlap them an inch or so on the ends.

If you have a serger, set your differential feed to neutral and serge along the edge with a 3-thread overlock stitch (a 4-thread stitch isn’t stretchy enough), guiding the knife right against the edge of the stabilizer. If you don’t have a serger, trim the fabric even with the edge of the stabilizer. If you think your fabric will ravel (most knits won’t), you can overcast the edge with a zig-zag stitch.
Fold up the hem and press it with a dry iron. Never get steam or moisture on the Sticky Solvy – it will shrink like crazy. Optionally, apply a thin stripe of washable glue stick on the stabilizer, fold the hem in place, then press it dry with your iron. Work on a small section at a time, since the glue dries quickly. The glue holds the hem in place so you don’t need pins, and is especially helpful on thin or stretchy fabric.

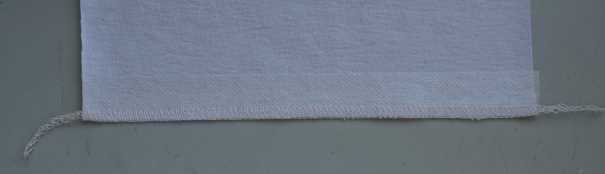
Position the hem wrong side up under the presser foot (but don’t start sewing) and put a hem guide in place. If you don’t have an edge guide for your machine, a stack of Post-it notes with the backing removed makes a great edge guide.
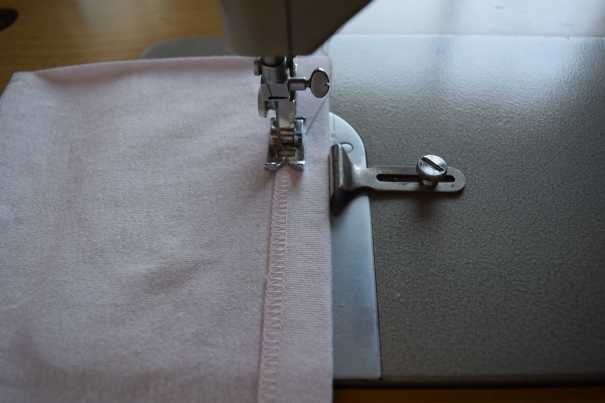
Flip your garment right side up and start sewing. I found a wide, 1.2 mm long 3-step zig-zag produced a strong, stretchy hem. You could also use a regular zig-zag stitch or a twin needle. In the picture below, I tried pinning my hem in place rather than using glue stick, and the top layer of fabric rippled and stretched. If you don’t glue your hem in place, using a walking foot helps keep the layers together.

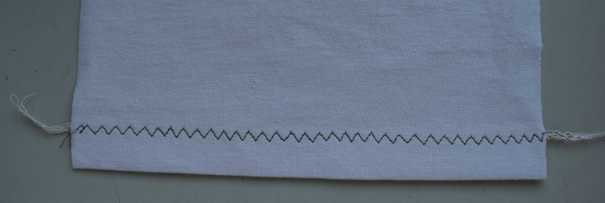
Here’s a 3-step zig-zag hem from the front . . .
. . . and the back. It looks a lot better when you use matching thread!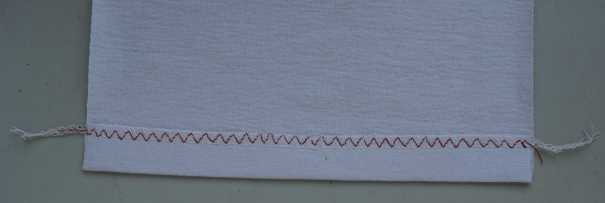
If you use water soluble stabilizer, either soak your garment and rinse it in plain water or put it in your washing machine on the rinse cycle before washing it, or the detergent may react with the PVA stabilizer to make a gooey surprise.
If you just have to have the look of a coverstitched hem, you can use twin needles. Wide twin needles will give you a hem with more stretch, but you’ll have less problems with tunneling using narrow twin needles. Just about every garment I hemmed with twin needles eventually ended up with popped stitches, so twin needles are not my favorite option.

There’s all sorts of conflicting advice on how to use twin needles. Tighten your upper tension, loosen your upper tension, loosen your bobbin tension, use woolly nylon in the bobbin, etc. I found leaving my tension settings at the same settings I use for regular straight stitching worked best.
In order for the stitches to stretch, you have to have some of the upper threads pulled to the back, and the bobbin thread needs to form a zig-zag stitch, so use whatever tension settings produce that result. Stabilizing your fabric can help reduce tunneling (the two rows of stitching pulling together so the fabric forms a ridge).

I tried using hand-wound woolly nylon in the bobbin, but it caused more tunneling and made the bobbin thread more likely to break. The zig-zag formed by the bobbin thread already provides stretch, so I say skip the woolly nylon thread. Although here’s a post from someone who had the opposite results, so maybe I just wound the bobbin too tight? I found it difficult to hand wind the bobbin with even tension.
Other things I’ve tried, with varied results, are starching the fabric before hemming, using a walking foot, Wonder Tape, and fusing knit interfacing to the hem. I’m not a fan of any method that permanently stabilizes the hem, such as using knit interfacing or Steam-a-Seam. If you ask me, the hem on a stretchy garment needs to stretch! I wear my homemade clothes all the time, so they need to be comfortable and durable. I guess a stable hem would be OK on something like a full skirt, where it’s not likely to be stretched.
Wonder tape wash-away double sided tape actually works quite well to both temporarily stabilize your hem and hold it in place while you sew, and many people swear by it. I chose not to use it because the cost adds up quickly when you are sewing a lot of knit garments, and it seems to leave a sticky, fibrous residue. Maybe the residue goes away after multiple washings, and even if it doesn’t, it’s probably not hurting anything, but it still bothers me for some reason.
Another option for hemming knits is a stretch blind hem. My machine doesn’t have a stretch blind hem stitch, so I sewed a blind hem on some velour using the 3-step zig-zag stitch, and it worked quite well.
Topstitching
I have to admit, I never did come up with a great way to topstitch knit garments. Twin needles work pretty well if you can keep your fabric from stretching out too much as you sew. Since you are typically sewing through several thicknesses of fabric when you topstitch, there is more stretch in the twin needle stitching, and the threads are less likely to break than when twin needles are used on a hem. The previous stitching on the seam and multiple layers of fabric also help stabilize the seam so it’s less likely to stretch in the first place.
I’ve tried starching the seam before topstitching, but if you starch too much, the fabric threads end up getting cut by the needles since they can’t slide out of the way of a ball-point needle, and you get holes in your fabric.
Once, even when I was using a walking foot, my fabric stretched out so much I had to put strips of Sticky Solvy on the underside of the fabric. The Sticky Solvy kept unsticking and the whole thing was just a mess, but I eventually got my seams topstitched, and they mostly looked OK.
I’m just going to refer you to this twin-needle topstitching tutorial, and I hope you have better luck than I did.
Applying Elastic
Elastic is often sewn directly to a garment with a coverstitch, such as on a waistband or lingerie. The conventional sewing machine alternative is a no-brainer – just use a zig-zag stitch instead. Here is a good tutorial for applying lingerie elastic. When applying wide waistband elastic, I like to use two parallel rows of zig-zag stitching, then trim the extra fabric away.
Some people apply elastic with a twin needle, but I think the threads are less likely to break if you use a zig-zag stitch. If you stretch both the elastic and fabric as you sew, the twin needle threads won’t break later, but the stitches will look loose and uneven on the right side.
Binding
Knit bindings are applied commercially with binding attachments used with coverstitch machines. There are many tutorials out there for different methods of attaching knit bindings with your sewing machine. Here are a few:
How to bind knit edges: the ultimate guide
How to sew knit binding in the round
But that’s not what I want to talk about. Because I’ve discovered something really cool. You can use a coverstitch binder with your regular sewing machine! And unlike the bias tape binder you may have for your sewing machine, the industrial coverstitch binders work really well. Once you know what you’re doing, anyway.
There is a pretty steep learning curve for using a binder, but they are so worth it if you do a lot of binding. If you are considering getting one, the first thing you need to do is go and read everything Debbie Cook has to say about coverstitch binders:
The Difference Between A & B Style Binders
I got the idea of using a coverstitch binder on my sewing machine after reading Sewing with Knits by Connie Long. There is a page in the book discussing using binders on knits, with a picture of a Bernina binder. The Bernina binder says it’s for unfolded bias tape, and the tape guide comes in at a 45 degree angle to the presser foot, not a 90 degree angle like coverstitch binders designed for knits, but apparently it works for knits, too. I don’t have a Bernina sewing machine, and I thought, huh, that binder looks a little bit like a coverstitch binder. Maybe I could just tape a coverstitch binder to my sewing machine? The generic coverstitch binders don’t cost all that much, so I thought it was worth a try, and if it didn’t work, I could use the binder on a coverstitch machine if I ever got one.
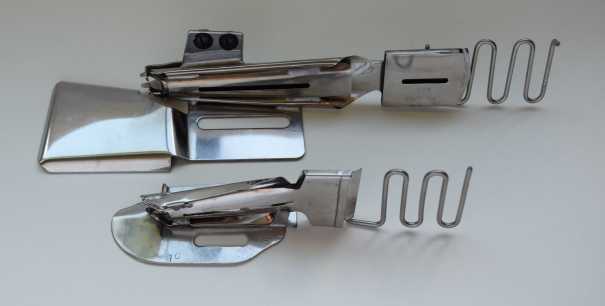
The binder in the front in the photo below was the first one I got. It is smaller than typical coverstitch binders and the description said it could be used on both home sewing machines and coverstitch machines. When I bought it, there were several sizes available, but as of now there are only 12 mm finish size binders left. I contacted the ebay seller, and they didn’t plan to restock these. You can’t adjust the fold guides on this binder, so you are probably better off with a regular coverstitch binder anyway.
The binder in the back in the photo below is a double fold coverstitch binder I bought on ebay. If you buy a binder, make sure you get one that attaches to the machine bed. If the description says “post mount” that is NOT the kind you want.
 The smaller binder has a slot on the back that is supposed to be where it attaches with screws into the seam guide holes on the sewing machine bed. I found it works way better positioned further forward, so I attach it with painter’s masking tape, which keeps it quite securely in place. Don’t worry if you don’t have screw holes on your machine bed – you won’t be using them anyway.
To be able to put a binder on your sewing machine, you’ll either need a flat-bed sewing machine or a free arm sewing machine with a flat extension table. If you don’t have a flat area in front of the sewing machine foot, you won’t have room to hold the binder in place.
Below you can see how I positioned the smaller binder on my sewing machine:
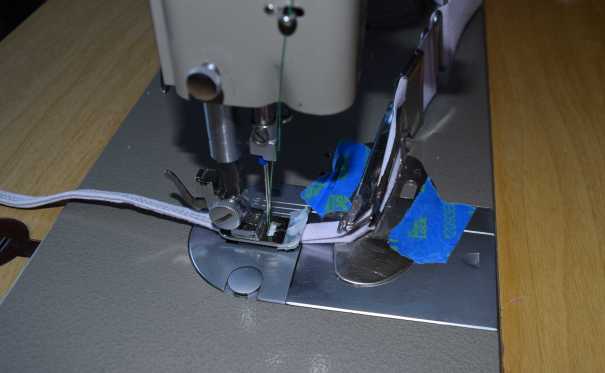
I tried just about every sewing machine foot in my vast collection, and none of them worked well with the binder, but I figured out that I could easily “modify” my standard presser foot to work better with the binder. I just wrapped a piece of tape over the front of the foot:
Here’s a picture of the small binder in use. I just happen to have a spool pin on my sewing machine bed in the right place to set a spool wrapped with the fabric strip on it. It really helps to not have to constantly adjust the strip of fabric as it goes into the binder – you can just keep your attention on feeding in the fabric that is being bound.

Below is the larger binder in use. It was too big for my machine bed, so I angled the right end out a bit, and it still works fine. The serpentine guide on the end can also be folded out of the way if necessary.

You can use a twin needle or zig-zag stitch to attach the binding. I haven’t had problems with threads breaking when using twin needles on bindings – just like when you use twin needles for topstitching, the extra thickness of the binding gives the stitches more stretch. A straight stitch might even work OK with fairly stable knit fabric.

Twin needle binding – front
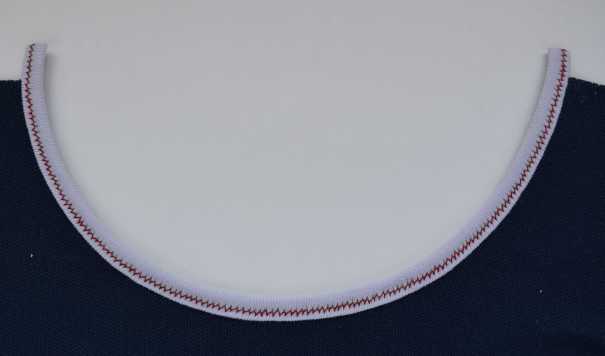
Twin needle binding – back
Binders won’t work with fabric strips made from thick fabric. Thin or stretchy knit fabric may need to be stabilized with starch or spray stabilizer before you cut out the strips.
When you get your binder, you will need to adjust the position of the fold guides. With mine, the fabric was bunching up and not folding right, and I realized that both guides needed to be adjusted out further to give the fabric more room. After that adjustment it worked perfectly.
Using a binder does take a bit of practice. Don’t expect perfect results at first. I cut up an old t-shirt, cut the bottom half into strips, and practiced binding the neckline over and over. I just kept cutting off the previous binding and trying again. Here are a few more binder tips that might help.
 GrowYourOwnClothes Etsy Shop

I think you have covered everything – very informative! I love that binder foot. I haven’t seen one like that before. Thank you!
LikeLike
[…] Coverstitch Alternatives | Grow Your Own Clothes How to Hem Leggings: Aila Sew-Along – The Last Stitch […]
LikeLike
[…] Coverstitch Alternatives | Grow Your Own Clothes What are your favorite tricks to keep knits from stretching when you … […]
LikeLike
[…] Coverstitch Alternatives | Grow Your Own Clothes binding [Coverstitching] […]
LikeLike
[…] Coverstitch Alternatives | Grow Your Own Clothes Knit Binders for Coverstitch Machines – the basics – YouTube […]
LikeLike
[…] Coverstitch Alternatives | Grow Your Own Clothes The Last Stitch – YouTube […]
LikeLike
[…] Use shirring elastic in the bobbin for better results (Source). […]
LikeLike