
I finally did it! I made myself some bras! For the first time in my life, I have bras that ACTUALLY FIT! They provide good support and they are pretty comfortable.


Ready-to-wear underwire bras are not an option for me – the wires are too narrow. I was professionally fitted years ago, and although the cup volume was correct on the bra I bought, the wires dug in at both the center and sides. I wore that bra all of one day. I loved the support of an underwire bra, but ouch, I’m just not willing to suffer that much. I’ve been wearing soft cup bras, but it’s hard to find a non-wired bra in my size, so I get them with cups that are too small. My old bras are worn out, I got tired of falling out of my bra when I bent over, they really weren’t providing much support, and the bands cut into my sides, so I decided to give bra-making another try.
I’ve been trying on and off for over a decade to figure out how to make an underwire bra to fit me. I’d make a few bras, get frustrated and quit, then try again in a year or two. I tried making soft cup bras, and that didn’t turn out well either. I made a couple of semi-wearable soft-cup bras, but they didn’t provide much support and weren’t comfortable.
I finally had the time and motivation to make a successful underwire bra. It only took twelve muslins over two months to get the design and fit right. Every time I thought about quitting, I’d just think, what will I do if I quit now? It’s not like I can just go buy a bra, and I don’t want to go bra-less all of the time. I took breaks for a day or two when I needed to, but I made sure not to start any other sewing projects. After about the fifth bra, I entered a sort of zen state and I stopped being impatient with the process. There’s nothing like bra fitting to teach you patience.
I thought I’d “artfully” drape all of the bra muslins over my dressform and take a picture. When I had all of the bras on the dressform, I had to laugh. Yes, there is a dressform under there somewhere!

I learned a lot and I want to document what I learned, but I just want to be done with bras for a while, so I’m going to jumble a bunch of stuff together into one long post. I’ve gotten some really good tips from other bloggers, so maybe something here will help you if you are making bras.
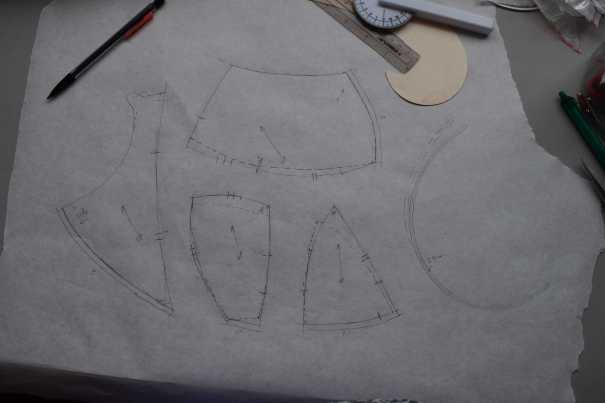
I looked at available bra patterns, and I almost bought the Pin-Up Girls Shelley pattern, but then I remembered what a nightmare it was the last time I used a commercial pattern. Not only are my breasts atypical in shape, but I have a flared rib cage and narrow bridge, so I knew I would have to significantly alter every single pattern piece. I decided it would be less frustrating to just make my own pattern. I briefly considered drafting a pattern from measurements, but I’ve had bad results drafting anything from measurements, so I decided to essentially drape a bra pattern over my old bra.
The first step, whether you are using a pattern or making your own, is to choose an underwire. I had a really hard time finding the right size and type of underwire. It’s not as simple as just holding up a wire to your breast. The wires flex wider when they are in a bra, and the wire gauge; underwire diameter, length, and width; tightness of the bra band; bra style; etc., all determine how much the wire flexes. The frame (and possibly cup) have to be adjusted to fit the flexed wire shape, so it’s an iterative process. I started out assuming the wire sprung out the recommended 1.5 cm. After making a bra, I bent a flexible ruler around my wire line while wearing a bra, and discovered the wire was actually flexing 2 cm, so I adjusted the pattern to match that shape.
The other reason I had a hard time picking a wire size is that I can’t tell where the sides of my breast tissue is visually. My breasts look like they gradually blend into my underarms. There is a definite edge to the tissue there somewhere; I just can’t see it. After wearing wires that are too narrow for a couple of hours, they started to hurt on the sides, so I kept going up a size until they didn’t hurt.
When I finally got the right wire size, all sorts of fit and comfort problems went away. The wires stayed in the right place instead of getting pushed downward. I’d been having to constantly readjust my bra when I had the wires too small, but now my bra “magically” stays put.
I started out with vertical (aka Bliss) underwires, because I thought they would fit my narrow bridge. They did, but I need really wide wires, which means they have to bend around the sides of my rib cage, so I eventually switched to the flexible Flex-Lite wires, which ended up fitting my bridge fine, too.
Flex-Lite wires are thin gauge spring steel wires with a plastic coating. I was really confused about them, since I couldn’t find adequate descriptions of them online. The description on the BravoBella site implies that they are not steel wires – they are steel, they just have a plastic coating so the edges aren’t so sharp. They will flex to bend around your body, since your rib cage probably isn’t a perfectly flat plane. They are easier to bend than other underwires, but still provide decent support. You just have to treat them gently so they don’t accidentally get bent in the wash or something.
Flex-Lite wires are sold on BravoBella and Sew Sassy, but the two sites label the same size wires with different numbers. Add 6 to the Sew Sassy Flex-Lite sizes to get the BravoBella size. For example, a BravoBella size 54 is the same wire as a Sew Sassy size 48. BravoBella also sells some smaller sizes that Sew Sassy doesn’t carry. I would trust the Sew Sassy sizes more, but go by the wire measurements when choosing a wire, not the bra size listed (and buy a wide range of sizes to try). The sizes listed on the BravoBella site assume you will bend the wires wider or narrower to fit. I don’t think that’s a good idea, and it didn’t work for me. There’s no way I could get two wires to end up the same shape, and I bent them back and forth so many times trying to get the right shape that I was worried the wires were ruined. I never did get the shape quite right, either. I needed the wire to curve more near the ends, but the wire wouldn’t bend there. Instead of bending the wires to shape, I’d suggest selecting the size with the right diameter, then shortening the wires as needed like you would any other wire.
Here’s how I finally found the right size wire. It wasn’t until bra #10 that I figured this out. I put Flex-Lite wires into my current bra muslin, bent the wires until they felt right when I was wearing it, then held up different sizes of wires to the bra until I found the curve that matched the bent wires. I was surprised at how large of wires I needed to avoid having wires dig into my breast tissue on the sides. I used different size underwires on my left and right sides, and I had to shorten both ends of the wires quite a bit. Short, wide wires don’t provide as good of support, so I made a full coverage bra and kept the wires as long as I could at the center and underarm.
To make the bra pattern, I put larger wires into the bra I still had from getting fitted years ago. It has stretchy seamless, non-padded cups, so it worked well to give me a fairly natural shape to work with. The band was too large, so I sewed tucks in it until it fit right. I also sewed a tuck in the bridge to make it narrower. While wearing the bra, I covered the cups with a combination of Glad Press’n Seal and tape. The Press’n Seal conforms to curves well, but additional tape, especially where there will be seams, keeps the pattern from stretching out when it is removed. I drew seam lines on the tape, then peeled it off and cut apart the pieces. I also traced the bridge and band.


When converting curved shapes to flat patterns, I kept ending up with cups that were too small, so I should have just graded up the pattern pieces right away. It’s easy to pinch out extra to make the cups smaller during fitting, but not so easy to make them larger.
For my first four bras, I tried making a partial band bra. Finally I realized that my wires were too flexible to work in a partial band bra, and I needed to make a full band bra. At least in my size, neither vertical wires nor Flex-Lite wires are rigid enough to make a partial band bra work. I started completely over with a new full band pattern for the fifth bra.
-

- The first four bras
-
- It looked like it fit, but it wouldn’t stay in place and the wires dug in.
I made the second version (starting with bra #5) with non-stretch woven cotton for the lower cups and the powerbar side panel. The grainline on the side panel is vertical, and the two lower cup pieces are cut on the bias. I have a rounded upper cup, so I used two-way stretch knit fabric for the upper cup with the greatest stretch in the horizontal direction.
I started out with an angled seam between the upper cup and lower cup, but the non-stretch lower and side portion of the cups pushed my boobs to the center and gave me a weird bulge on the lower part of the stretchy upper cup. I switched to a horizontal seam, and the shape was much improved. The upper cup to lower cup seam is just above the apex so the woven fabric covers my nipples for a little more modesty – the knit fabric would outline every contour. I actually put the seam there by accident, but it worked out so well I’m pretending I did it on purpose.
I’m extremely sensitive to pressure and I don’t have much fat over my ribs, so I started out with thickly padded underwire channeling. It kept me from feeling wires cutting into my bones, but then the channeling itself was so thick that it made an uncomfortable ridge. I tried putting the wires into channeling sewn onto the outside of the bra, and that made a huge difference in comfort. I put non-padded channeling (really just folded bias tape) made from muslin on the inside to cover the seam allowance and the trimmed band elastic, then I topstitched padded channeling onto the outside for the wires. It looks a little weird, and it’s more work, but it is SO MUCH more comfortable. I don’t think I could tolerate wearing wires otherwise, but now I barely feel them.
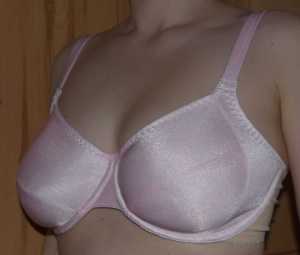
Here’s the first bra that really fit me (bra #12). The wrinkling on the upper cup in the pictures below is not a fit issue. I used nylon tricot for the upper cup lining and stretchier fabric on the outside, so the lining pulled tight before the outside did. I’ll have to remember to make the outer cup a little smaller if I use that combination again. Right now I don’t care about the wrinkles, because THE BRA FITS. I can’t believe I can say that now.


Here’s the last bra I made (bra #13). Now I have two wearable bras. The lower cups on this bra are made from a remnant I had left over from the first dress I sewed as a teenager. There’s definitely a late 1980s look to that print. I think I’m going to have to make some bras with larger cups to account for monthly size fluctuations. The one below is pretty snug at the moment, but I can still wear it.


Here are some other random things I learned:
- The only thing I learned from my second bra is that nylon tricot shrinks! A lot! I couldn’t even assess the fit of the bra, because I washed it to get glue out before wearing it and it shrunk at least a cup size. I drew a square on a piece of tricot, washed it on warm and dried it on low heat, then checked the size of the square. It took two wash and dry cycles to finish shrinking, and it shrunk 7% in each direction. Even the polyester fabric I was using to line the tricot shrunk 2%, so I’m going to pre-wash all of my fabric from now on, regardless of fiber content. Anything that shrinks a lot I will pre-wash twice. Even a tiny bit of shrinkage affects the fit of a bra. Lesson learned the hard way.
- Nylon tricot stretches out significantly when wet. I used it for the upper cup on my final versions, but I wouldn’t want to rely on it for support on the lower cup. Imagine a miserable hot summer day, you start to perspire, and then your boobs sag.
- Elmer’s washable school glue works well to stabilize nylon tricot and stop it from curling when cut. I mixed a teaspoon of glue in a cup of water, then sprayed it on the fabric. I dried it with a hair dryer, then ironed it. It’s much cheaper than the spray stabilizer you can buy, and works great.
- I made non-stretch bra straps, but didn’t interface them. They stretched out. Duh.
- Non-stretch bra straps with a section of adjustable elastic at the back provide good support, reduce bounce, and hold the bra in place while still allowing you to raise your shoulders. I make my straps adjustable, since I notice even a tiny difference in tension, and I like them to feel just right.
- My sewing machine tries to eat my fabric when I start a seam on knit fabrics or lightweight wovens. To keep my fabric from getting chewed up, I start sewing on a scrap of paper, then place the fabric over the paper so there is paper under the first half-inch or so of the seam. The paper tears right off. It only works with straight stitched seams though, unless you want to spend an hour using tweezers to pick bits and pieces of paper out of a zig-zagged seam (AMHIK).
- I tried stretching unmeasured plush elastic by eye as I sew like some people recommend, but after practicing on 10 bras in a row, I still had different lengths of elastic on the left and right. Now I pre-measure the underarm and neckline elastic, making it 90% of the length of the fabric edge (measured off the pattern). The band elastic length I determined by trial and error – it ended up just slightly shorter than the back band fabric.
- Full band bras, even those with a narrow band, are much more comfortable and stable than partial band (frameless) bras. With partial band bras, the channeling tends to twist around, and if you don’t have really sturdy underwires, the wires bend outward too much. I’m not sure how to describe the difference, but as soon as I switched to a full band bra, the bra just felt like it was staying firmly in place instead of shifting around and the pressure from the wires was distributed better.
- Firm powernet band fabric keeps the band elastic from digging into you as much. I found that a stretchier band initially felt more comfortable, but then after wearing the bra for a bit I noticed the elastic digging in.
- I started out using what I thought was 1/2″ elastic on the lower band. It stretched out and stayed stretched out. I finally measured it and discovered it was actually 3/8″ elastic with 1/8″ scallops. It works fine for the upper band and cup edges, fortunately, so I don’t have to waste that pretty elastic.
Next I went completely the other direction and tried some 1″ plush band elastic from my stash (purchased a while ago from Sew Sassy), and it was too firm (it went from too loose on one bra hook to rib-cracking tight on the next – my rib muscles are still sore from wearing that bra for a day or two). The 1″ elastic still stretched out a bit after an hour or two of wear.
Then I bought good quality 3/4″ elastic from ArteCrafts on Etsy. It worked well, and it was so much softer and more comfortable than the low quality stuff that pills up and gets scratchy after you wash it. It is fairly firm, so I have to get the length exactly right, but it gives good support. Even a 1/4″ difference in length takes the band from too tight to just right on my short band. I think I’ll stick to ordering my band elastic from ArteCrafts. It’s hard to judge the quality of elastic from a picture, and quality varies so much from seller to seller. Low quality elastic really doesn’t work for the band. You can get away with cheap elastic on the upper edges, but not the band.
I’m still not used to wearing a firm bra band, but I’m hoping my rib muscles will strengthen and I’ll adjust. Narrower elastic is stretchier, but I’m afraid narrow elastic will cut into me more and also have poor recovery. If I can’t get used to the 3/4″ elastic, I might try two parallel rows of 1/2″ elastic, or 1/2″ elastic on the bottom with 3/8″ elastic above it.
So, that’s what I’ve been up to for the last couple of months. I’m definitely ready to sew some other things now!
 GrowYourOwnClothes Etsy Shop

Amazing result from a lot of perseverance! Congrats!! And thanks for all the tips too!
LikeLike
That’s awesome!! Well done!!!!!
LikeLike
That’s awesome! So glad you could share some of this knowledge with us.
LikeLike
You have the patience of a saint! I probably would have given up after no 3! Well done anyway, amazing job!
LikeLike
I’m thoroughly impressed – and very happy to see the bras modeled! I get frustrated by bra-sewing posts with just a picture of a bra lying on a table. But I wonder, why do you have to use underwire? I have such dislike for those, I always remove them. Self made bras should be easy to make without underwires?
LikeLike
The underwires provide more lift and shaping without putting the weight on the straps. I did try one of my bras on without wires, and it fit surprisingly well, but didn’t provide nearly as much support, and there was a lot of weight on the shoulder straps. The pattern wouldn’t need too much alteration – I think I would just have to straighten out that curve on the front of the band. If my bust was still smaller and self-supporting like it used to be, non-wired would be fine. I will at some point try making a soft cup version.
LikeLiked by 1 person
Goodness me – this post mirrors so much of my experience and frustrations. Problem is that I can’t bear underwires and I’ve given up on them. I haven’t been able to wear even professionally fitted or off the shelf underwire bras. I was experimenting with no wires but they’ve gone by the board too.
You put me to shame – maybe I’ll try agian.
LikeLike
Using Flex-Lite wires and putting them on the outside of the bra is what finally made the difference for me. I still can’t say they are completely comfortable, but I got tired of looking saggy so I went with underwires. Even though there is enough padding on the wires, they still transfer weight onto my rib cage, so I’m putting pressure where my body isn’t used to it. The firm band is giving me some twinges in my rib muscles too. I’m going to give it at least a month to see how I get used to it. If I can’t I guess I’ll try converting my pattern to soft-cup.
LikeLike
Bra is very good, neckline is nice.
LikeLike
Oh my goodness! You have done some amazing work to get to a fitting, dare I say well fitting bra. I am amazed. I do not have breasts your size…guessing here 🙄. But, I have a few fitting things to perfect and I just get frustrated as you know…so many details go into bra making. I vow to get back on the bra horse and take another ride…soon😉. Thanks for sharing your journey!
LikeLike
[…] here’s an update on the bras I made a couple of years ago. Those bras no longer fit, but I wore the smallest three up until recently anyway. In fact, after […]
LikeLike
You are a Goddess! Thank you for taking the time to teach us what you have learned in such detail. This information is so hard to find and I want you to know that you are truly appreciated ❤
LikeLike