
I’m now voluntarily and gratefully unemployed, my kids are growing out of their clothes, we moved to a smaller house, and I don’t have room for my huge fabric stash. What is this a recipe for? Sewing kids’ clothes! And what do they usually wear? Jeans and T-shirts. I’ve made a couple of T-shirts, and I decided now it was time to tackle jeans. I couldn’t find much in the way of kids’ jeans patterns. They all seem to be skinny jeans, and Kid 1 isn’t exactly skinny. I took a chance and bought the Jagger pattern on Craftsy, hoping I would at least learn something from the instructions. I made these up for Kid 2 as a test. I did learn a couple of things from the instructions, although they were at times vague and confusing – so at least it wasn’t a wasted purchase. I think I have the skills now to make my own pattern by rubbing off and grading up an outgrown pair of classic jeans.


The Amazon product links in this post are affiliate links. If you click on these links and purchase something, I will earn a small commission.
Here are a few tips for sewing jeans or anything else with thick fabric:
- I used to think you couldn’t sew jeans on a regular home sewing machine. You don’t need an industrial machine, you just need a hammer! I learned about this at fashion-incubator, and it has been an invaluable sewing tip. No jeans hemming or sewing should be done without a soft face hammer. Any time you have a thick area where multiple seams meet, give it a few whacks with a hammer before you sew over it. The results are amazing – the sewing machine goes right over the bumps with even stitches, and I sewed a whole pair of jeans without breaking a needle. I rarely even need to use a jean-a-ma-jig or folded scrap of fabric to level the presser foot. You can use a regular hammer, but put a scrap of fabric over your garment first, and be careful not to hit too hard.
- I figured out how to sew on the belt loops with perfect bartacks. I used to completely mangle these. First, make sure the belt loops are extra long so you can fold under extra on the ends. That way you won’t have a lump on the end. You’ll trim the ends after the belt loops are sewn on. I hand basted the belt loops in place, but I’ll try using glue stick next time. Once you have the belt loops basted in place, flatten the ends with a hammer. Fold up two scraps of fabric until they are the same thickness as the belt loops and position one on each side of the belt loop. Then put on a buttonhole foot and center it over the belt loop. Lower your presser foot (It’s easy to forget on thick fabric, since you can’t see that the foot has been lowered). Sew a bartack with closely spaced zig-zag stitches.
-

- Position folded scraps on each side of the belt loop.
-

- Use a buttonhole foot when sewing the bartack.
-
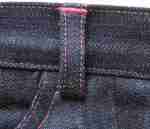
- Finished bartack on belt loop
- Don’t buy jeans zippers from the fabric store. I will never buy one of those again – it was poor quality and did not slide smoothly. Now I save zippers from old jeans. If I run out of those I’ll either use regular plastic coil zippers or order YKK zippers.
- Shorten a metal zipper at the top by pulling out the extra zipper teeth with pliers. There is a trick to this – you have to make sure you only grip the edge of the tooth with the pliers or you will pinch it shut and rip your zipper tape. If you do it right, they pull out pretty easily. I have pictures and instructions for shortening metal zippers at the end of my jeans zipper fly tutorial.
- Use a presser foot with an edge guide to keep your stitches straight when you are edge stitching or top stitching. Use a quarter inch foot when you need to topstitch a second row of stitches, guiding the edge of the foot along the first row of stitches. I bought a very inexpensive set of snap on presser feet that will fit on any short shank machine. They actually seem to be decent quality. My sewing has improved quite a bit since I got these. It is so easy to switch feet, I actually bother to switch to the proper foot. The blind hem foot that comes with this set can be modified to make it into a top stitching foot. The foot comes with a little plastic lip that goes under the edge of the fabric. Here’s what the foot looked like originally. I cut that lip off with a razor knife so I can use the foot for stitching on the edge of interior seams as well as along the edge of the fabric.

Blind hem foot with the lip cut off
- I didn’t bother with topstitching thread on this pair of jeans. I have used it before, though. I don’t use topstitching thread in my bobbin, because I don’t like to change the bobbin tension, and I can never get the stitches on the underside to look good anyway. I just sew the hem from the right side. The main things to remember when using topstitching thread are to use a large needle and increase the upper thread tension until you don’t get loops on the underside of the fabric.
 GrowYourOwnClothes Etsy Shop

[…] had said before that you don’t need an industrial sewing machine to sew jeans. Well, that is only true up to a point. My Singer Fashion Mate 252 did fine on 12 […]
LikeLike
The belt loops tip is so very helpful thank you! In my head, I was thinking of my regular buttonhole foot, and wondering how that would make a difference. I also have a buttonhole foot attachment just like yours and I will definitely try this with my next jeans make! Thanks for sharing! Oh, I’m going to make sure I have my soft mallet out next time too! Visiting via Did You Make That! 🙂
LikeLike
An excellent source for zippers, especially jean zips, is WAWAK.com. Also rivets, topstitching thread, and tack buttons for sewing denim stuff.
LikeLike
Thanks for the tip.
LikeLike
[…] easy to sew. Even so, I picked up some helpful tips from Leila of Grow Your Own Clothes… Grow Your Own Clothes: Sewing Jeans. I used my now TNT Ginger Jeans pattern. And the name, Blue Gingers? Well…obviously […]
LikeLike