
I’ve tried various methods for calculating the length of knit neckbands. I did not get good results with the methods I used. First I looked for neckband calculations online, and then when I realized different people gave different advice, I started looking in patternmaking books, and found . . . the same varying advice. I hate trying to unpick a serged seam in knit fabrics, especially around a curved neckline, so I really wanted to get my neckbands right the first time.
The methods for calculating neckband lengths that I found online and in books are just approximations, and they don’t work for the full range of band widths and neckline lengths, but the other problem is that each fabric needs a different band length to account for how much it stays stretched out after you pull the garment over your head. This recovery factor varies a lot from fabric to fabric.
As home sewers, it’s difficult to find a rib knit fabric that matches or coordinates with the main garment fabric, so we usually make knit neckbands from the same fabric as the rest of the garment. Rib knits, which have a lot of stretch and require very little force to stretch, are the perfect fabric for knit neckbands, but you can get pretty good results with less than ideal fabric if you stick to using narrower neckband widths (the less stretch your fabric has, the narrower the neckband has be to get it to lie flat). Knit fabrics with a spandex content, even ribbing, are also not ideal fabrics for neckbands, so stick to narrower neckbands when using spandex fabric, too. When you are using less than ideal fabric for a neckband you really need to get it exactly the right length.
I dusted off the corner of my brain that holds my high school algebra, geometry, and trigonometry and I figured out how to get knit neckbands the right length every time, for any fabric, and any neckband width or neckline length. The neckband length also needs to be adjusted for your particular fabric, though. You should always make your own neckband pattern rather than using the one that came with a pattern. Who knows what the patternmaker did to draft it anyway.
If you just cringed when I mentioned algebra, geometry, and trigonometry, don’t worry, you can actually figure out the perfect length for your knit neckband without doing any math at all! First I’ll show you the “no math” method, then I’ll show you how you can measure and calculate the perfect neckband length. Finally, since I’m going so far as to state that all of the published patternmaking and sewing books I’ve read are wrong on this subject, I’ll use some math to prove why.
Neckband Width
Before you can figure out the length you should cut your neckband, you need to decide on a finished width. The amount of stretch and the recovery factor of your fabric will affect how wide you can make the ribbing and still have it lie flat around the neck.
To get an idea of how your fabric behaves, cut a strip of your fabric that has a width of twice the desired neckband width plus two seam allowances (I recommend using 1/4″ (6 mm) seam allowances around the neckline), with the direction of greatest stretch along the length of the strip. Pull on the ends of the fabric strip to stretch it out a bit, fold it in half lengthwise with wrong sides together, and press.
On your ironing board, bend the fabric into a curve that approximates the shape of a quarter of your neckline and see if it will lie flat with a single pin holding it in place at each end. If it won’t lie flat, choose a narrower band width, use different fabric for the neckband, or live with the fact that your neckband will probably ripple along the edge and pucker at the seamline.
If you use a narrower neckband than your pattern was designed for, you may want to add the width removed from the neckband to the neckline so the finished neck opening does not end up larger.
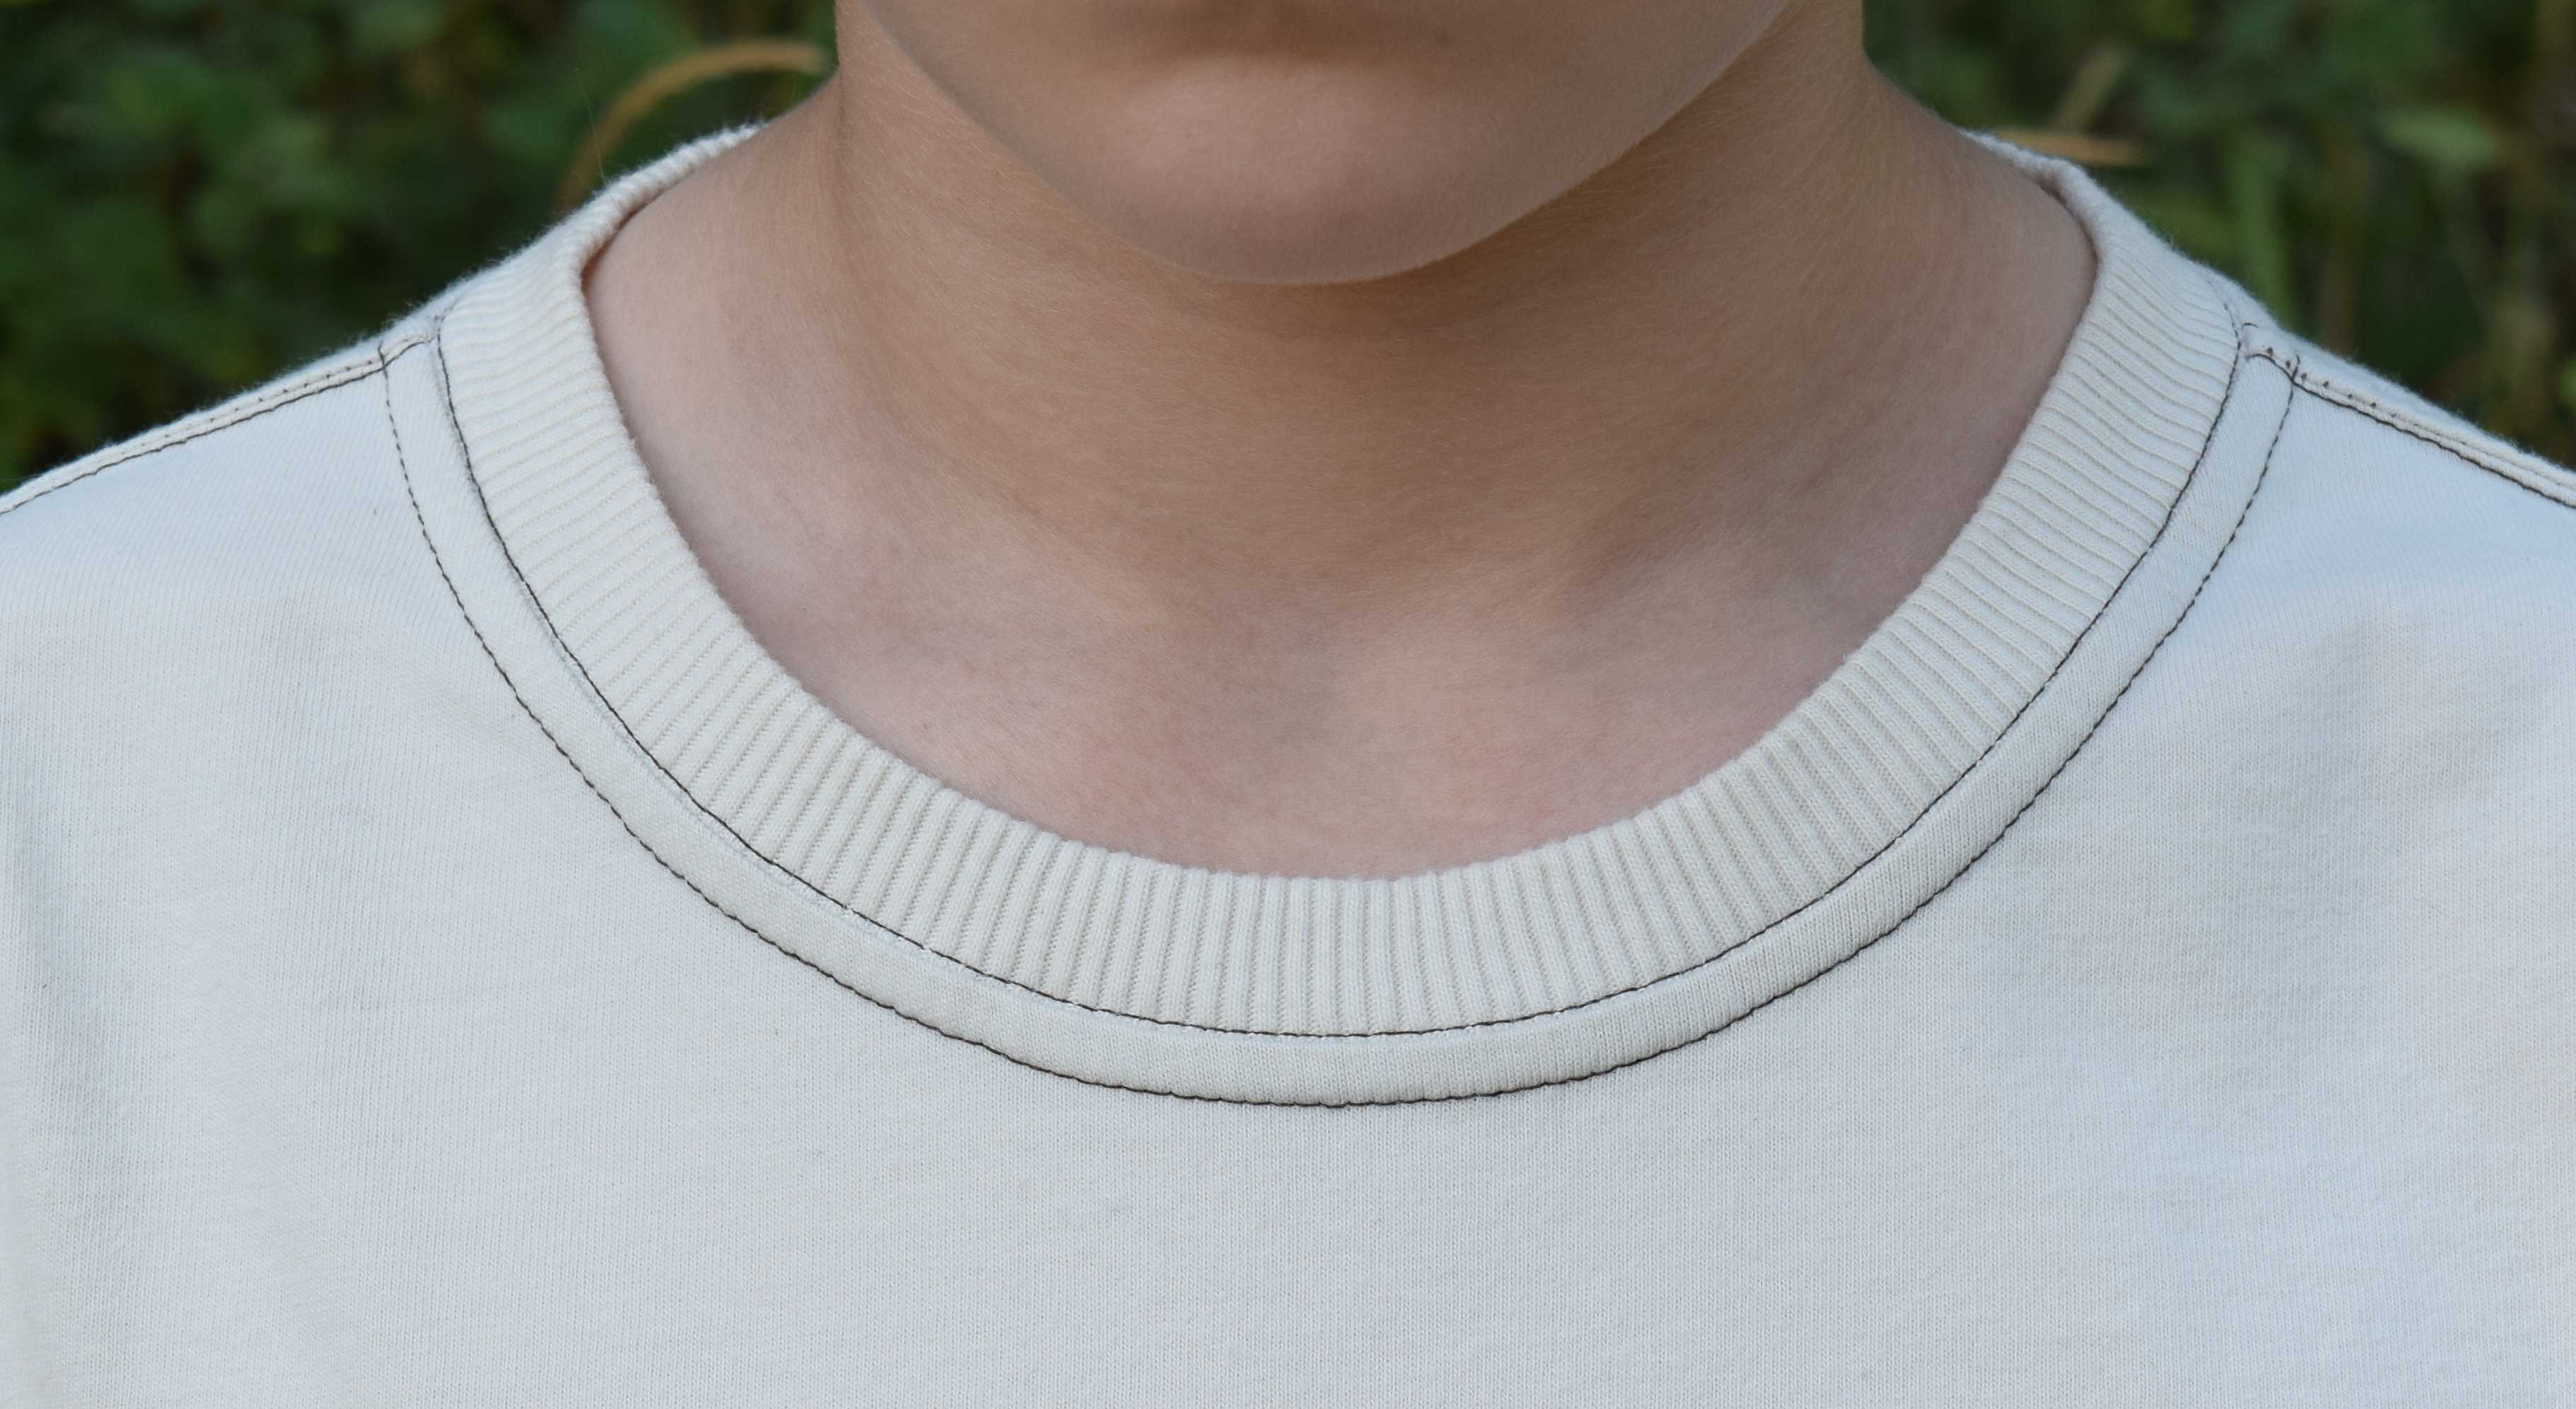
Here I cut a 1 3/4″ (4.4 cm) wide strip of cotton jersey. With 1/4″ (6 mm) seam allowances, the finished neckband width would be 5/8″ (1.6 cm). This fabric will not lie flat when cut this wide.

However, when I cut a 1 1/4″ (3.2 cm) wide strip of the same fabric, for a 3/8″ (1 cm) finished neckband width, it bends smoothly around the neckline curve.

I describe the methods below in a lot of detail, so they are not really as time consuming or complicated as I make them look. Figuring out the perfect neckband length definitely takes less time than unpicking a neckband that was the wrong length!
Neckband Length Method 1: The “No Math” Method
If your pattern includes seam allowances, draw in the stitching lines on the shoulder seams and around the neckline. You will want to work with half patterns, so if your patterns include both left and right sides together, draw in the center front and center back lines.

Note: If your pattern has a seam allowance of more than 3/8″ (1 cm) around the neckline, you need to reduce the seam allowance to be able to sew on the neckband correctly, especially if your fabric does not have a lot of stretch. A 1/4″ (6 mm) seam allowance is best, especially if you will be sewing the seam with a serger. On some sewing machines it can be difficult to sew a 1/4″ seam, so you can use a 3/8″ (1 cm) seam allowance if you have to, but trim the seam allowances to 1/4″ (6 mm) after sewing.
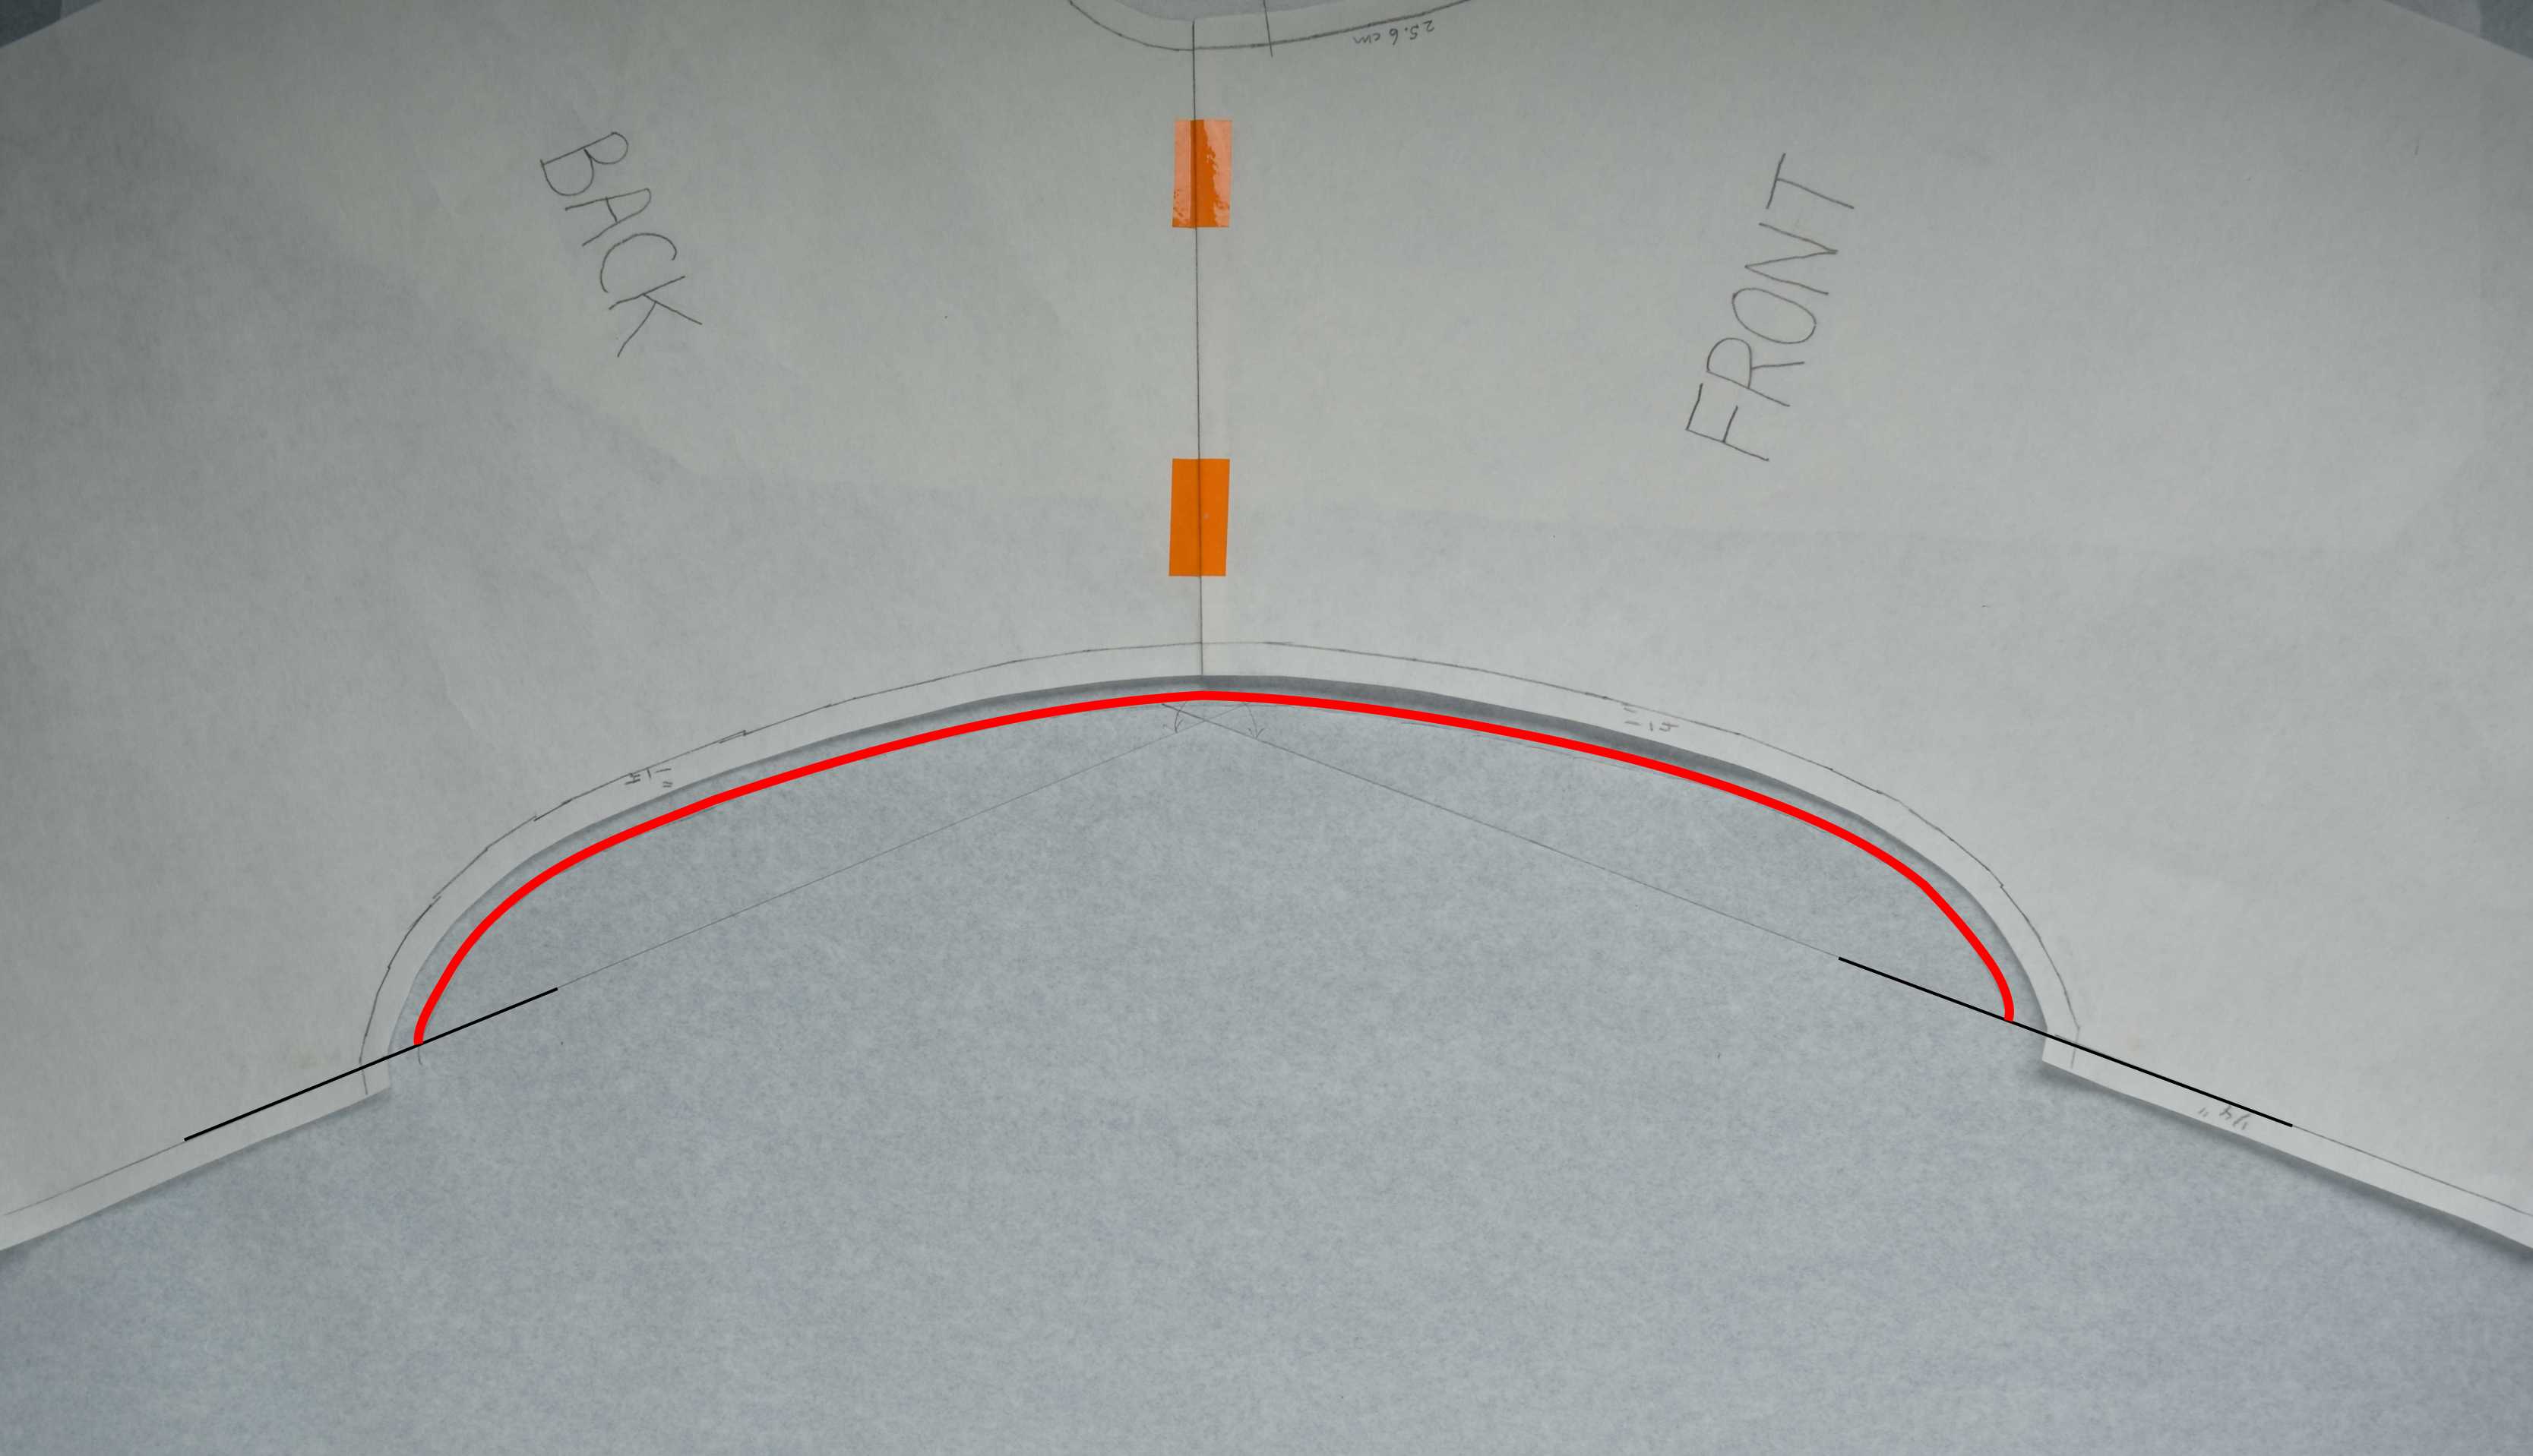
Align the front and back pattern pieces at the shoulder stitching line and tape them together. Place another piece of paper under the neck area of the pattern and hold it in place with a couple of pieces of tape.
Extend the center front and center back lines up a bit. From the neckline stitching line, measure out the width of the finished neckband and draw in a line where the finished neckband edge will be. Do this as accurately as possible. When drawing or measuring a curve, if you are even slightly off, it will affect the length of the line quite a bit.

Cut out a rectangular piece of paper that is a little longer than the length of the neckline and has a width of twice the finished neckband width plus two seam allowances (the same seam allowance as you used around the neckline). Make sure you square off one end, then on that end draw in the seam allowance you want to use to sew the ends of the ribbing together. This rectangular strip is going to become the neckband pattern.

Fold your rectangular strip in half lengthwise. Place it on edge along the line you drew for the finished neckband edge, lining up the stitching line you drew at one end with the center front line.
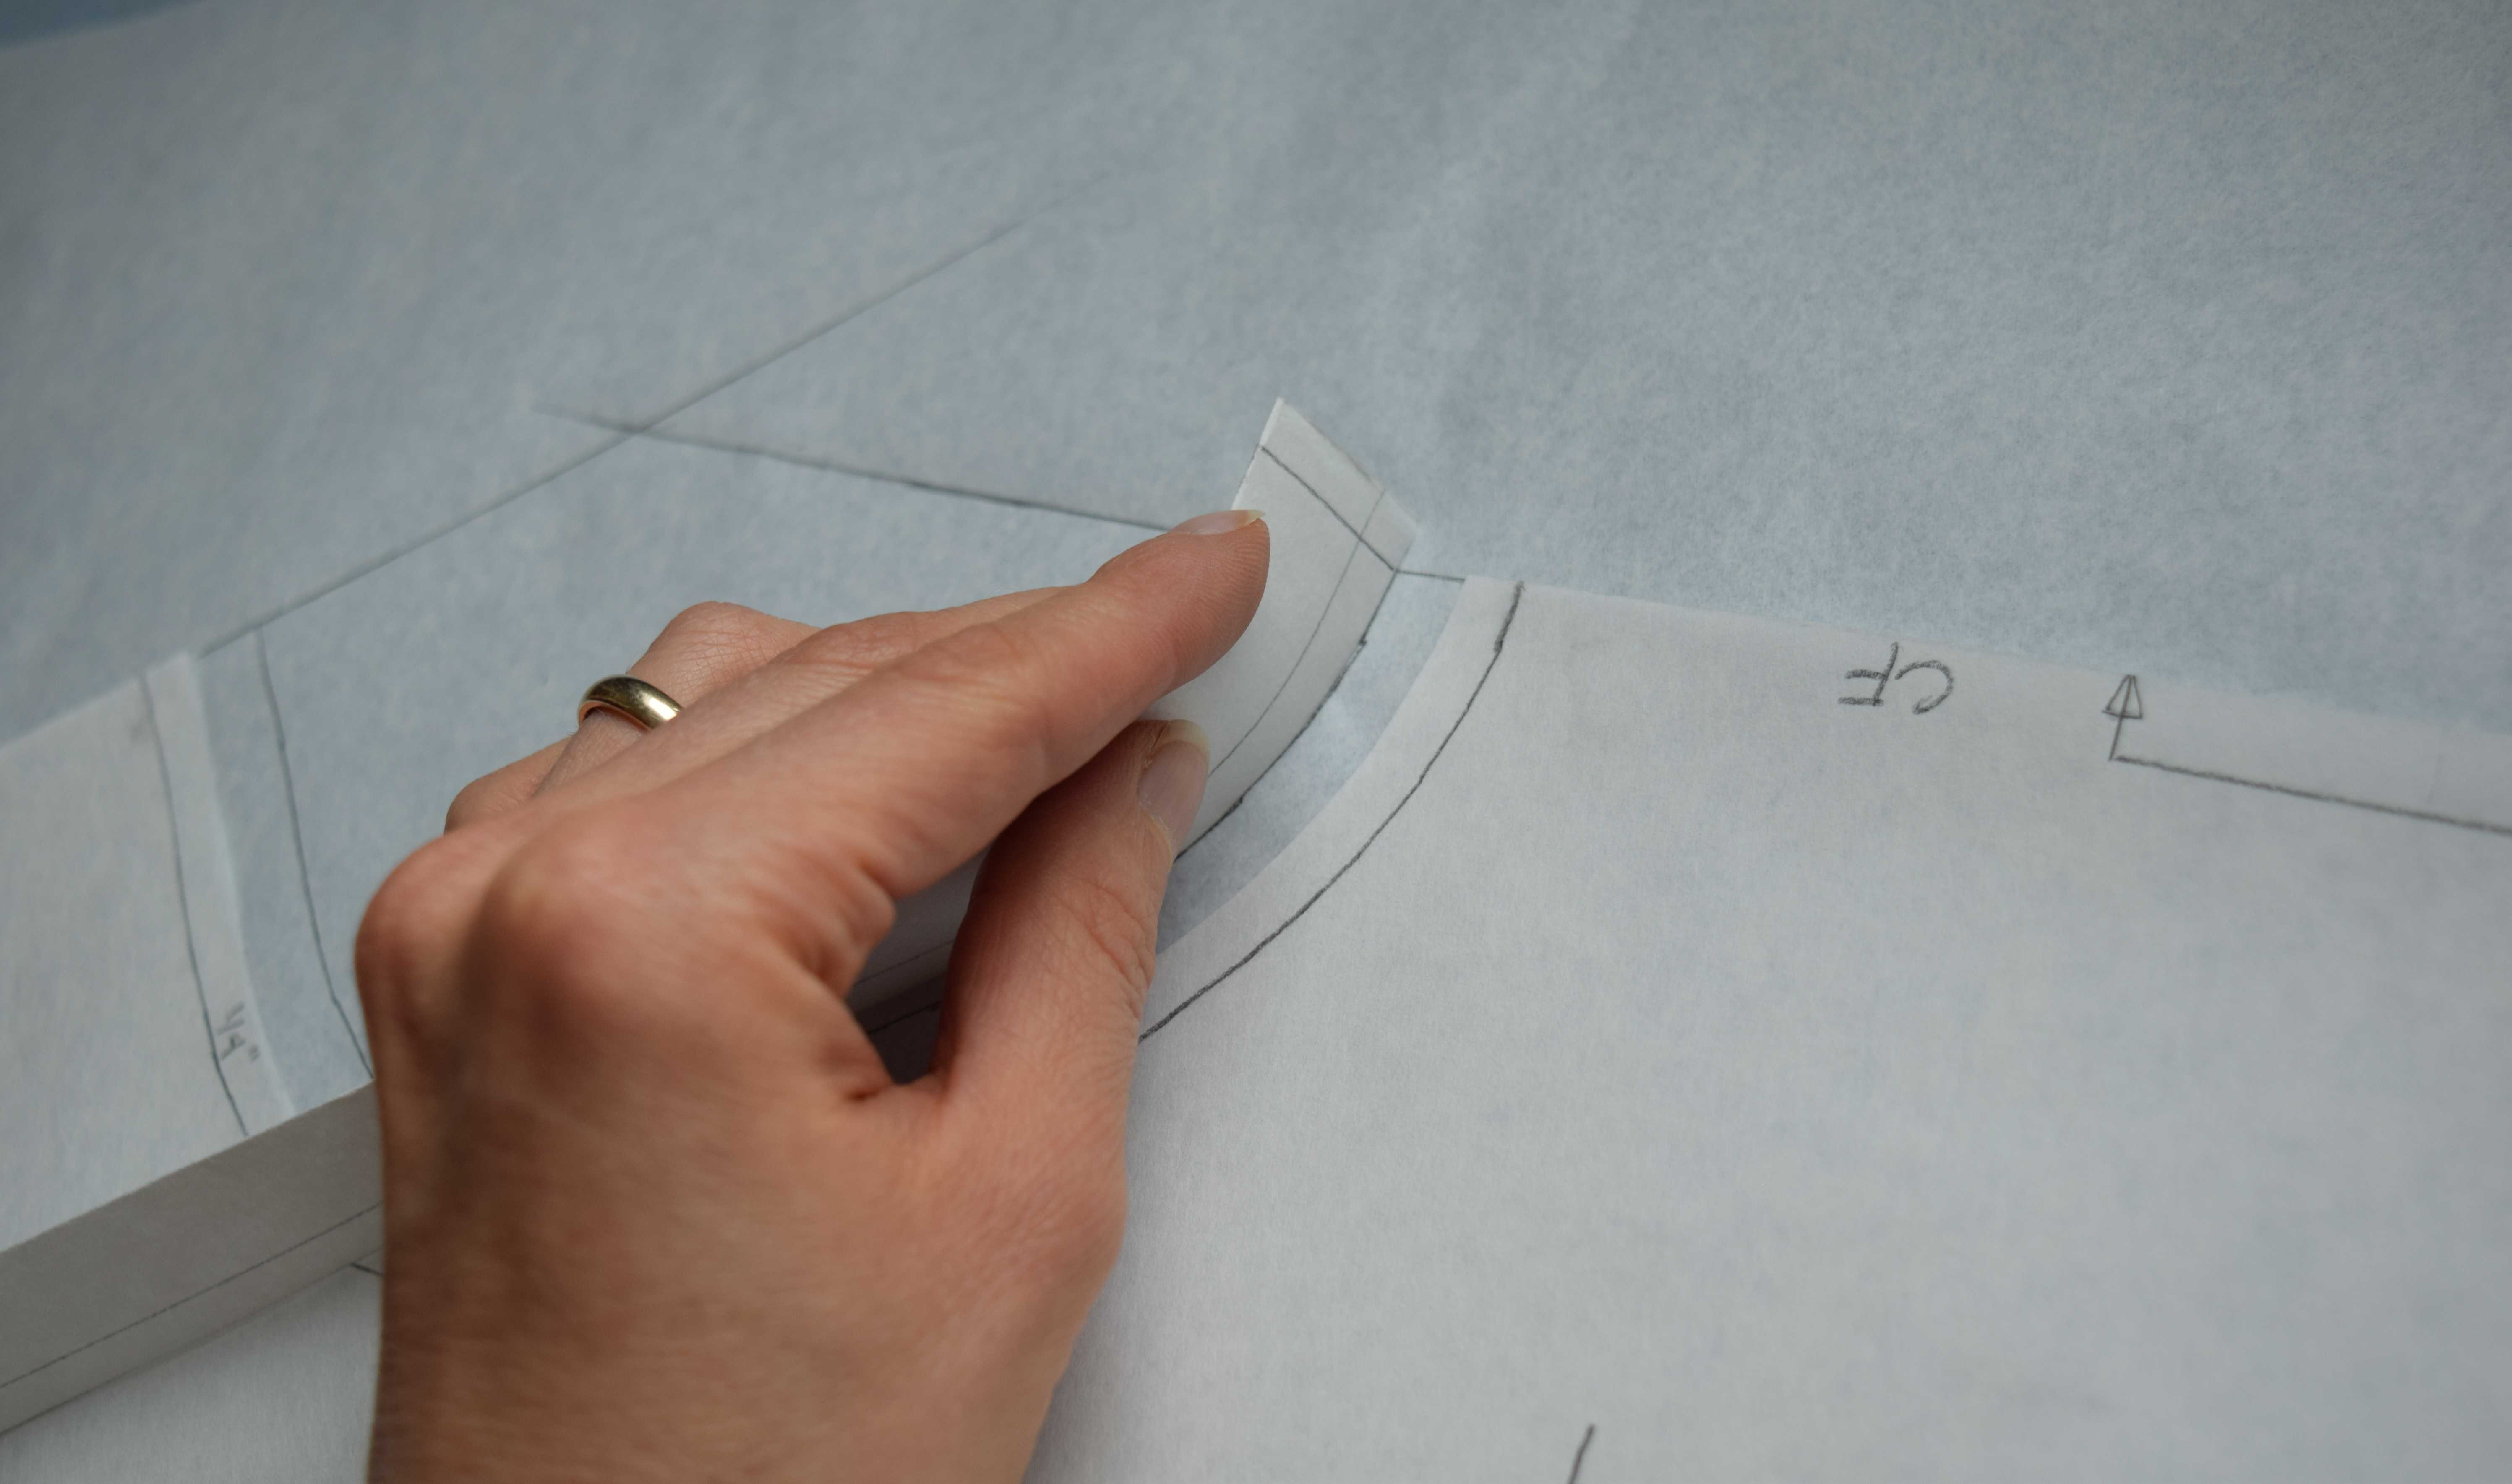
Walk the rectangular strip all of the way around the line for the finished neckband edge until you get to the center back line. Make a mark on the neckband pattern where it crosses the center back line.


Fold the neckband pattern at the mark you just made on the neckband where it met the center back line. Trim off the excess length on the end that sticks out (or add on a strip of paper if you cut your pattern too short).
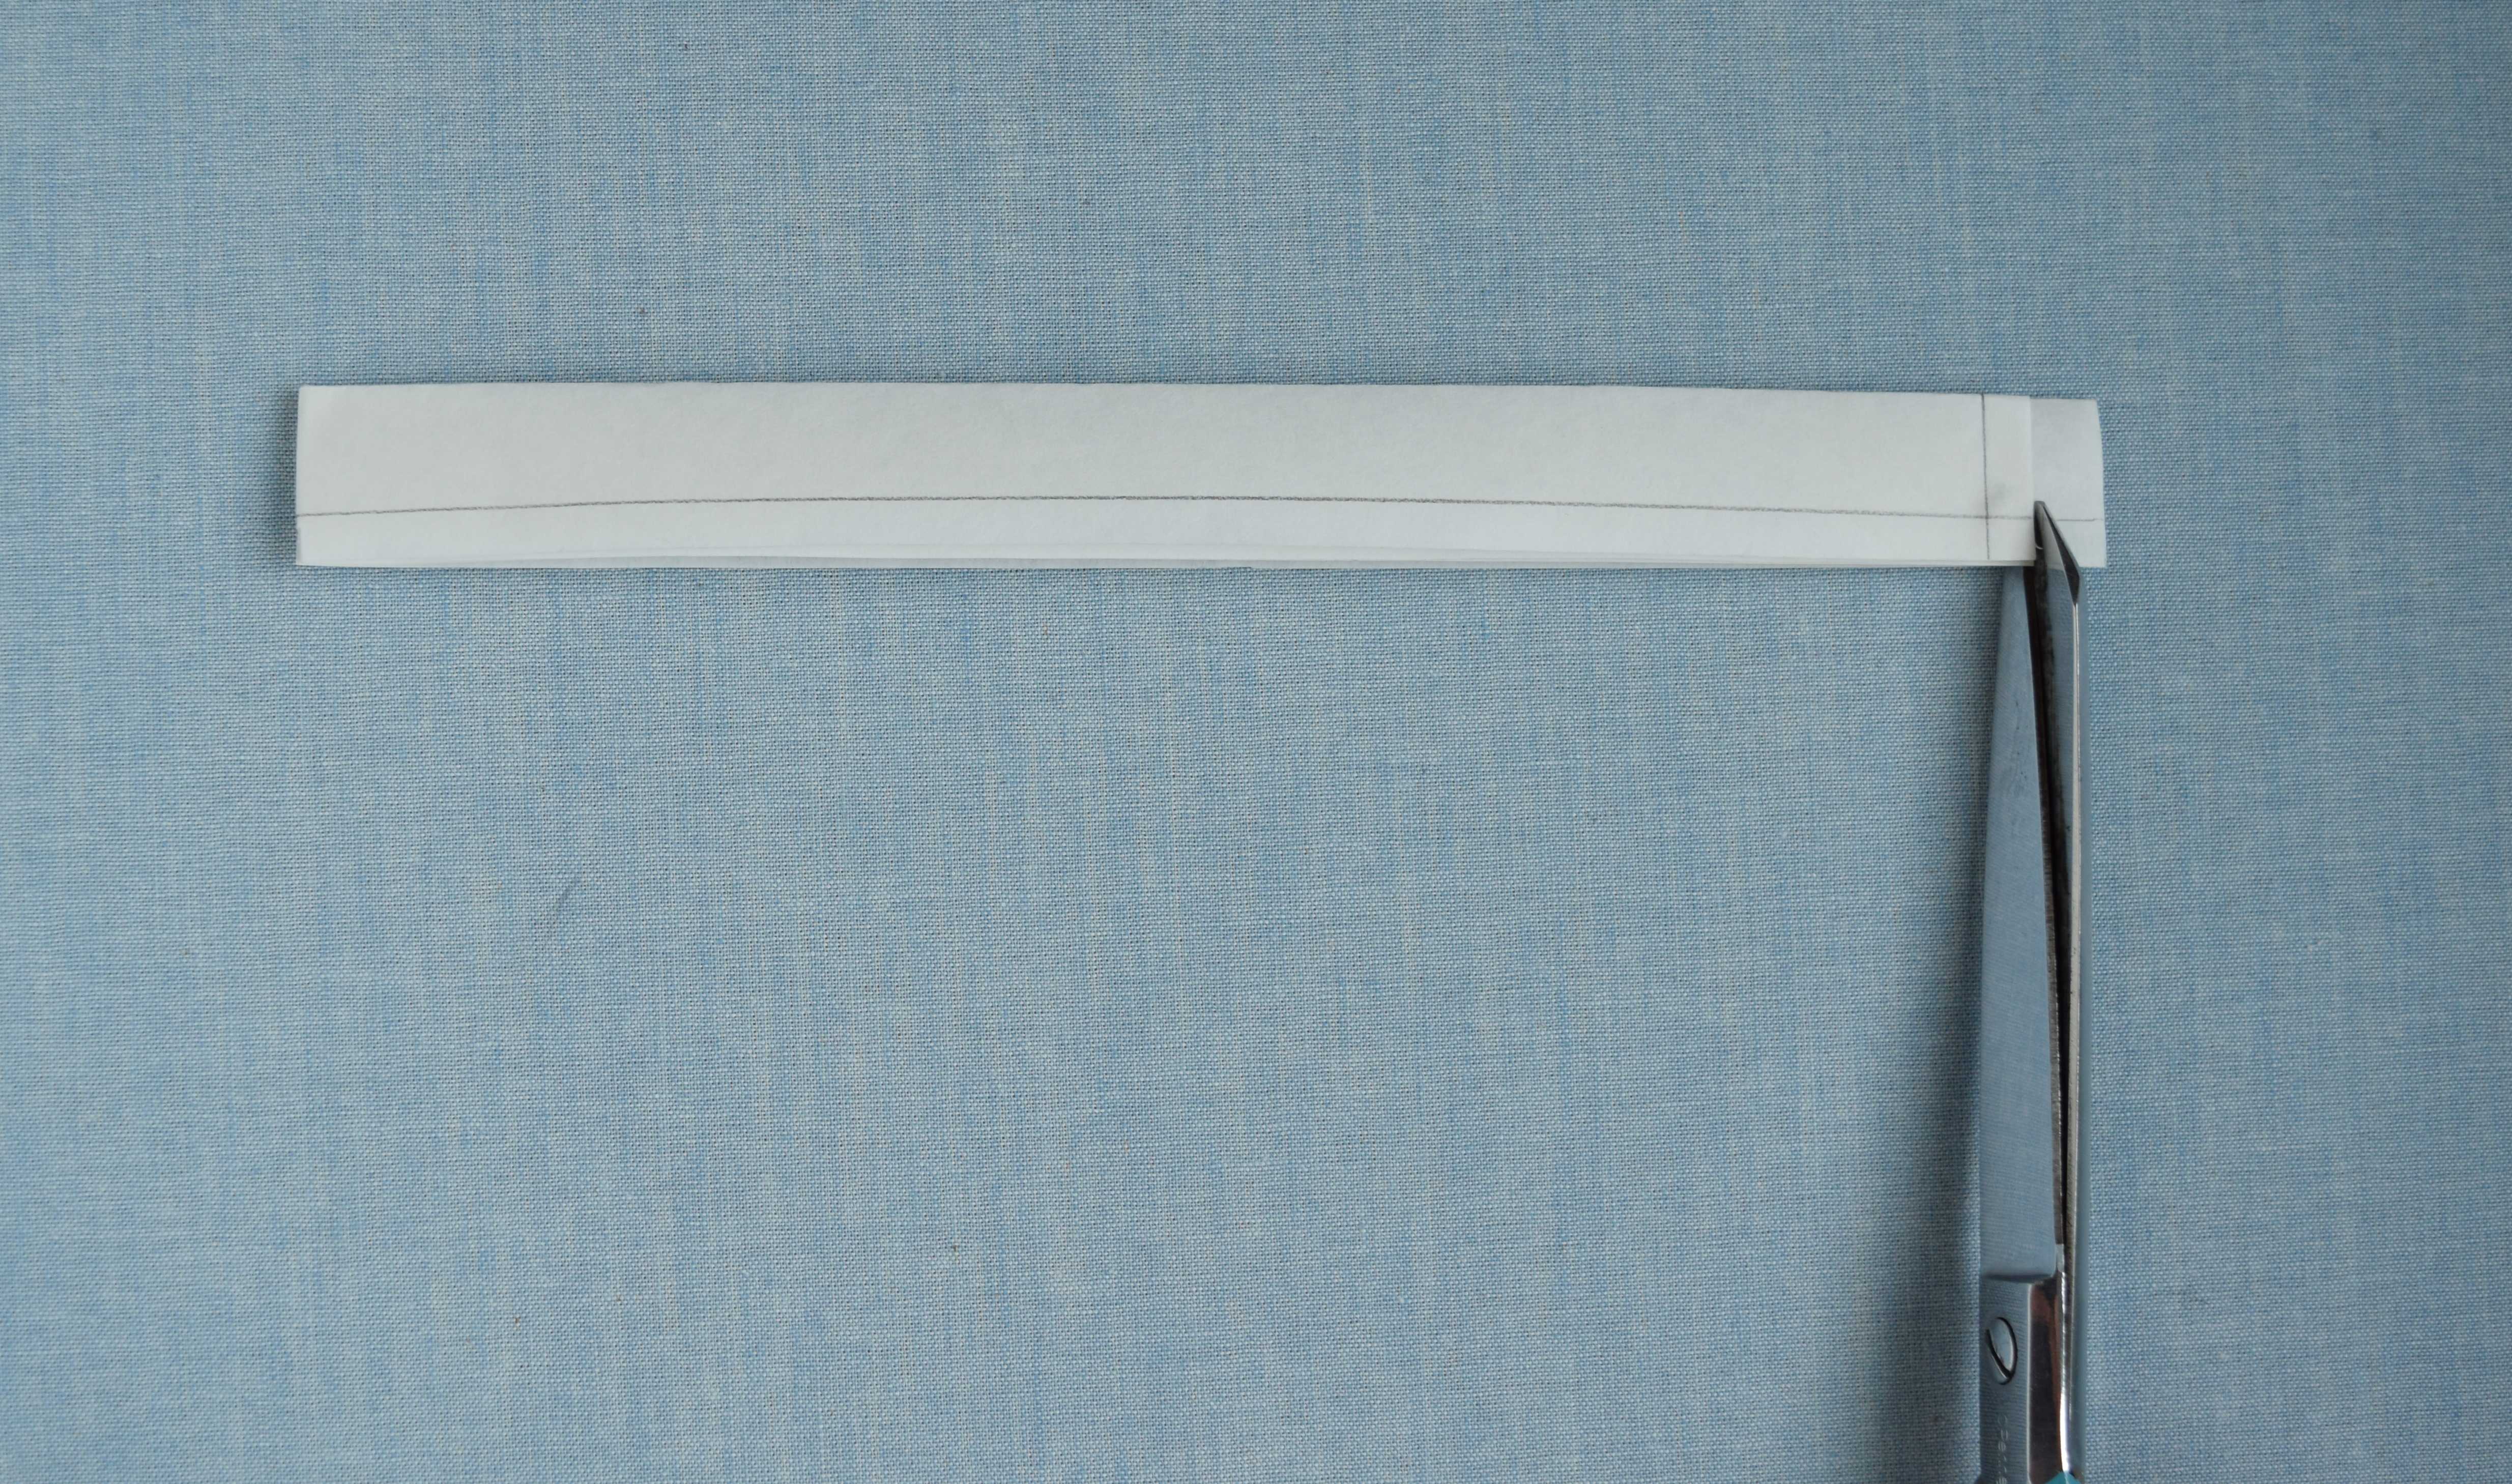
Fold the short folded edge up to the stitching line (not the end of the pattern) to quarter mark the pattern. Clearly mark the quarter marks on the pattern.

In the next step you will transfer the quarter mark to the neckline. I do this because it is nearly impossible to accurately find quarter marks on a curved neckline in knit fabric by folding it – even if you try not to stretch the fabric, the curved neckline stretches differently on different sections because of the fabric grain.
Unfold the neckband pattern, but leave it folded lengthwise. Line up the stitching line at the end of the pattern with the center front line again. Walk the pattern around the finished neckband edge line until you get to the first quarter mark. Make a mark at this location on the neckband line, then extend the mark out into the actual pattern seam allowance. When you cut out your fabric, mark this quarter mark on your fabric. Since your seam allowance is narrow, use a marking tool such as marker or chalk to mark this notch on the fabric rather than clipping the fabric with scissors.

On the finished garment, you want the neckband ribbing fabric to be either in a relaxed state or slightly stretched around the inner folded edge of the neckband. When you stretch out knit fabric, such as when you pull a top over your head, it usually stays stretched out a bit. Every fabric is different, so it doesn’t make sense to guess what the recovery factor is. To account for poor recovery, when you cut out your neckband, cut out a rectangle of fabric a little bigger than your neckband pattern, pre-stretch it, then let it relax again before cutting out the neckband from the pattern. Don’t stretch the fabric as hard as you can – just think about how much it’s likely to get stretched when the garment is being pulled over the head, and stretch it that much or a little more.
Clearly mark your pattern piece so you don’t forget to pre-stretch the fabric for the neckband.

If you are going to be cutting out many garments from the same fabric, you may want to adjust the neckband pattern so you don’t have to pre-stretch your fabric. That will require a little bit of measuring and math, and I’ll discuss how to do that at the end of Method 2.
You will also need to check that your neckband can easily stretch enough to sew onto the neckline, and that the neckband will stretch enough to fit over the wearer’s head. This is especially important to check in children’s garments. If your fabric neckband does not have enough stretch, either try making a narrower neckband and re-calculating the length (it will be longer), or use different fabric with more stretch for the neckband. If the neckband didn’t fit over the wearer’s head and neither of the above was enough to fix the problem, you could also draw the entire neckline larger and make a new neckband pattern.
You can also use this method to make a band pattern for armholes. Place the shoulder seam stitching lines together, extend the side seams along the stitching lines, and draw in the stitching line around the armhole. Measure out the desired band width from the armhole stitching line and draw in the line for the finished edge of the band. The length of that curved line will be the length of your pattern (then add seam allowances). Place quarter marks on the armhole, if desired. You will need to pre-stretch your fabric before cutting it from the pattern as for a neckband.
You can also use a similar method to find the length of a V-neck neckband. Draw in the shape of the finished edge of the neckband and measure the length, then copy the shape at the point of the V onto your neckband pattern.
Neckband Length Method 2: The Measuring and Calculating Method
With this method, you don’t have to draw in the finished neckband edge. Instead, you measure the length of the neckline at the stitching line and the angle between the center front and center back lines, then do some math. As long as you don’t make an error in your measurements or calculations, this method is just as accurate, or even more accurate, than the previous method. It is not a rough approximation – you are actually getting the right answer, as crazy as it seems. I’ll go through how I derived the formula later in the post for those who are interested.
This calculation method only works for rounded necklines, not V-necks or square necklines, or any other shape that comes to a sharp point. The rounded neckline can be any shape or size, though. The neckline needs to meet the center front and center back lines at a right angle (which all rounded necklines should).
The first couple of steps are the same as with Method 1: If your pattern includes seam allowances, draw in the stitching lines on the shoulder seams and around the neckline. You will want to work with half patterns, so if your patterns include both left and right sides together, draw in the center front and center back lines.
Note: If your pattern has a seam allowance of more than 3/8″ (1 cm) around the neckline, you need to reduce the seam allowance to be able to sew on the neckband correctly, especially if your fabric does not have a lot of stretch. A 1/4″ (6 mm) seam allowance is best, especially if you will be sewing the seam with a serger. On some sewing machines it can be difficult to sew a 1/4″ seam, so you can use a 3/8″ (1 cm) seam allowance if you have to, but trim the seam allowances to 1/4″ (6 mm) after sewing.
Align the front and back pattern pieces at the shoulder stitching line and tape them together.
Use your favorite curve measuring method to measure the length of the neckline seamline from center front to center back. We’ll call this measurement N. Try to get an accurate measurement – don’t do something awful like try to measure it with a flexible ruler.
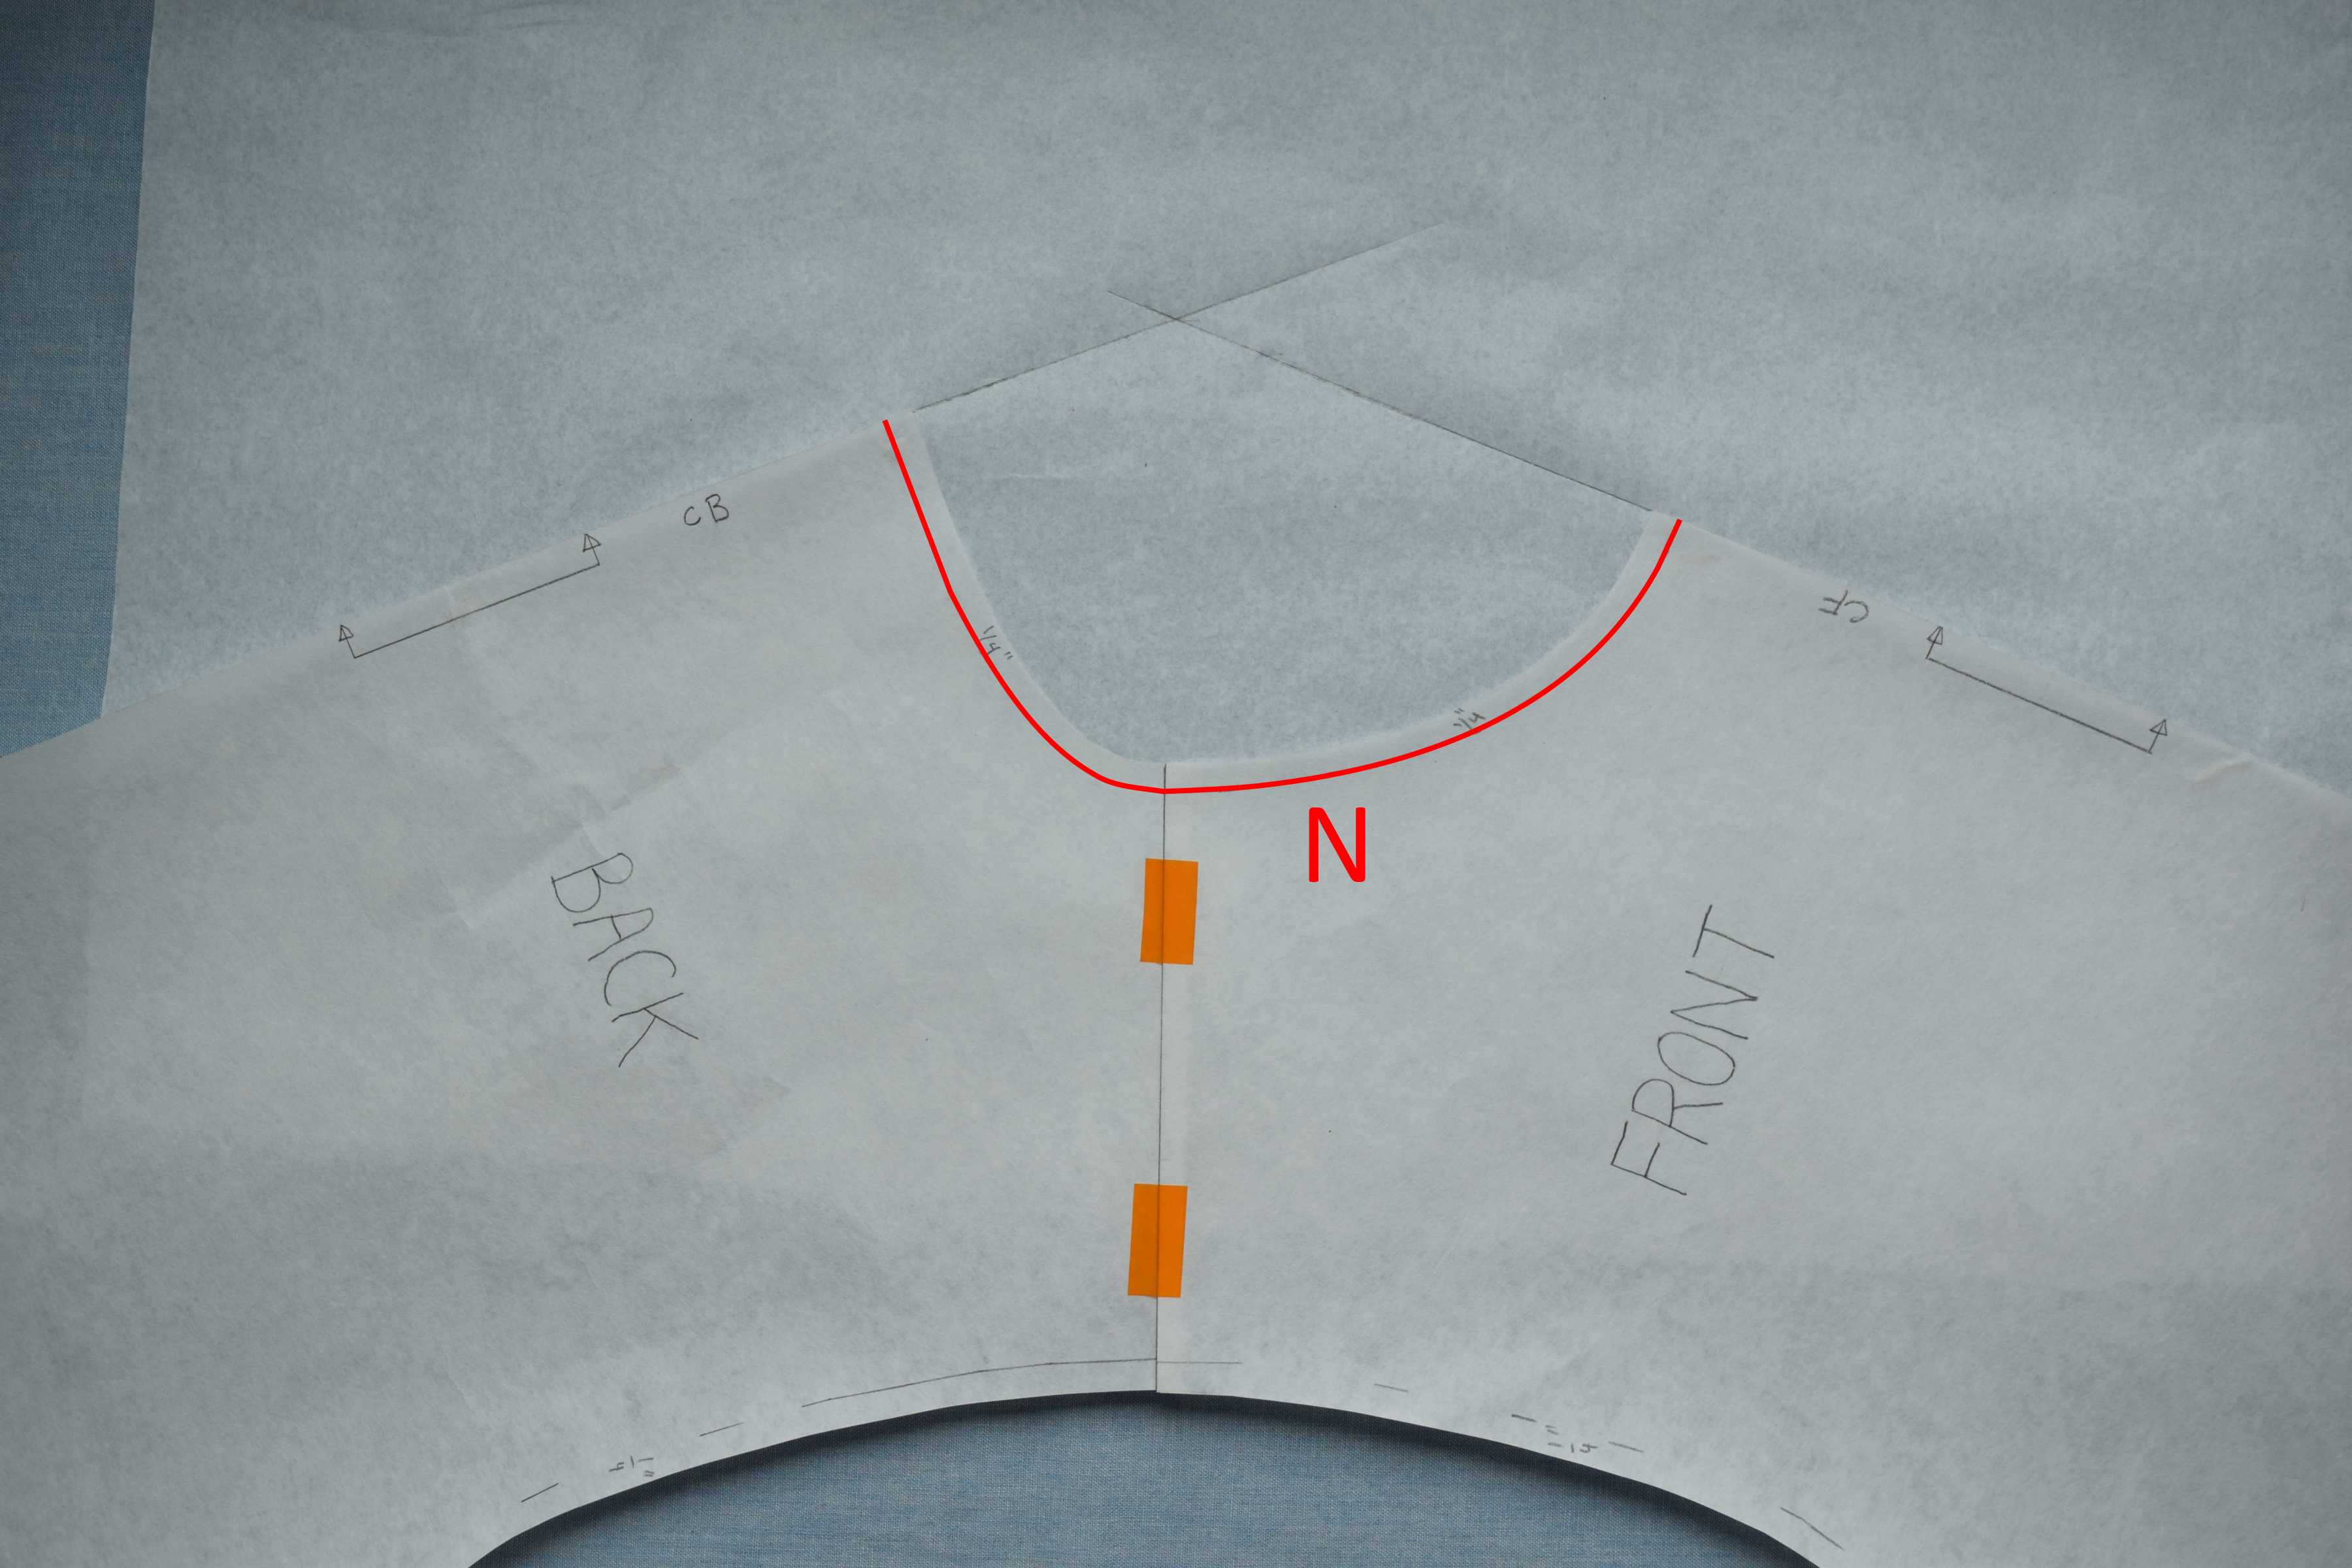
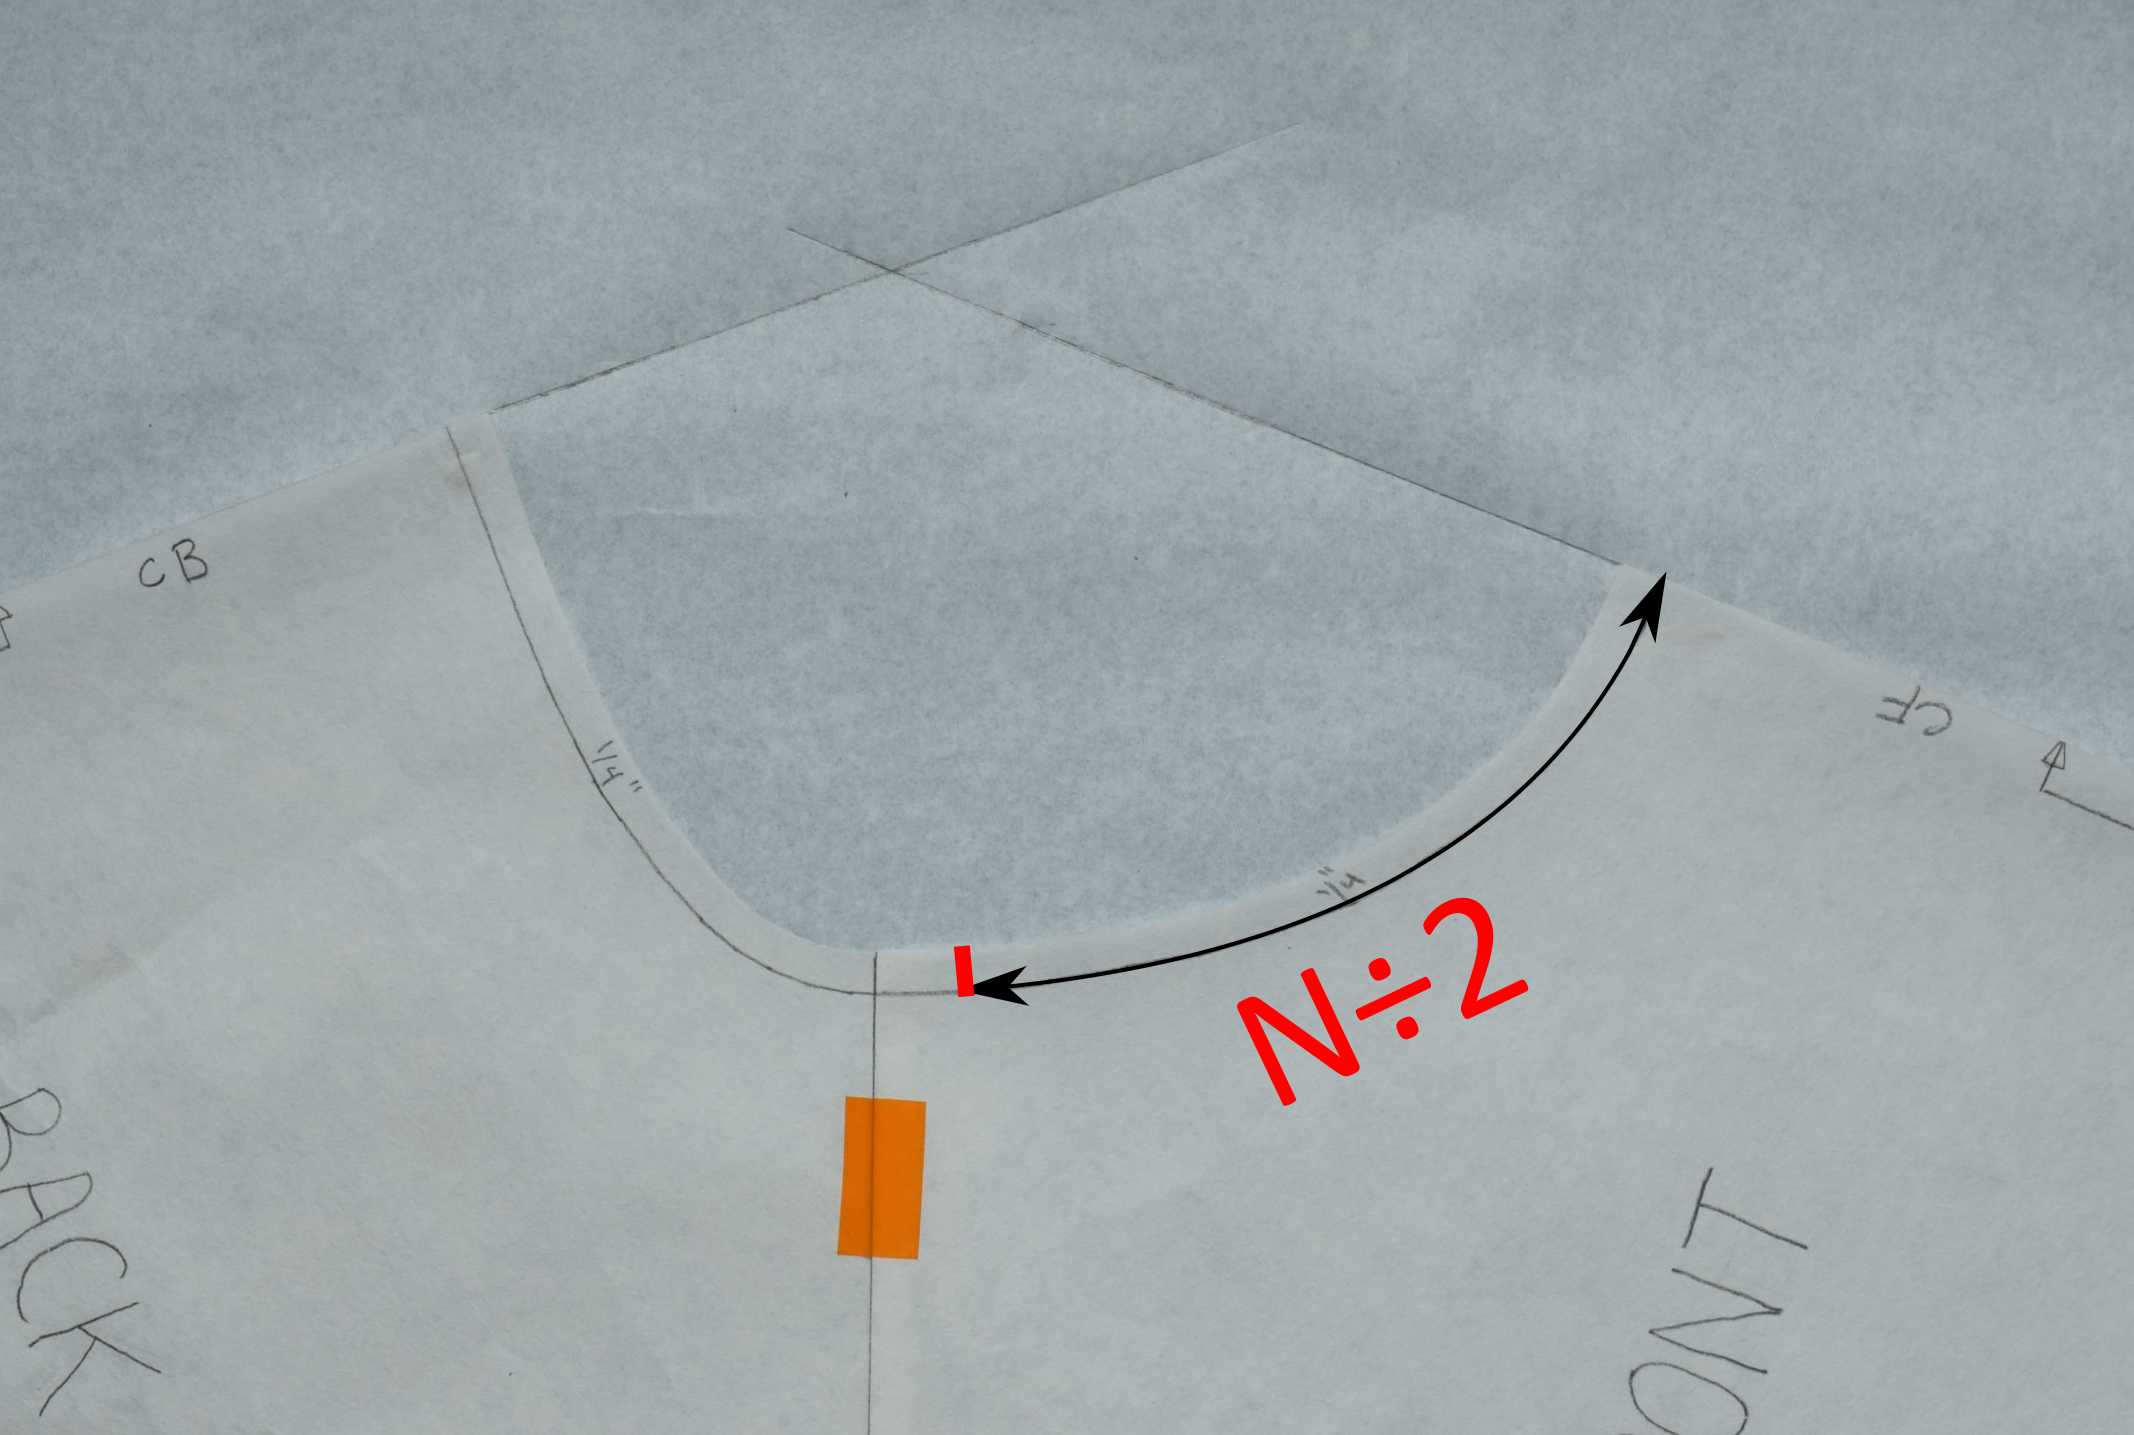
Divide the length N by 2. From center front, measure this distance along the neckline stitching line and make a notch. This will be a quarter mark, which you will mark on your fabric with a marking tool when you cut out your fabric.
Place straight edges along the center front and center back lines, placing them so they cross each other. Hold them in place with weights. If you prefer, you can tape another piece of paper under the pattern and draw in the extended center front and center back lines instead.

Links in this post identified by an asterisk (*) are affiliate links. If you click through and make a purchase, I will earn a commission (at no additional cost to you).
Use a protractor to measure the angle between the center front and center back lines. We’ll call this angle A. You want to measure the interior angle – the smaller one that is closest to the pattern. I prefer to use a 360° protractor*, since when measuring for a armhole band, the angle is greater than 180° (I’ll show you how to calculate armhole bands in a bit, too).
If you don’t have a protractor and want to try out this method right away, you can print out one of these printable protractors. If you print out the 360° protractor, cut out half of the small circle in the center so that you can align the center mark.

In the formula below,
N = The distance you measured around the neckline stitching line from center front to center back (which is half the total neckline length, since you measured a pattern for only one side of the body)
A = The angle you measured between the center front and center back lines, measured in degrees.
W = The desired finished width of the neckband
The full unadjusted length of the neckband pattern = (2 × N) − (0.0349 × W × A)
The first time you do this, I suggest checking your answer by also using Method 1. Your answers should be within a millimeter or so if you measured accurately. Slight differences are likely due to rounding and measuring errors, but larger ones probably mean you made a math error. If the two lengths differ by more than 3 mm (1/8″), check your measurements and calculations.
Now all you need to do is adjust for poor fabric recovery, then add seam allowances.
If you will only be using the pattern once with each particular fabric, you can simply label your pattern to indicate that you should pre-stretch your fabric before cutting out the neckband, as described in Method 1.
Here is how you can adjust the neckband pattern so your fabric does not need to be pre-stretched, which you may want to do if you will be using the pattern multiple times with the same fabric, or if your fabric is delicate and becomes distorted when you stretch it. You would also make this adjustment if you are making a pattern to sell, in which case you will have to estimate the recovery factor.
Fold your ribbing fabric a bit away from the cut edge, with the direction of greatest stretch running along the fold. Place two pins near the fold 10 cm apart.

Stretch the fabric just a little more than you think it will be stretched when the wearer puts on the garment. Let go of the fabric and let it relax. Measure the new distance between the pins in centimeters, to the nearest millimeter. We’ll call this measurement D.

To calculate the recovery factor (let’s call that R), divide the unstretched length by the length after stretching:
R = 10 cm ÷ D
To adjust the length of your pattern for poor fabric recovery, multiply the previously calculated neckband length by R.
To get the final length of the pattern piece, add two seam allowances to the length. The final width will be twice the finished neckband width plus two seam allowances (the same seam allowance that you used around the neckline).
You will also need to check that your neckband can easily stretch enough to sew onto the neckline, and that the neckband will stretch enough to fit over the wearer’s head. This is especially important to check in children’s garments. If your fabric neckband does not have enough stretch, either try making a narrower neckband and re-calculating the length (it will be longer), or use different fabric with more stretch for the neckband. If the neckband didn’t fit over the wearer’s head and neither of the above was enough to fix the problem, you could also draw the entire neckline larger and make a new neckband pattern.
Method 2A: Calculating Ribbing Length for an Armhole Band
The only real difference when calculating the length of an armhole band is that you are working with the full length around the armhole instead of half of the neckline.
Note that this mathematical method will only work if your armhole curves meet the side seams at right angles. They may not on some garments. In that case use Method 1 instead, and treat the underarm point as you would a V-neckline, sewing the band ends together at an angle to match the garment shape.
Mark the stitching lines around the armhole and on the side seams of the garment. Tape the front and back pieces together at the shoulder stitching lines.
Measure the distance around the armhole along the stitching line, making sure you start and stop at the side seam stitching lines (don’t include any seam allowances in the measurement). We’ll call this length around the armhole L.
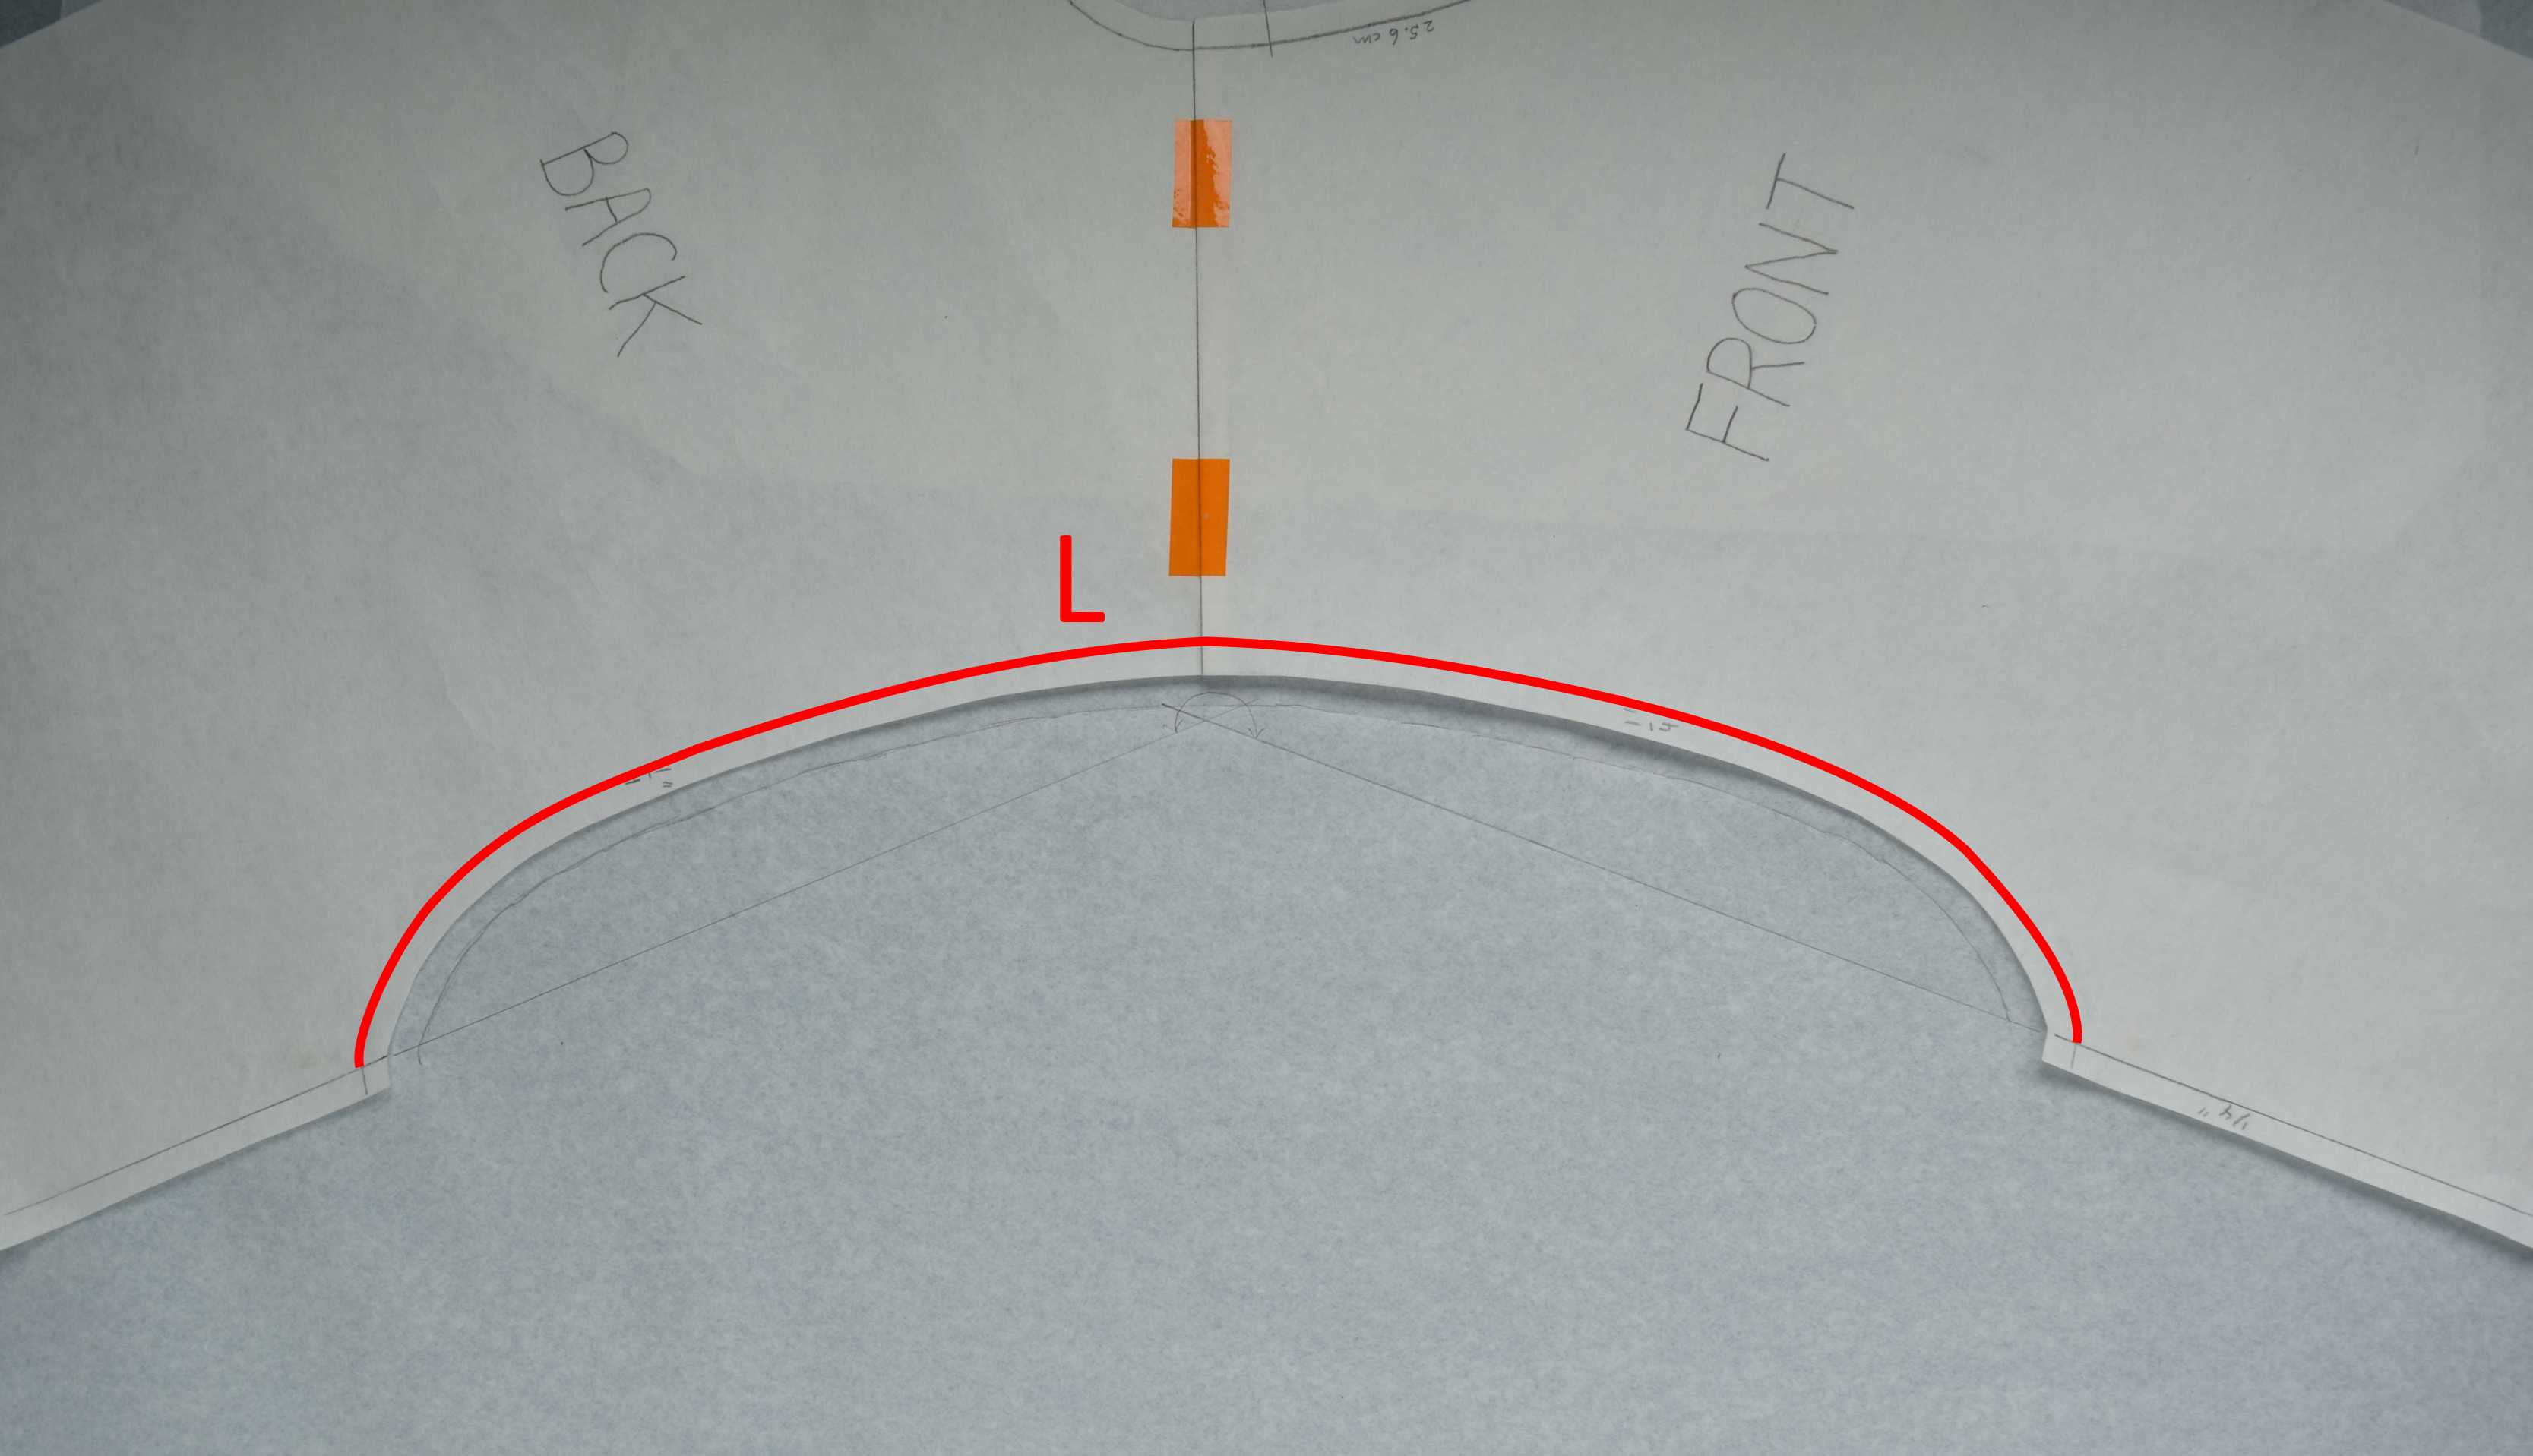
Place straight edges along the stitching lines of the side seams, extending them until they intersect. Alternatively, you can put paper under the pattern and draw in these lines. The point where the lines intersect might end up inside the pattern, which is not a problem.
Measure the larger angle formed by the side seam lines (the angle closest to the pattern). We’ll call this angle B.

In the formula below,
L = The distance you measured around the armhole stitching line.
B = The angle you measured between the side seam stitching lines, measured in degrees (it should be greater than 180°).
W = The finished width of the armhole band.
The length of the armhole band pattern = L − (0.0175 × W × B)
Now adjust the length for fabric recovery, add seam allowances, etc. just like you did for a neckband.
The Math Behind it All
Here’s how I came up with that mysterious formula for calculating the neckband length. I assumed that with the garment laid out flat, the neckband fabric should be it’s natural length (neither stretched nor rippled) at the finished folded edge. (The additional adjustments for the fabric recovery factor are done as a separate step after this length is calculated.) The other edge of the neckband will stretch to fit the neckline seam. So what I really need to find is the length of the finished neckband inner edge.
Let’s start with a simplified case and represent the stitching line and the finished neckband edge with two circles. The outer circle, with a radius R and a circumference N, represents the neckline stitching line. The inner circle, with radius r and circumference n, represents the finished neckband edge. The distance between the edges of the two circles is w, which represents the finished neckband width.

I’m going to write down a few known equations to relate the different variables labeled on the circles.
R = r + w
N = 2πR
n = 2πr
I can use algebra to re-arrange a couple of those equations to get
r = R − w
R = N/(2π)
What I want to find is n in terms of N and w.
Doing some substitutions and simplifications:
n = 2πr = 2π(R − w) = 2πR − 2πw
Substituting N/(2π) for R,
n = 2πR − 2πw = 2π(N/(2π)) − 2πw = N − 2πw
Now I have what I wanted: n = N − 2πw
However, necklines or armholes are not full circles. Let’s say they are arcs – fractional parts of circles. In the figure below, N1 is the outer arc length, n1 is the inner arc length, w is the distance between them, and A is an angle measured in degrees.

So now,
A/360° = N1/N = n1/n
n1 = An/360°
N1 = AN/360°
so N = 360°N1/A
Substitute N − 2πw for n, simplify,
n1 = An/360° = A(N − 2πw)/360° = AN/360° − 2πwA/360° = AN/360° − (π/180°)wA
then substitute 360°N1/A for N:
n1 = AN/360° − (π/180°)wA = A(360°N1/A)/360° − (π/180°)wA = N1 − (π/180°)wA
If we calculate the decimal approximation of the equation to three significant digits, we get
n1 = N1 − (π/180°)wA ≅ N1 − (0.0175)wA
When we are calculating the arm band length, this is the equation we use. We know the width w and we measure the arc length N1 and the angle A.
When we are calculating the neckband length, we know the width w and we measure the arc length N1 and the angle A. However, in this case since we are measuring half the pattern, what we really want to find is 2n1 so we multiply both sides of the equation by 2 and get
2n1 = 2N1 − 2(π/180°)wA = 2N1 − (π/90°)wA ≅ 2N1 − (0.0349)wA
Now you probably are waving your hand in the air and saying, “But wait, Leila, my neckline and armhole shapes are not perfect arcs! How good of an approximation is that, really?”
It’s either an exact answer or a very close approximation. I’m not a mathematician, and I never learned about this in school, so I can’t tell you for sure. I checked it with the Inkscape drawing program I have, which is not as exact as a CAD program, and when I compare measured lengths to calculated lengths for various curved shapes, I get very close to the same answer.
To see why this formula works for shapes other than circles, let’s start with a circle, cut it in half, and insert four line segments of equal length between them to stretch the circles out into oval shapes. N is now the perimeter of the outer shape, and n is the perimeter of the inner shape.
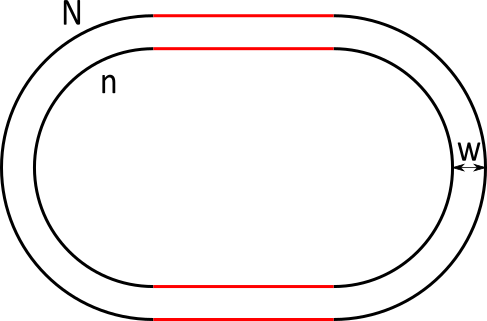
Because the line segments that were added to the inner and outer shapes are the same length, the perimeter of the inner shape can still be calculated with the formula n = N − 2πw.
We can keep splitting apart the circles and adding more pairs of equal length line segments to get all sorts of rounded shapes. Since the length added to the outer shape still equals the length added to the inner shape, we can still use the same formula to calculate the difference in the length of the perimeters.

If we keep making the line segments smaller and smaller, and inserting more of them, eventually it all blends together into one smooth shape. If you have access to a CAD program, you can draw various rounded shapes, offset them a specified distance, measure the perimeter of the inner and outer shapes, and verify that the formula still holds true. You can even have concave curve portions – the length lost going around the inner curves is balanced out by the extra length on the convex portions. You just can’t have a sharp bend anywhere. As you start to get tight curves that are close to a sharp point, the results are less perfect, but the same equation is still a close approximation even for these shapes. It’s kind of mind blowing that such a simple formula can work for complex shapes.
This fact has other applications in sewing, such as when you are adjusting a pattern to be used with thicker fabric.

What everyone else is saying
I don’t really blame sewing bloggers or home sewers who have passed on bad advice about calculating neckband length, because they had to have gotten their information from somewhere, right? And often bloggers add a little apologetic, “Well, this seems to work most of the time,” comment at the end of their posts about calculating neckband length, so they at least hint that the method they are showing you does not work perfectly (unlike patternmaking books, which just say “use this formula”). After using various methods for calculating neckband length I found online and not having success with them, I pulled out all of the sewing and patternmaking books I could get my hands on. Sadly, these books give the same advice as I found online. I guess that’s not surprising – these books and others like them are where the information is originating from. Here’s what I found from a few different sources:
The Practical Guide to Patternmaking for Fashion Designers: Juniors, Misses and Women* by Lori A. Knowles. Multiply the finished neckline length by 0.75 to get the neckband length.
Patternmaking for Fashion Design* by Helen Joseph Armstrong. She basically says to use trial and error to find the correct neckband length, which I guess I can’t really say is wrong, but it is a waste of time.
Patternmaking with Stretch Knit Fabrics* by Julie Cole. Measure the length of the neck seamline then reduce this by 1/7 to get the neckband length. There is a footnote indicating that Designing and Patternmaking for Stretch Fabrics* by Keith Richardson was the source for this formula.
Sew Knits with Confidence* by Nancy Zieman. Make the ribbing length 3/4 of the neckline seamline measurement.
Sewing with Knits* by Connie Long. Here is the exact quote from the book: “To cut the ribbing length, measure the neck opening along the stitching line. Divide this measurement by two-thirds, and add two seam allowances.” In case your math skills are as rusty as Connie’s, I’ll remind you that “divide by 2/3” means the same as “multiply by 3/2”. So technically what the author is telling you is to make the ribbing 150% of the neckline length. I’m 100% sure she actually meant to tell you to “multiply this measurement by two-thirds”. It could have just been a typo. Maybe.
Pattern Making for Kids’ Clothes* by Carla Hegeman Crim. Make the ribbing length “about 3/4 the size of the neckline”.
Craftsy Class: Sewing Knits That Fit with Dyanne Marte. She says to make the neckline banding three inches shorter than the neckline length, and to always make the neckline banding a half inch finished width or wider. Quote: “You should always work with at least a half inch and up for banding because if it’s too thin what’s going to end up happening is that it’s going to roll over because it’s not going to have enough of a control.” (FYI – I have a t-shirt I made with a 1/4″ (6 mm) wide neckband, and it lies perfectly flat. Maybe she was having problems with narrow bands because she’s making them the wrong length. She was also discussing using bands on sleeves and in place of shirt hems, though, and yes, those bands should be wider, but narrow neckbands are fine if you cut them exactly the right length.)
The methods listed above are approximations, and will not always give you the right answer. The percentage reductions listed above vary from 67% to 86%, which is quite a wide range. If you want accurate results, you can’t make the neckband a percentage of the neckline length or reduce it by a fixed amount to get the right length for a neckband. Mathematically it just doesn’t work. Rib knits are pretty forgiving, so you will probably get OK results most of the time even if you use one of these estimates. However, if you are using neckband fabric with less stretch, you will need to use one of the methods I described. Also, if your neckline is especially long or short, or if your ribbing width is narrower or wider than typical, your neckband length can be way off using the percentage calculations.
I was curious where these percentage calculations most other people reference came from. I guessed that maybe they work for certain combinations of common neckline lengths, neckline widths, and fabric recovery factors.
Cutting the neckband to 75% of the neckline length is mentioned frequently. I put together a table using my calculations to see what neckline lengths, band widths, and recovery factors might result in a neckband measuring 75% of the neckline length. I adjusted the recovery factor until I got some results near 75%:
Neckband length as a percent of neckline length
(Assuming angle A = 150°, and recovery factor R = 0.8)
| Neckband width (cm) | |||||||
| 0.5 | 1 | 1.3 | 1.5 | 2 | 2.5 | ||
| Neckline length (cm) | 50 | 78% | 76% | 75% | 74% | 72% | 70% |
| 52 | 78% | 76% | 75% | 74% | 72% | 70% | |
| 54 | 78% | 76% | 75% | 74% | 72% | 70% | |
| 56 | 78% | 76% | 75% | 74% | 73% | 71% | |
| 58 | 78% | 76% | 75% | 75% | 73% | 71% | |
| 60 | 78% | 77% | 75% | 75% | 73% | 71% | |
| 62 | 78% | 77% | 76% | 75% | 73% | 72% | |
| 64 | 78% | 77% | 76% | 75% | 73% | 72% | |
| 66 | 78% | 77% | 76% | 75% | 74% | 72% | |
| 68 | 78% | 77% | 76% | 75% | 74% | 72% | |
| 70 | 79% | 77% | 76% | 76% | 74% | 73% | |
| 72 | 79% | 77% | 76% | 76% | 74% | 73% | |
| 74 | 79% | 77% | 76% | 76% | 74% | 73% | |
| 76 | 79% | 77% | 76% | 76% | 74% | 73% | |
| 78 | 79% | 77% | 77% | 76% | 75% | 73% | |
| 80 | 79% | 77% | 77% | 76% | 75% | 73% | |
| 82 | 79% | 77% | 77% | 76% | 75% | 74% | |
| 84 | 79% | 78% | 77% | 76% | 75% | 74% | |
| 86 | 79% | 78% | 77% | 76% | 75% | 74% | |
| 88 | 79% | 78% | 77% | 76% | 75% | 74% | |
| 90 | 79% | 78% | 77% | 77% | 75% | 74% | |
| 92 | 79% | 78% | 77% | 77% | 75% | 74% | |
| 94 | 79% | 78% | 77% | 77% | 76% | 74% | |
| 96 | 79% | 78% | 77% | 77% | 76% | 75% | |
| 98 | 79% | 78% | 77% | 77% | 76% | 75% | |
| 100 | 79% | 78% | 77% | 77% | 76% | 75% | |
When I made the major assumption of setting the recovery factor to 0.8 for these calculations, the 1.3 cm (1/2″) neckline bindings are close to 75% of the neckline length. If you are using a rib knit, I can see how most of the time you could get away with making your band 75% of the neckline length. HOWEVER, keep in mind in this chart I was assuming R = 0.8, and in reality it will vary widely from fabric to fabric. If I change the recovery factor to something else, the percentages no longer fall in this range.
Look what happens when I change the recovery factor to 0.9. Now 75% is not a good estimate to use for any of the common neckband width/neckline length combinations:
| Neckband width (cm) | |||||||
| 0.5 | 1 | 1.3 | 1.5 | 2 | 2.5 | ||
| Neckline length (cm) | 50 | 88% | 85% | 84% | 83% | 81% | 78% |
| 52 | 88% | 85% | 84% | 83% | 81% | 79% | |
| 54 | 88% | 86% | 84% | 83% | 81% | 79% | |
| 56 | 88% | 86% | 85% | 84% | 82% | 79% | |
| 58 | 88% | 86% | 85% | 84% | 82% | 80% | |
| 60 | 88% | 86% | 85% | 84% | 82% | 80% | |
| 62 | 88% | 86% | 85% | 84% | 82% | 80% | |
| 64 | 88% | 86% | 85% | 84% | 83% | 81% | |
| 66 | 88% | 86% | 85% | 85% | 83% | 81% | |
| 68 | 88% | 87% | 85% | 85% | 83% | 81% | |
| 70 | 88% | 87% | 86% | 85% | 83% | 82% | |
| 72 | 88% | 87% | 86% | 85% | 83% | 82% | |
| 74 | 88% | 87% | 86% | 85% | 84% | 82% | |
| 76 | 88% | 87% | 86% | 85% | 84% | 82% | |
| 78 | 88% | 87% | 86% | 85% | 84% | 82% | |
| 80 | 89% | 87% | 86% | 86% | 84% | 83% | |
| 82 | 89% | 87% | 86% | 86% | 84% | 83% | |
| 84 | 89% | 87% | 86% | 86% | 84% | 83% | |
| 86 | 89% | 87% | 86% | 86% | 85% | 83% | |
| 88 | 89% | 87% | 87% | 86% | 85% | 83% | |
| 90 | 89% | 87% | 87% | 86% | 85% | 83% | |
| 92 | 89% | 87% | 87% | 86% | 85% | 84% | |
| 94 | 89% | 87% | 87% | 86% | 85% | 84% | |
| 96 | 89% | 88% | 87% | 86% | 85% | 84% | |
| 98 | 89% | 88% | 87% | 86% | 85% | 84% | |
| 100 | 89% | 88% | 87% | 86% | 85% | 84% | |
As for the 3″ (7.6 cm) that Dyanne Marte said to reduce your neckband? To get even some of the numbers to come out close, I had to set the recovery factor to 0.92. The numbers in the chart change drastically with slight changes in the value of the recovery factor R, and the fixed amount only comes close to working for a small number of neckband width/neckline length combinations. I would say subtracting a fixed amount from the neckline length is never a good strategy for calculating the neckband length. Come to think of it, on the example t-shirt Dyanne Marte showed in her Craftsy class, the neckband looked really loose and ripply. Note that the numbers in the chart below are in centimeters.
Neckline length minus neckband length
(Assuming angle A = 150°, and recovery factor R = 0.92)
| Neckband width (cm) | |||||||
| 0.5 | 1 | 1.3 | 1.5 | 2 | 2.5 | ||
| Neckline length (cm) | 50 | 5.2 | 6.4 | 7.1 | 7.6 | 8.8 | 10.0 |
| 52 | 5.4 | 6.6 | 7.3 | 7.8 | 9.0 | 10.2 | |
| 54 | 5.5 | 6.7 | 7.5 | 7.9 | 9.1 | 10.3 | |
| 56 | 5.7 | 6.9 | 7.6 | 8.1 | 9.3 | 10.5 | |
| 58 | 5.8 | 7.0 | 7.8 | 8.3 | 9.5 | 10.7 | |
| 60 | 6.0 | 7.2 | 7.9 | 8.4 | 9.6 | 10.8 | |
| 62 | 6.2 | 7.4 | 8.1 | 8.6 | 9.8 | 11.0 | |
| 64 | 6.3 | 7.5 | 8.3 | 8.7 | 9.9 | 11.1 | |
| 66 | 6.5 | 7.7 | 8.4 | 8.9 | 10.1 | 11.3 | |
| 68 | 6.6 | 7.8 | 8.6 | 9.1 | 10.3 | 11.5 | |
| 70 | 6.8 | 8.0 | 8.7 | 9.2 | 10.4 | 11.6 | |
| 72 | 7.0 | 8.2 | 8.9 | 9.4 | 10.6 | 11.8 | |
| 74 | 7.1 | 8.3 | 9.1 | 9.5 | 10.7 | 11.9 | |
| 76 | 7.3 | 8.5 | 9.2 | 9.7 | 10.9 | 12.1 | |
| 78 | 7.4 | 8.6 | 9.4 | 9.9 | 11.1 | 12.3 | |
| 80 | 7.6 | 8.8 | 9.5 | 10.0 | 11.2 | 12.4 | |
| 82 | 7.8 | 9.0 | 9.7 | 10.2 | 11.4 | 12.6 | |
| 84 | 7.9 | 9.1 | 9.9 | 10.3 | 11.5 | 12.7 | |
| 86 | 8.1 | 9.3 | 10.0 | 10.5 | 11.7 | 12.9 | |
| 88 | 8.2 | 9.4 | 10.2 | 10.7 | 11.9 | 13.1 | |
| 90 | 8.4 | 9.6 | 10.3 | 10.8 | 12.0 | 13.2 | |
| 92 | 8.6 | 9.8 | 10.5 | 11.0 | 12.2 | 13.4 | |
| 94 | 8.7 | 9.9 | 10.7 | 11.1 | 12.3 | 13.5 | |
| 96 | 8.9 | 10.1 | 10.8 | 11.3 | 12.5 | 13.7 | |
| 98 | 9.0 | 10.2 | 11.0 | 11.5 | 12.7 | 13.9 | |
| 100 | 9.2 | 10.4 | 11.1 | 11.6 | 12.8 | 14.0 | |
I had to make a lot of assumptions when I made the charts above – don’t try to use them for calculating your own neckbands! I made the charts to show you why using an approximate formula will not work well in general.
* Links in this post identified by an asterisk (*) are affiliate links. They are links to the US Amazon site. If you click through and make a purchase, I will earn a commission (at no additional cost to you).
 GrowYourOwnClothes Etsy Shop

Oh my! There’s a lot of math involved with this. I prefer your “no math” method… and a lot of patience and extra fabric!
LikeLike
Absolutely fantastic information!! Thank you so much for the incredible amount of work involved. I love a definitive method, rather than a “suck it and see” approach and now I have it. You’re a genius!
LikeLike
This was a very interesting post, which I thoroughly enjoyed reading. Thank you!
I learned to calculate band length using the method in the beginning of this video.
http://www.threadsmagazine.com/item/3839/video-a-neckline-binding-for-knits
Next time I will compare it to your method(s) to see how close they are. Again, thanks!
LikeLike
The method in that video will only work correctly if your finished neckband width is the same as the width of the seam allowance around the neckline. So if you cut your neckband 1 1/2″ wide and use 3/8″ seam allowances like Sarah Veblen does in the video, you should get good results with that method.
To be really nitpicky: Although she says her finished band width is “about one half inch,” if you do the math the finished band width should be 3/8″ if she used 3/8″ seam allowances like she said she did. Watching her sew, though, I think her serged seam allowances were a little less than 3/8″, which would make the neckband end up a little too long for the length of the neckline, since the actual neckline seamline ends up shorter than intended with the smaller seam allowance. For example, if you are 1/8″ off on your seam allowance, that will make about a 5/8″ difference in the length of the seam around the neckline.
LikeLike
This has been such a great read, thank you for sharing! I was googling to see if I could find a really great/consistent sweet spot % for calculating neckbands and came across your post. I’m excited to have an equation to rely on because inconsistent results and visible pulling towards the neckband drive me crazy!
Would the neckband follow the same calculations if I then turned my sewn-on neckband over the seam and stitched it as a binding or would that require added length do you think?
LikeLike
I haven’t tried this yet for a binding, but using similar principles will probably work. The length of a turned over binding would be even easier to figure out, though. You won’t need to do any calculations or draw in the neckline edge, since you already have the neckline edge on your pattern.
Here’s what I would try: Pre-stretch the strip of fabric you are going to make the binding from, cut it to the length measured around the neckline edge, then add seam allowances. Also make sure your binding fabric has enough stretch to stretch around the curve of the neckline at whatever width you want it to be by bending it around the neckline curve like I showed for the neckband width test.
LikeLike
Thank you 🙂
LikeLike
Do you have any advice for figuring out the length for raglan style tops? I’m having a hard time wrapping my head around how to do it as the sleeve piece has part of the neckline as well.
LikeLike
Use the graphical “no math” method. Pin or tape the sleeve to the front and back pattern pieces, matching the stitching lines together, and proceed just like usual.
LikeLike
Actually, now that I think about it, there’s no reason you couldn’t also use the other “calculation” method with a raglan top, too.
LikeLike
I actually would prefer the calculation method if possible but I wasn’t sure how to handle the angle portion when you add another pattern piece (the sleeve) to the mix. Would I be putting front, sleeve, back all lined up and then lining up the straight edge and getting the angle as usual? Thank you again for this help and for this post. I do this for all my band pieces now and I have been so happy with the results. I also use your binding advice and it’s wonderful.
LikeLike
I’m glad to hear this method has been working for you. Once you have the front, back, and sleeve all attached together along the stitching lines, you essentially have the same thing as when a regular front and back are attached at the shoulder seam. If the seams between the sleeve and front/back are not straight, line them up near the neck and ignore the rest of the seam. Then just extend the center front and center back lines and measure the angle line usual.
LikeLike
K, I’m going to give it a shot. Thanks so much!
LikeLike
I found your site through google and love this! I’ve basically been doing method 1 for my projects but am intrigued by your formula for method 2. I’m going to try it out. Thanks!
LikeLike
exactly where my mind was headed — thank you for working it out for me!
LikeLiked by 1 person
Thank you for all the time spent preparing this post, you are very generous indeed!
LikeLike
This information is great. I can’t wait to try it on the dress I am currently making for my granddaughter! Great information for folks like me who want the neckband correct on the first try. This is definitely a win/win!!!
LikeLike
This was really interesting to read and definitely bookmarked for the future.
Inevitably there are still some variables from different fabrics and width choices and with step-in lycra dance dresses designed using neck scoops just big enough to stretch over hips – those can be can be even more testing for higher necks! It’s great to have this method fully backed up with practical observations and a solid rational.
If I’m using a commercial pattern it has to be a trial & adjust process overall so a similar approach to the neckband may not always seem that onerous unless the fabric is challenging but I expect the more I use this method the more it will become second nature. Having this method to use with self-drafted patterns however will be particularly satisfying.
Thank you for all your hard work and especially for sharing it. 😊
LikeLike
Yes, there is some subjectivity involved, since you have to decide how much to pre-stretch the fabric before cutting the neckband. I’m finding for fabrics with spandex, it might be best to let them sit for a minute after stretching them, because they start to shrink back a bit.
That’s a good point about dancewear necklines that have to stretch over the hips. I did have to make a neckband for my daughter’s high necked shirt bigger than this method would indicate just so it would fit over her head (the finished neckband was a little ripply, but not too bad), but hips are another consideration. Since you’re sewing, you can do things “backwards” and start with a neckband stretched the right size to fit over the hips, then figure out the length the neckline needs to be to fit that neckband. I would cut a strip of neckband fabric a little wider than the neckband will be, stretch it around the hips, then let it relax for a minute and measure it, and use that length for the length of the finished neckband edge line around the neckline. If you cut a strip of heavy paper or posterboard about an half inch wide and the length that you need the finished neckline to be, you can stand it on edge and hold it in place with weights to curve it to the shape of the neckline. That way you get it the curve the right length the first time and don’t have to keep redrawing and remeasuring it. After that you would draw another line the finished width of the neckband further from the neckband line to find the stitching line of the neckline. When you sew on the neckband, you’ll also have to make sure that you are using stitches that stretch enough to go around the hips, too.
LikeLike
Thank you very much for sharing this post I used method 2 which worked perfectly! Having painstakingly made a sweatshirt which I drafted from another I have, and having used pricey fabric I wanted to make sure I got the neckband just right. I’ve not made a neckband for a sweatshirt before so I was a bit nervous but I followed method 2 your mathematical calculation and my neckband turned out so perfect!!! A huge thank you again for sharing!
LikeLike
I’m so glad it worked for you! Thanks for sharing your results.
LikeLike
Back in the 70’s, I took a Basic 6 Stretch course with a local fabric store while I was still in high-school (Pre ’76 graduation). They used 75% of neckline length for ribbing. Over the years, I have used self trim and guessed by yanking on the fabric and taking off an amount that felt right and it has always worked…but as a sewing teacher, I was looking for some formula that would work for the various types of stretch fabrics, that I could teach to my students so they had something other than the 3/4 neck length which appears to based on fabrics and their percentage of stretch from sometime back in the dark ages.
Thank you for this and for being a “sewing nerd”. I use that term respectfully since I took a look at some of your other posts and noted how in depth you get on various topics.
LikeLike
So the stretch of the fabric does not have any relation to how long the neckband is? Other guides I’ve seen say to make the neckband one percentage for a medium stretch fabric and another for a high stretch fabric.
LikeLike
Since each fabric behaves differently, the stretch and recovery are manually accounted for by pre-stretching the fabric. There is some subjectivity in this step. I’ve found that “stretch percentage” is not enough information to be useful for neckbands. Two fabrics could stretch the same amount, but one can need a lot more force to stretch it that much, and their recovery will also be different.
LikeLike
Hi Leila ,
The mathematical method is from far the best method I’ve tried ( I’ve tried a lot ) and the most logical .
I have read like 8 times the explanation in the section ” The Math Behind it All ” but I can’t really figure out from which calculation the number 0,0349 is coming . I feel like it’s coming from a calculation between π and 180° but I don’t really fully understand why . If you have some time to explain , it will be lovely to you .
LikeLike
Without being next to you in person, it’s kind of hard for me figure out which part doesn’t make sense to you. So I don’t know if your algebra and geometry skills are just rusty, or if you are from another country that uses different math symbols and conventions, or what. But I will take a stab at trying to clarify it more.
My first diagram with the two circles represents a simplified idea of a neckband that is a perfect circle (Imagine a shirt with the front and back made from perfect rectangles, with a circular hole cut out for the neck. The shoulder seams are sewn, and the neckband is attached, but there are no sleeves and the side seams are not sewn, so you can lay it flat on a table without folding it). The smaller circle represents the inside edge of the neckband, and the larger circle represents the outside edge of the neckband.
Then I wrote down some letters used to represent different geometrical parts. The circumference of a circle is 2 times π times the radius of the circle. So I wrote out a formula for the larger circumference, which I called N. This formula is N = 2πR and represents the edge of the neckband that is sewn to the shirt. This is also equal to the measured length of the shirt neck opening at the stitching line. These are the math notation conventions I am using: When numbers and letters are right next to each other in an algebraic equation without a mathematical symbol between them, or if one or both are in parentheses, this indicates that they are multiplied together. So 2πR means 2 times π times R. If something is in parentheses, calculate that first, then calculate the rest of equation.
Then I wrote out another formula for the smaller circumference, which I call n. The distance between the two circles is the width of the neckband, so I wrote another formula to say that the outer radius is equal to the inner radius plus the width w. I used some basic algebra to rearrange things to get n = N − 2πw. This is a formula that lets me calculate the inside edge of the circle, n, based on the outer edge, N, and the width of the neckband, w. N is the measured length of the neckline on the shirt.
The reason I use the inside circumference, n, to calculate the neckband length is because that edge of the neckband needs to be in a non-stretched state to lie flat. So if I cut a neckband equal to the circumference of the inner circle, I can stretch the outer edge to fit the shirt neckline opening, and it will usually still lie flat. If the inside edge of the neckband is too long, it will ripple or stick out.
But then I add in another factor, because shirts are generally not made from perfect rectangles. The shoulders slope. So if you sew together one shoulder seam, and then sew on the neckband, you will see the neckband is not forming a complete circle. An angular piece is missing, like if you cut a piece out of a pie. In my calculations, A is the angle between the front and back centerlines of HALF of a shirt (see the photographs above in the blog post to show you what angle A represents).
So the first equation, n = N − 2πw, gives you the neckband length for a full-circle neckband. But we are cutting an angular “pie piece” out of the full circle to account for the shoulder slope. Using the measured angle A, I can figure out the fraction to multiply the full-circle formula by to get the neckband length.
Angle A is measured on HALF the pattern, so it gives you HALF of the desired length for a neckband. If we take A/360° to get the fraction of a full circle we need, and multiply n by this fraction, this gives us HALF desired neckband width. That is what these formulas are doing: (Note that the 1 in n1 and N1 below are supposed to be subscripts, but I can’t format them like that in the comments. See the actual formulas in the blog post above for how they should look. Putting a subscript on a letter is just another way of making another variable to use in an equation.):
n1 = An/360°, where “n1” is the length of the inner circle after the pie piece is cut out. Remember “An” means “A times n”.
We already had the formula for n above. Since n = N − 2πw, we can put “N − 2πw” in the formula above instead of n. That is what I was doing on this line: n1 = An/360° = A(N − 2πw)/360° = AN/360° − 2πwA/360° = AN/360° − (π/180°)wA
We are left with a formula containing the variable N, which is the mythical full-circle shirt neckline length. What we can actually measure is N1, the real neckline length which is a fraction of the full-circle shirt neckline length, N.
The fraction N1 divided by N is the same fraction as A divided by 360°. So N1/N = A/360. Using algebra to rearrange that, we can calculate N in terms of N1 (N1 is known, because we measure it): N = 360°N1/A
So then take the formula for n1 we had before, n1 = AN/360° − (π/180°)wA, and replace the mythical full-circle N with 360°N1/A. After using algebra to simplify that result, we are left with
n1 = N1 − (π/180°)wA. If we replace π with the decimal approximation 3.14, we get n1 = N1 − (0.0175)wA.
But remember, since we were measuring A and N1 on only HALF the pattern, this formula calculates HALF the neckband length. So to get the full neckband length, we to multiply that formula by 2, which gives us
2n1 = 2N1 − (0.0349)wA
Hope that helped and didn’t just confuse you more.
Leila
LikeLike
Hi Leila ,
Thank you so much for your long reply, it make sense and it’s all clear. Thank you again for the time you spended to create this formula which is absolutely great and work perfectly in real live .
Cedric
LikeLike