
For the first few years that Singer produced the model 66 sewing machine, the machines had back clamping presser feet instead of the low shank side clamping feet used on their other machines. The back clamp feet are expensive and hard to find, and you are limited as to what feet and attachments are available, so it’s nice to convert a back clamp Singer 66 to side clamp if you plan to use it regularly. These sewing machines are so old they were made before zippers were used in clothing, so you probably won’t be able to find a back clamping zipper foot. After converting to side clamp, you can use those new-fangled inventions like zipper feet, walking feet, and buttonholers with your machine. You can also use a low shank snap on foot adapter with the machine so you can use modern snap on feet.
-
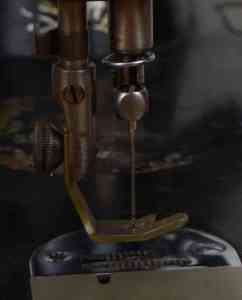
- Back clamping foot

-

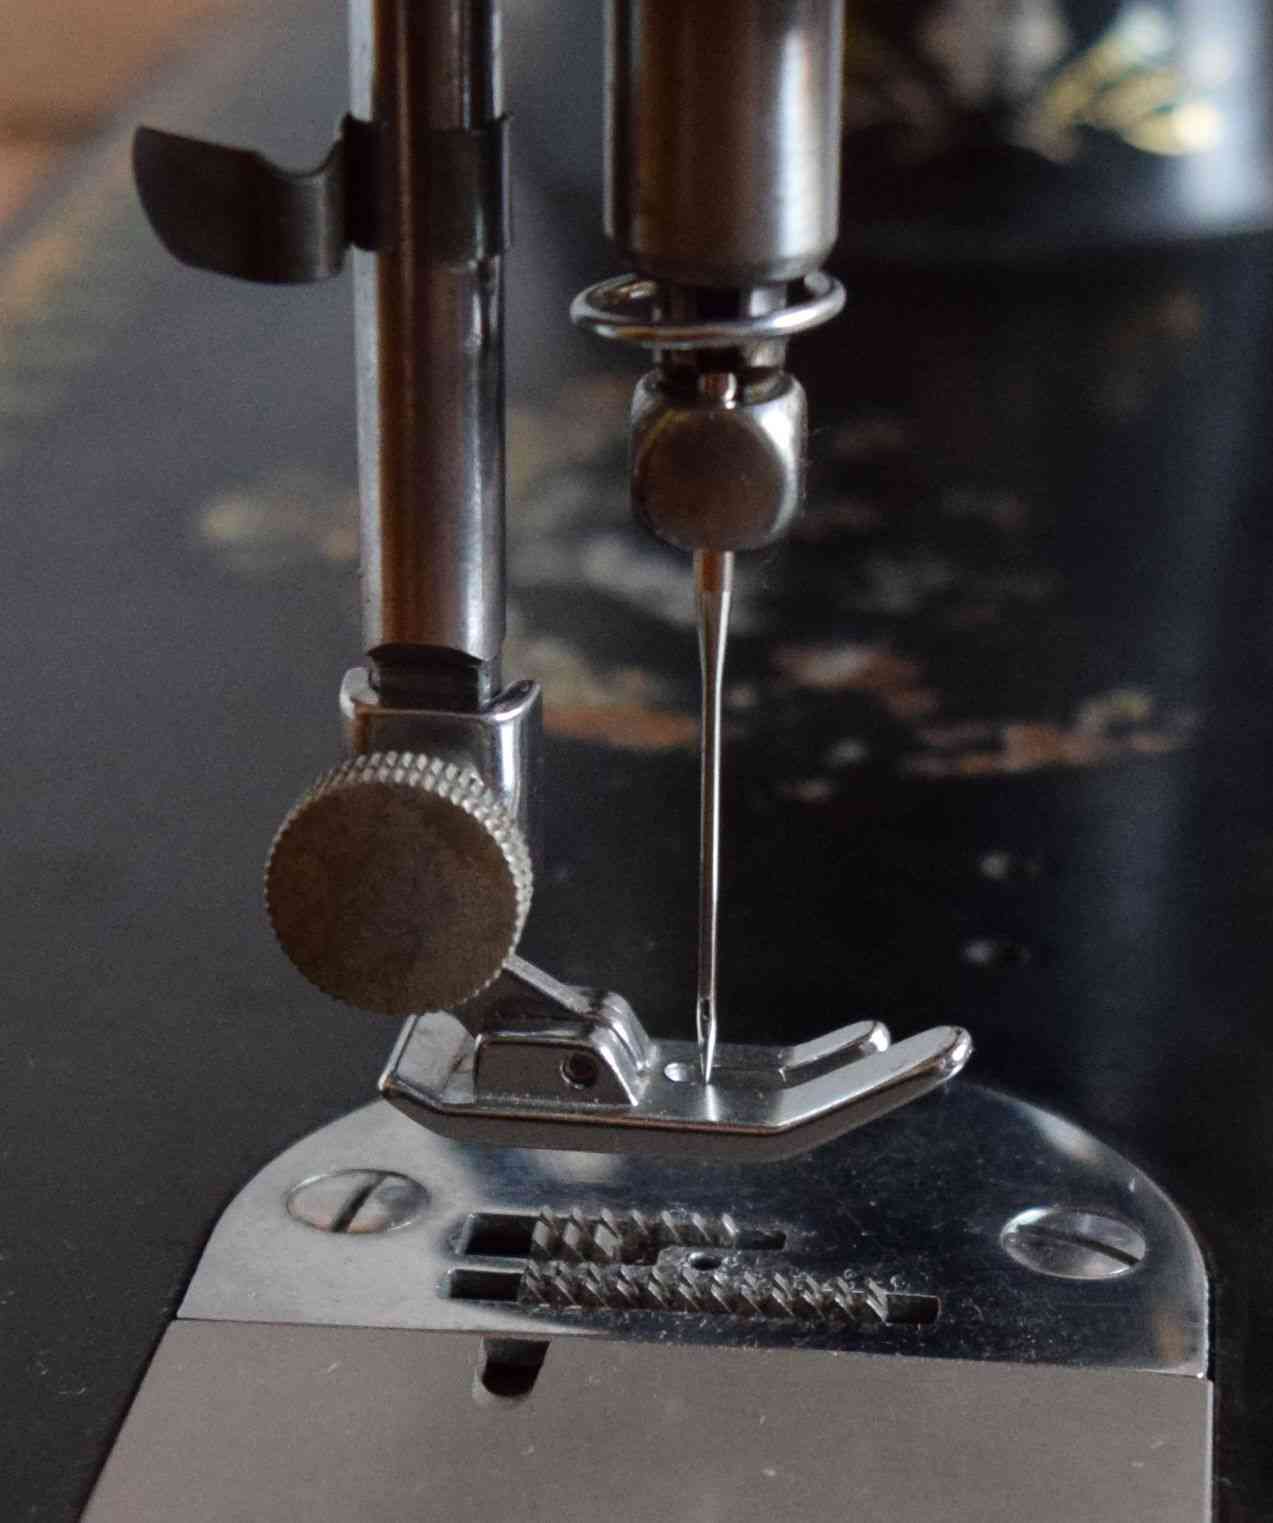
- Side clamping foot
I found text directions for the conversion on the Treadle On site, but I couldn’t find any pictures of the process, so I’m writing up a tutorial on how I did it.
You’ll need a side clamping presser bar from a Singer 66 parts machine. You can find these on ebay sometimes, but I found it was cheaper to just get a whole parts machine for myself. I got mine on the shopgoodwill auction site. Just make sure you get one with a side clamping presser foot.
The conversion process is pretty simple, but you might run into problems due to old hardened oil and rust. If you have any problems with stuck parts, apply some penetrating oil (such as kerosene or Liquid Wrench) and let it sit for a bit, then heat the area up with a hair dryer, which does wonders to soften up hardened oil. I don’t like to get WD-40 near my sewing machines, but if you choose to use it, make sure to clean it off thoroughly before putting the machine back together. If left on the machine, it will eventually dry to a film that will glue the parts together.
On my rusty parts machine, in order to remove the foot pressure knob, I had to wrap the knob with a strip of leather, then grip it with locking pliers. I use the locking pliers as a last resort, though, because no matter how much I try to protect the knob from damage, I usually end up scraping it up. My presser bar was a bit rusty on the ends, but after soaking it in Evapo-Rust and polishing it with metal polish it looked pretty good.
The procedure for removing the presser bar from a donor side clamping machine is basically the same as for the back clamping version, so I’ll just show the steps for the back clamping machine.
This probably goes without saying, but clean all parts and rub them down with sewing machine oil before putting them back in the machine.
- Remove the needle, just so it isn’t in the way and you don’t stab yourself. Remove the presser foot and the screw that holds it in place. On a back clamping machine, also unscrew and remove the presser foot holder that the presser foot attaches to.


- If you have a thread cutter, remove that too. To remove it, wrap it in a rag so you don’t hurt your hand, then twist it back and forth as you pull down on it.
- Lower the presser foot lever. Clean the exposed portion of the presser bar. I use rubbing alcohol on a cotton swab to remove hardened oil (be careful not to drip any alcohol on the black finish – alcohol dissolves the shellac used on it). Rub some sewing machine oil on the bar after cleaning it.
- Loosen or remove the upper screw holding the side plate in place, remove the thumbscrew, and remove the side plate.


- Unscrew and remove the foot pressure knob.
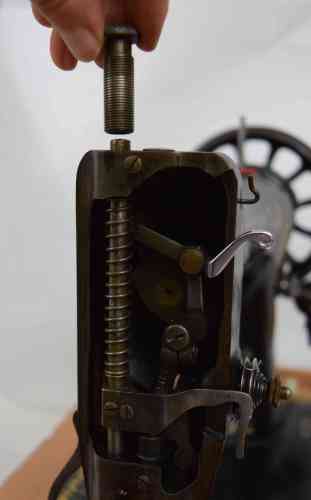
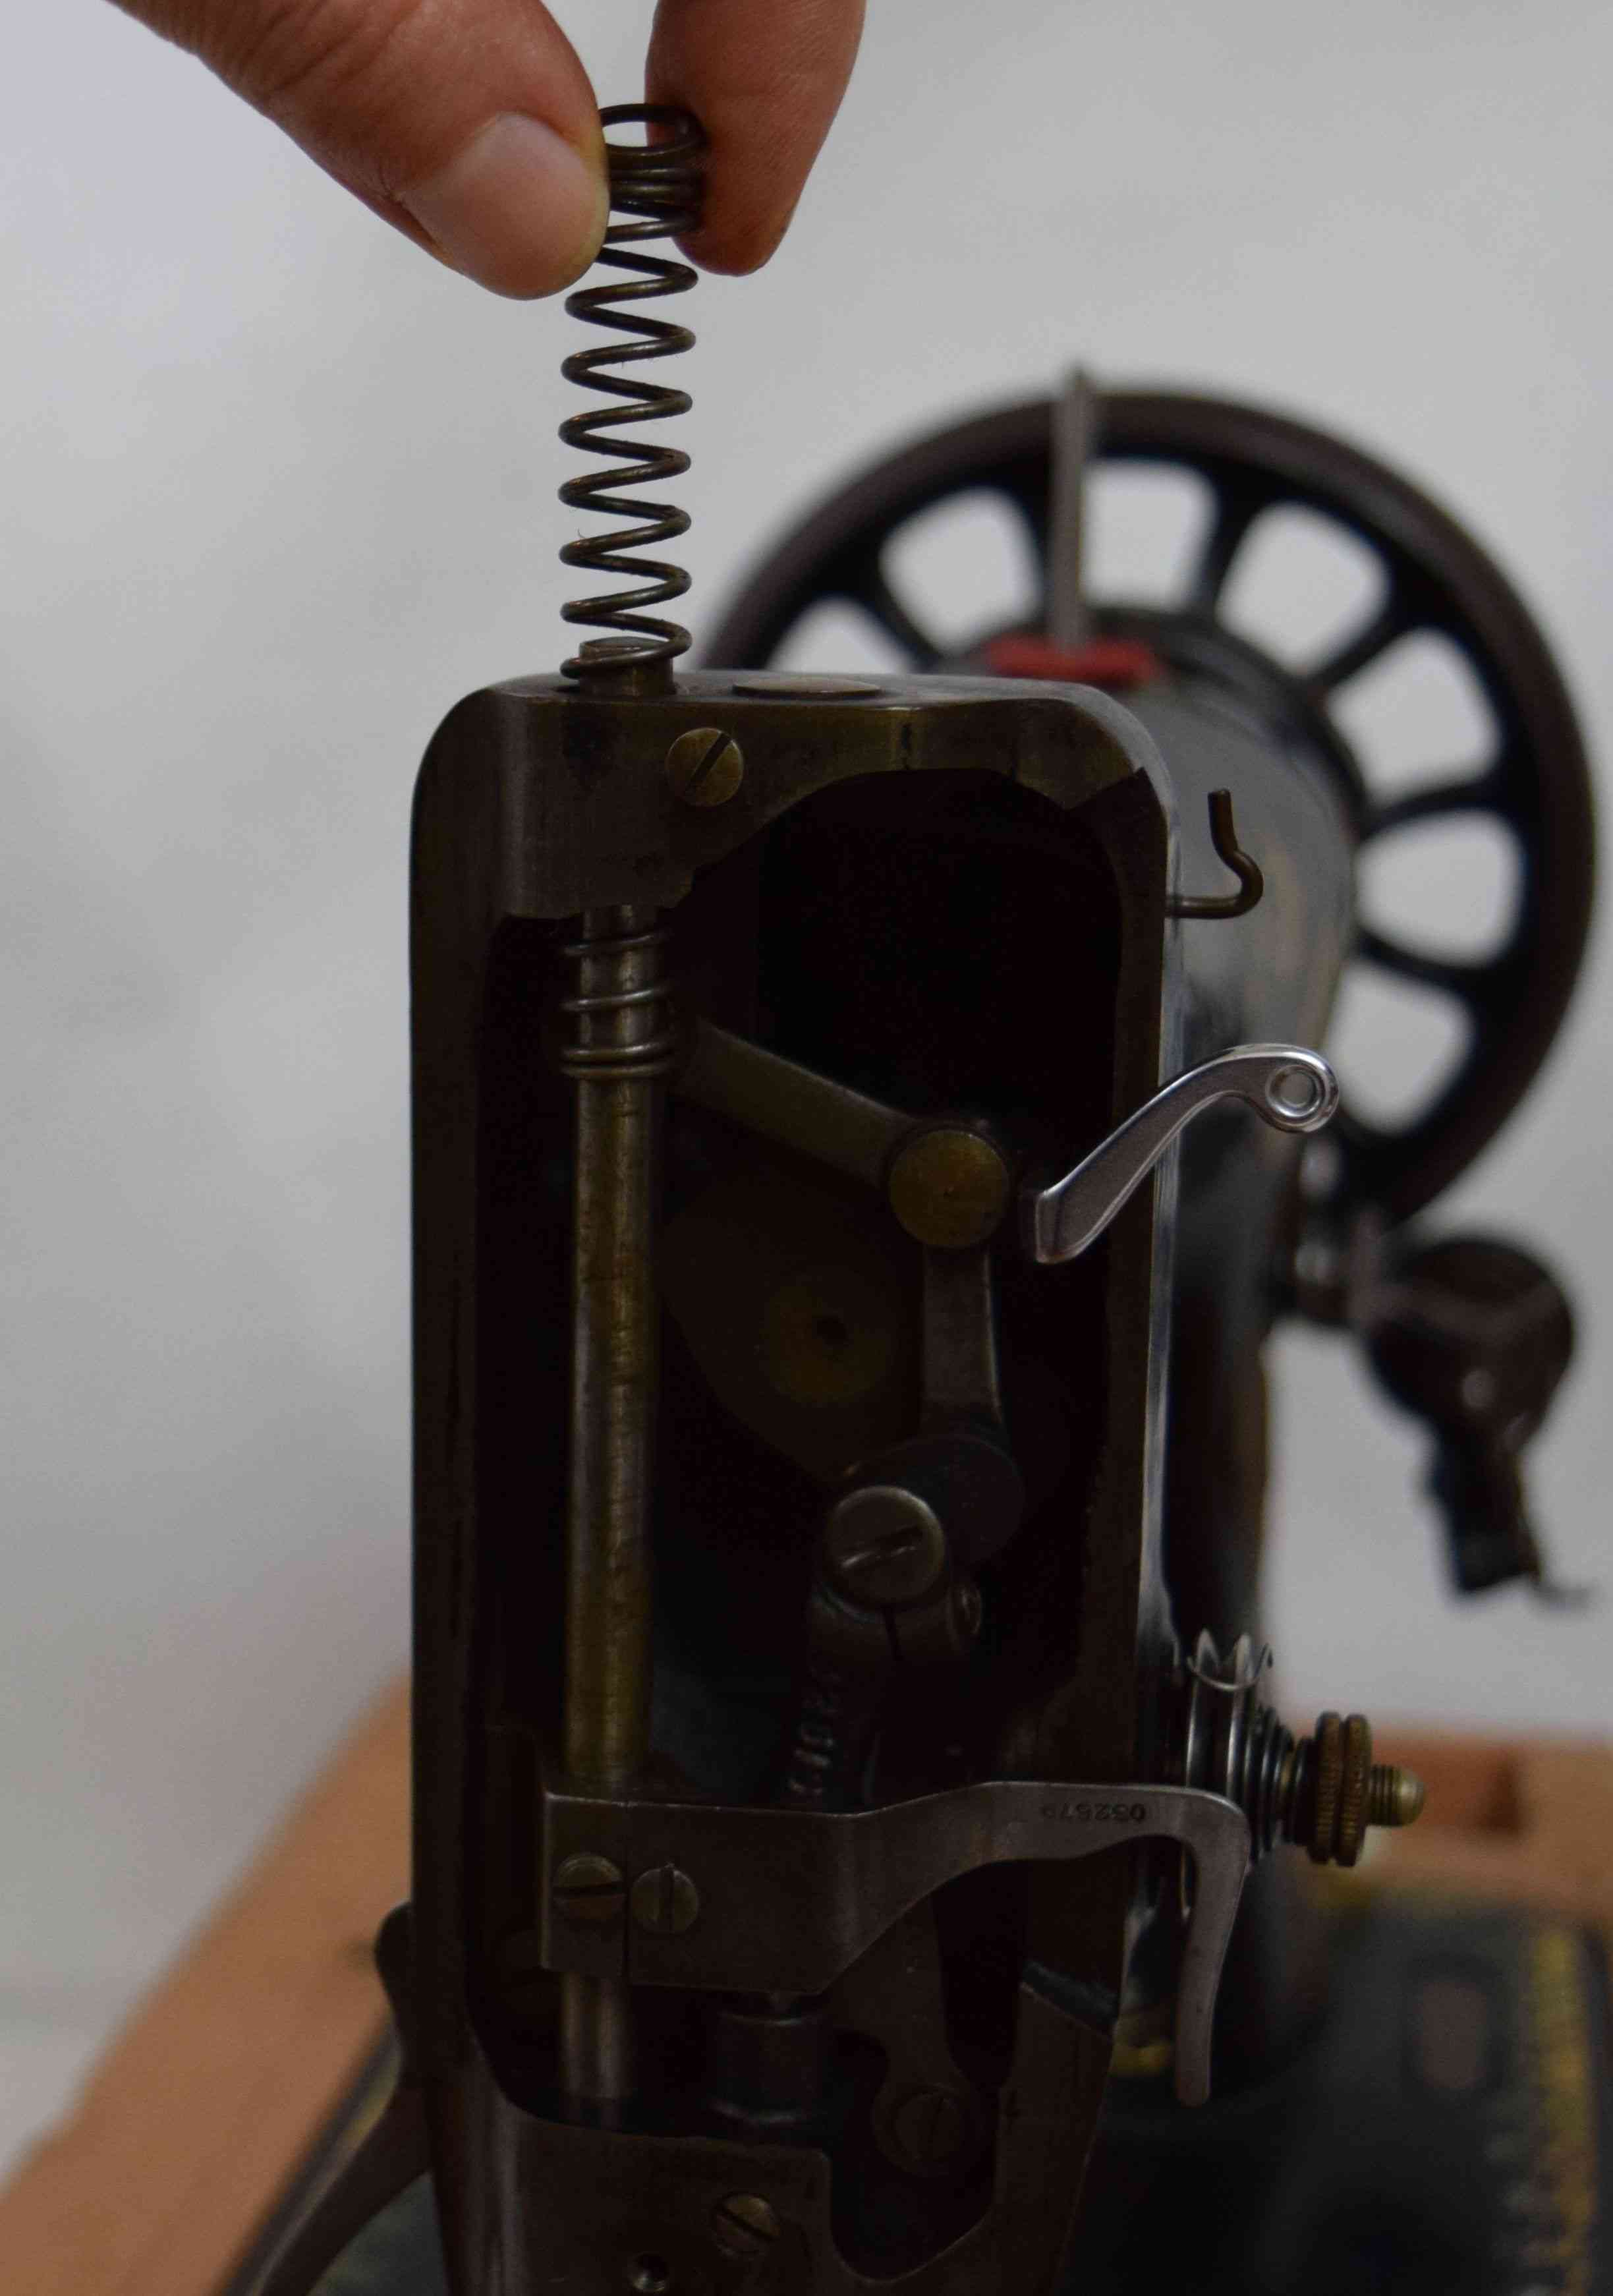
- Remove the spring through the top of the machine. There should be a washer sitting on top of the spring, so be careful not to lose it.

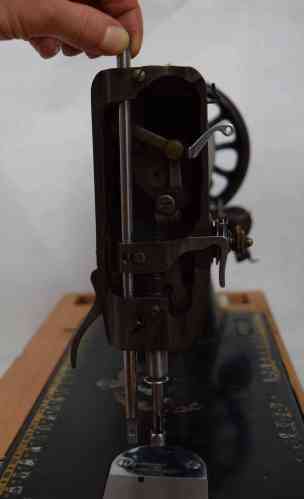
- Loosen or remove the set screw that holds the presser bar in place. Remove the presser bar through the top of the machine.


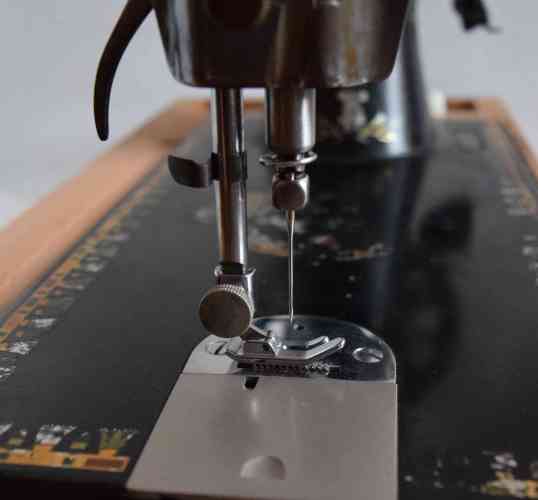
- Insert the side clamping presser bar down into the machine. Turn it so the flat edge on the lower end of the bar is facing the left side of the sewing machine.
- Put a general purpose presser foot on the bar. Turn the flywheel (hand wheel) until the feed dogs are in the lowered position. Adjust the position of the foot so it is straight and down against the machine bed.
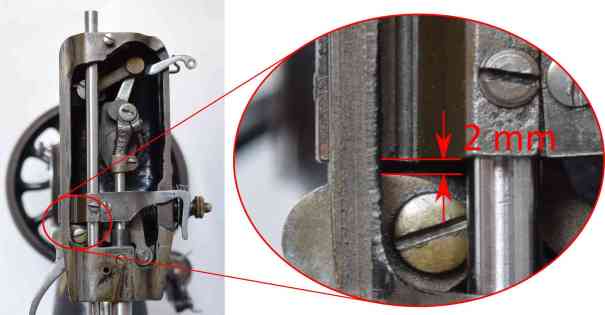
- Adjust the position of horizontal bar that the set screw goes in so there is about a 2 mm gap between the lower edge of the bar and upper edge of the presser foot lifting lever (this is just based on how my machine was originally adjusted – I don’t know what the official gap should be). Insert the set screw and tighten it. Raise the presser foot lifting lever, turn the flywheel a full revolution, and make sure the needle bar doesn’t hit the presser foot. If the needle bar hits the presser foot, lower the presser foot and adjust the horizontal bar up a little further.
- Lower the presser foot lever. Insert the spring down through the top of the machine. Place the washer on top of the spring.
- Screw the foot pressure knob back in.
- Put the side plate back on.
- Remove the presser foot and the screw that holds it in place. Slide the thread cutter onto the presser bar. I used a small flat head screw driver to pry it open a little as I got it started. Put the presser foot back on.
- Test out your machine and adjust the presser foot pressure. The pressure should be just enough to feed your fabric evenly and give you stitches that are all the same length.


 GrowYourOwnClothes Etsy Shop

What a terrific alteration which I’m sure will make this machine more useful. Well done!
LikeLike
Thank you for this. I don’t have a back clamp machine (right now) but you never know. I love reading the Treadle on site. There was another one I found last night that talked about how to fix various sewing machine problems… Darn if I can remember it now, but I did write it down… Somewhere!
LikeLike
Have you been to the Victorian Sweatshop Forum? There are lots of people there discussing antique and vintage sewing machines.
LikeLike
Good walk-through on changing the Singer 66 presser bar. I’ve changed a few of them in the past 10 years, but I haven’t changed one for myself yet (I do vintage machine work for the public in my wife’s fabric shop). I also collect sewing machines, so I’ve got a 66-14 with a side-mount foot, left my 66-3 hand crank Red Eye as a back-clamper, and finally found a 66-1 Lotus back-clamper (treadle only – no mounting boss) just this past May 2016. It was the first Lotus that I’d even SEEN in my area in 10 years. It’s interesting how machines can either be abundant or scarce in various areas of the nation.
I just found your blog, and will be looking in on it from time to time. Your treadle Singer 328 brought me here. I mend jeans for the public regularly on a treadle Singer 319W, so I search periodically for electric-to-treadle conversions. I love to sew on a treadle, and have 10 of them in my house (9 of them ready to sew on) with 5 of them being Singer Industrials. Can I post a link to my personal sewing machine collection? It’s on a commercial site (for our fabric and sewing shop) but on 7 pages by themselves separate from the business.
CD in Oklahoma
LikeLike
Never mind about the question “can I post a link to my collection”. The link came to you in the sign-up to post the comment. I think that you can see it, but it doesn’t need to be public.
CD in Oklahoma
LikeLike
Thanks for your comment. Yes, if I click on the link on your name, your sewing machine collection comes up. I always like to look at sewing machine pictures!
LikeLike
Oh I can’t thank you enough for this tutorial WITH PICTURES! I have a Singer 66 treadle and have been wanting to buy a quilting foot for my machine (for starters) but couldn’t find one for it. It appears I will need to convert from my back clamp foot assembly to a side one, which is what brought me to your website. I also found the other website with only text directions and although I’m very grateful those kind people shared their knowledge, I didn’t feel I could tackle the conversion problem from it. I just don’t know enough about sewing machines or their part names. Your pictures made all the difference for me, along with the info of what’s needed. I actually lucked out and found a used 66 presser shaft side mount assembly on Ebay! THANK YOU so much for taking the time to make and share this tutorial!
LikeLike
Great article on converting a 66-1 to side clamp. Will a presser bar from a Singer model 27 work in the 66?
Thanks,
Charlie
LikeLike
I checked the 66 presser bar against my other machines and didn’t find a match. They were different lengths.
LikeLike
Another enthusiast, heartfelt thanks for these instructions. Not just any old quick instructions, either – you are so wonderfully organized and methodical. My soon-to-be Model 66, from 1919, also thanks you!
LikeLike
I am so grateful for your good tutorial. You are such a good teacher, and so generous to do this for all of us. THANK YOU!
LikeLike
Hello and many thanks for your information in such abundance. I have a Singer treadle base and a Singer 66 made in 1926. At the moment they are separated by 100 miles. When they are together what should I look for to unite them an make a treadle machine?
Thanks again, Larry
LikeLike
You can find a lot of information on treadle sewing machines on the treadleon site.
I would recommend that you take apart your treadle base and clean and oil it if you haven’t already.
Here’s a video of how to put a machine in a cabinet. They show an electric machine, but the procedure is the same for a treadle cabinet.
After you get your machine in the cabinet, you’ll need to install a 3/16″ diameter leather treadle belt.
Happy treadling!
LikeLike
Great tutorial. I have a converter, but, haven’t ever tried to change out the presser bar. I already have some donor machines.
LikeLike
Another heartfelt thanks here for your thorough directions and photos. We found my 7-drawer, 1919 66-1 treadle in the next state. Hubby refinished the cabinet and made some small repairs while I cleaned, shined, and minimally adjusted the machine. All parts were in good order then after a little practice operating the feet and learning to start and stop, I have been ready for my first Lone Star quilt. It took a little while to find the 66 assembly after finding your directions.You have made all the difference for us to finish getting this lovely machine to its present state. Best wishes to you!
LikeLike
Excellent conversion run through,i found a few minutes with a heat gun around the presser bar adjuster and some oil work a treat.
LikeLike
Thank you! Just switched mine out, easy peasy.
LikeLike
Just got a 66 lotus and need to do this, thanks for the help
LikeLike
I have a grungy Red Eye back clap treadle. Didn’t come with a presser foot. I bought one on eBay (36021 I think) but it doesn’t fit. After finding a manual for a 66-1, I think I need a different (shorter) presser foot. Want to make sure the machine will run before I spend more $ and the time to clean it up. Can you tell me the part number of the CORRECT presser foot? Thanks.
LikeLike
My back clamp foot is marked 32559. Looking online, it looks like it is interchangeable with #32601. My best guess would be that you have the right foot, but maybe your presser bar slipped down and needs adjusting. If that is the case, you can use my instructions here to adjust the height of the presser bar. There is only one type of Singer back clamp foot attachment, so the foot you have should be the right one (unless it was for a different brand of machine and was mis-labeled by the seller on ebay). If it is marked 32601, it should be the right Singer part, and I would start with adjusting the presser bar.
LikeLike
After removing the necessary screws & ect., this bar is wedged in my machine & will not budge. Do I need to use heat or something else, to get the bar to move? I am trying to clean up a machine that got left outside & is a little on the rusty side. So far I have tapped the bar with a small copper hammer, with no success.
LikeLike
If there is rust on the presser bar just above the part it is screwed into, you should remove that first. Maybe polish it off with some metal polish. You can put some on a strip of fabric and use it like floss to get the back side. Let some penetrating oil sit overnight, heat, oil, tap gently with a hammer. Repeat if it doesn’t work the first time. Good luck!
LikeLike
The presser foot bar from a singer 27 also works, it is just longer than the back mount singer 66 foot presser bar.
LikeLike