
I need all new short and long sleeved t-shirts, and my attempt at making a pattern from a ready-to-wear tee didn’t work out very well, so I decided to give the new Grainline Lark Tee pattern a try.
I haven’t had much luck with getting patterns to fit me in the past, but recently I bought a copy of the out of print Simplicity 9900 pattern, which includes a basic fitting pattern in a range of sizes. I have a custom fitting shell that I draped, so I compared it to the Simplicity pattern. I was surprised to find I no longer have sloping shoulders to deal with – I guess my efforts to keep my shoulders back have paid off! Anyway, I decided that for loose fitting patterns, I can probably get away with making length adjustments, moving the shoulder seam forward, and doing a full bust adjustment.
I decided to just blindly make these fitting changes to the Lark tee pattern to see how they worked out (spoiler – it worked great!). The first thing I had to do was pick a size to start with, though. Easier said than done! Here are my current measurements:
Bust: 38″
Upper bust: 33″ or 34″ This measurement can be subjective – taking a “snug” measurement leaves room for interpretation.
Chest (under bust): 30″
Waist: 31″
Hip: 39 1/2″
I’ve never understood the logic behind selecting a pattern based on the upper bust measurement. If I did that, I’d have a large full bust adjustment to make, which would be hard to do for a knit pattern. Instead, I started with my chest measurement, and using the typical US calculations for bra sizing, came up with a theoretical bust size of 36″ if my breasts were B-cups (add 6″ to the chest measurement if it’s an even number, or 7″ if it’s odd). This seemed more reasonable – I’d only need to add 2″ to the front in the bust area.
I cut a size 8 in the shoulder and chest area and blended to a size 10 at the waist and hips. Then I shortened the body 3″, shortened the long sleeve 2″, shortened the 3/4 length sleeve 1 1/2″, and moved the shoulder seam forward 7 mm. (Yeah, I mix unit types all the time. Haven’t had any disasters yet . . .)
Now for the full bust adjustment. I had read this post on knit FBA’s, and I used those ideas as a starting place, but I pretty much just made this up as I went along. The picture below shows what I did. I slashed and spread the pattern as for a typical FBA, then trimmed off half of the width of the new dart from the underarm. This lengthened the armhole seam, but this extra length eased into the sleeve without any problems. I eased the rest of the dart width into the side seam over a length of 8″. I added corresponding notches to the back side seam. The blue line is the shape I used for my first try (the blue t-shirt below), and the red line is the final shape I used later for all of the other tees.

I’ve been in stashbusting mode, so I pulled out everything in my stash that could possibly be made into a Lark tee, and started sewing. Here’s what I’ve got so far:
Lark Tee #1 3/4 sleeves and crew neck:

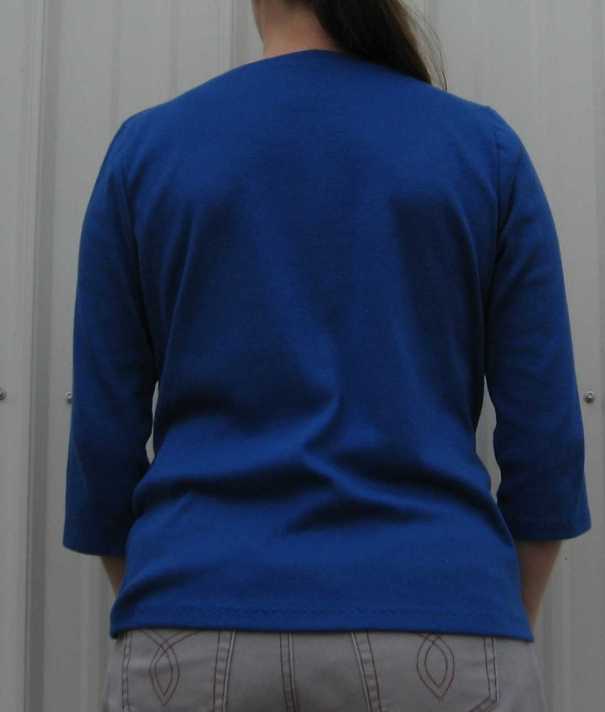
This blue fabric is a vintage poly/cotton blend that I picked up at a thrift store. It’s a 1×1 rib knit with no vertical stretch, but stretches easily crosswise. This fabric worked quite well for this pattern. I can’t stand the feel of polyester, so I’m not sure I’ll be able to actually wear this shirt, but it worked well as a muslin.
I wasn’t sure at first how I would like high sleeve caps on a t-shirt. In general, I prefer being able to lift my arms easily over looking nice with my arms at my side. The high sleeve caps means extra fabric bunches at the shoulders when I lift my arms.
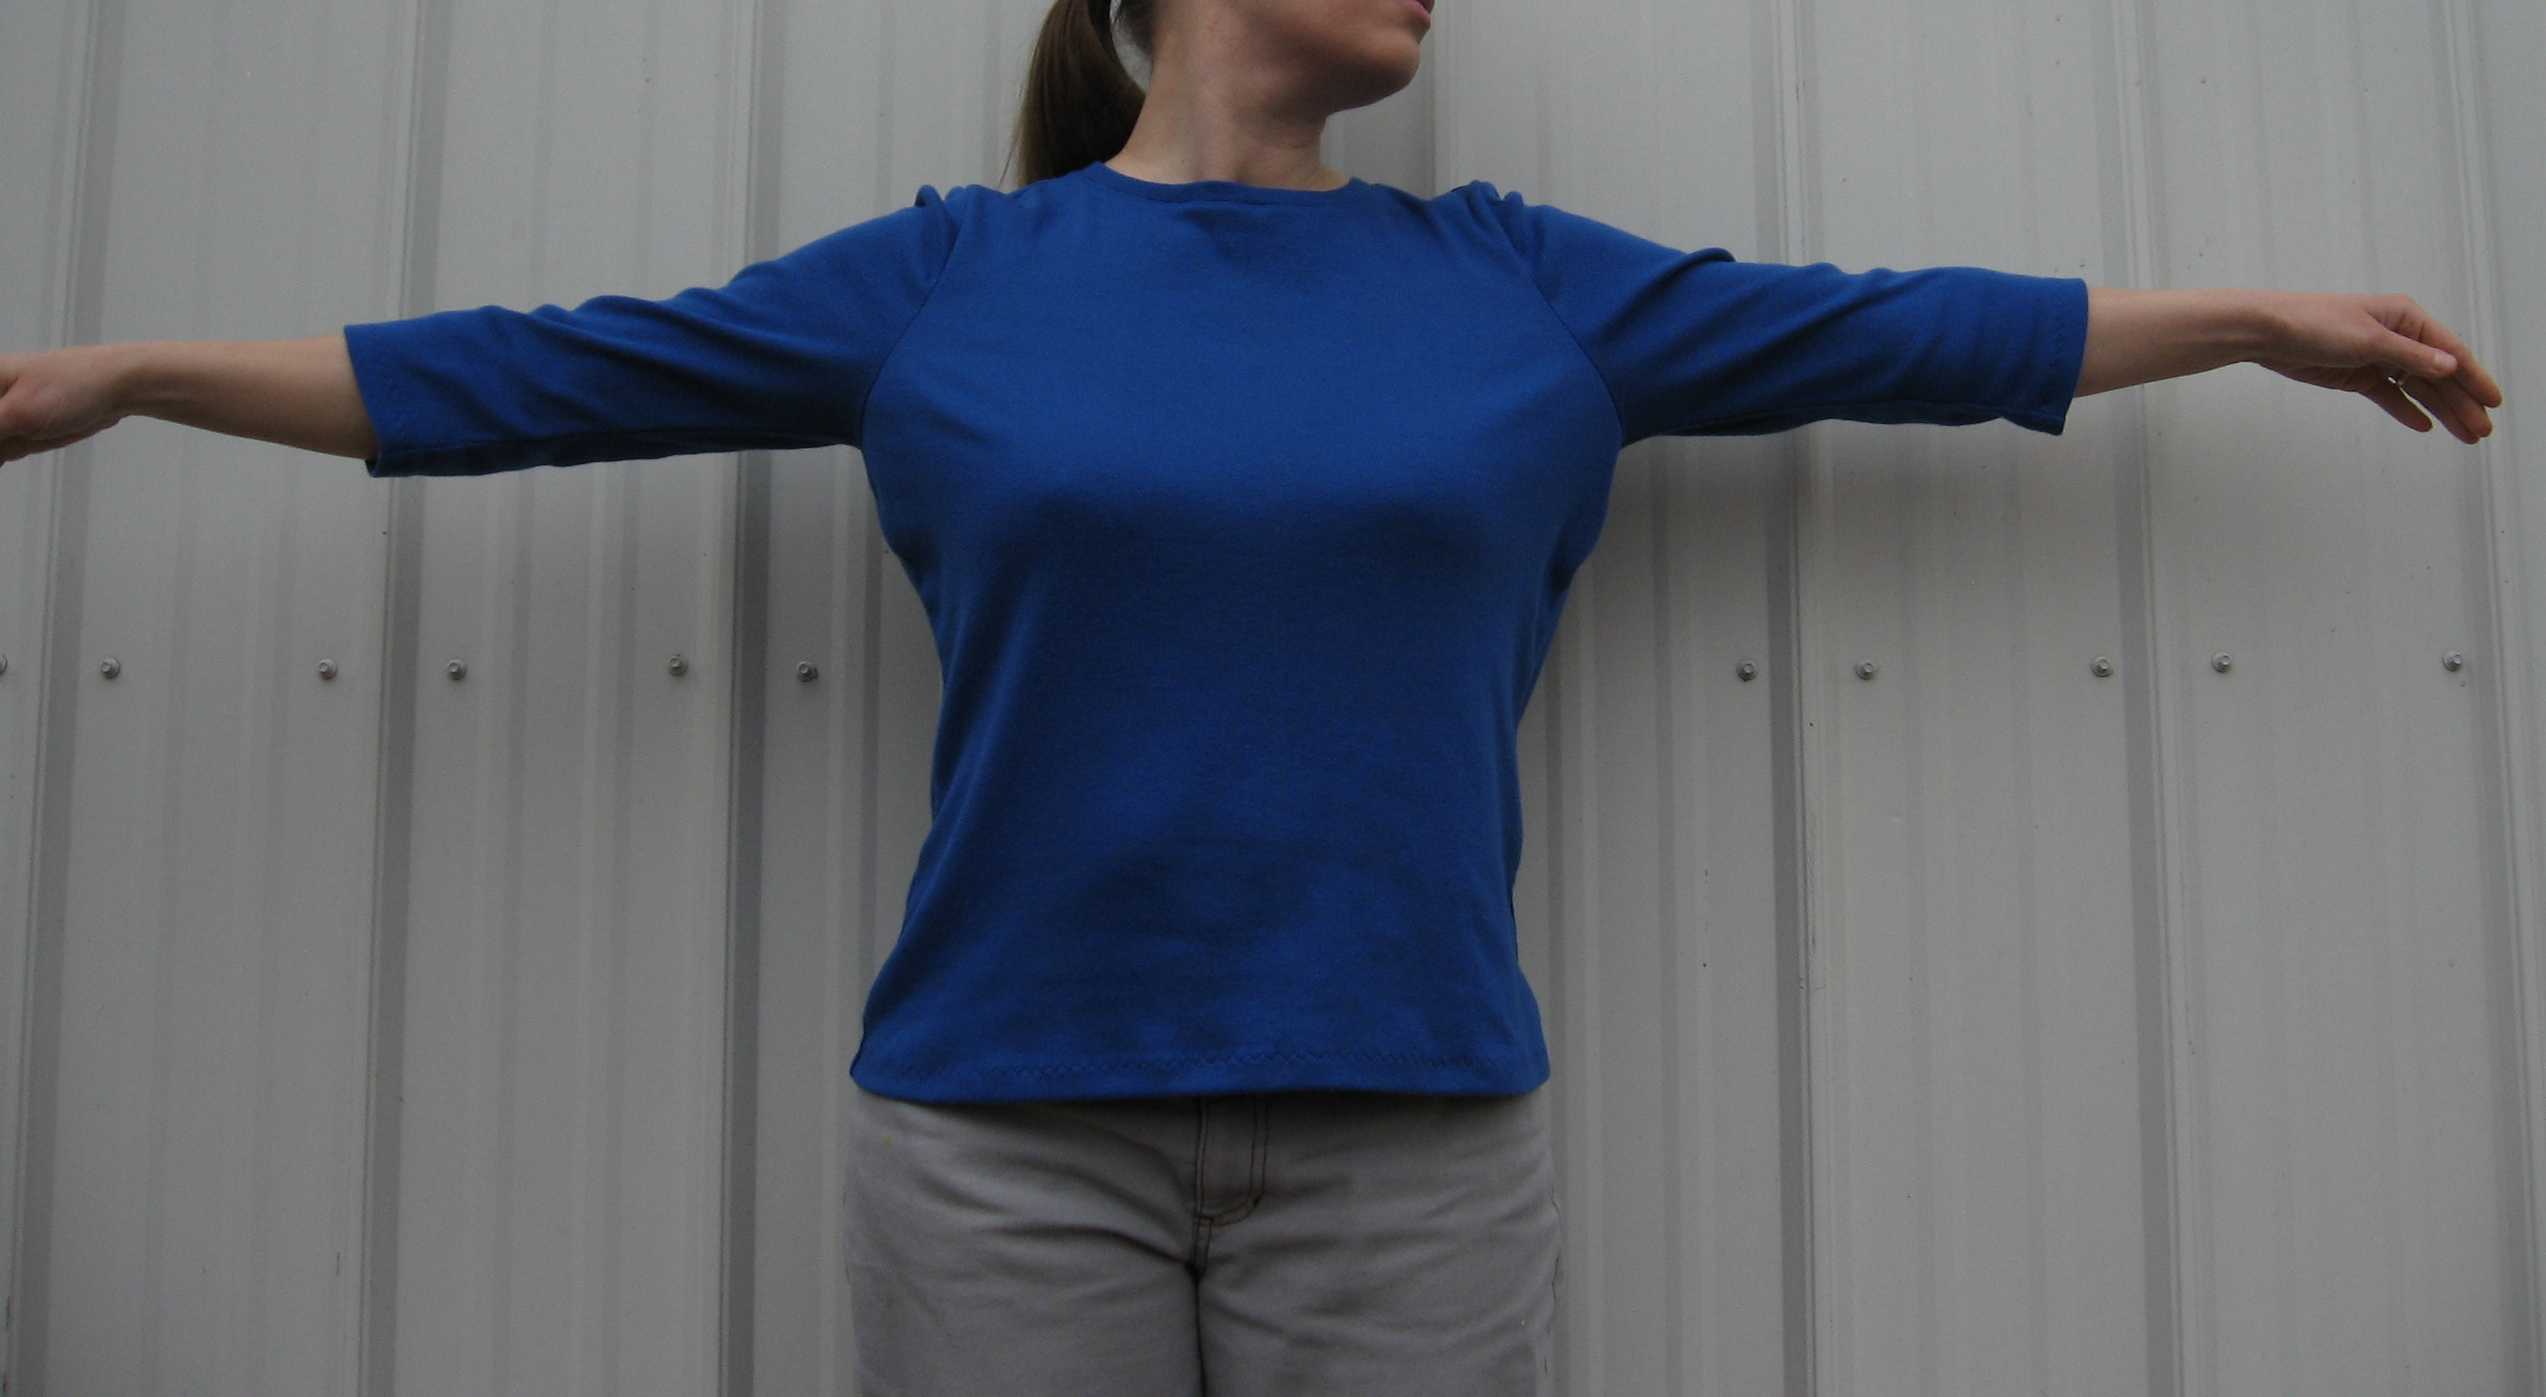
Then I remembered that this pattern was designed for layering, and I put on the down vest that I practically live in all winter over the Lark tee. It was really comfortable! The high sleeve caps mean no bulk under the arms. I hadn’t realized how irritating that wad of fabric under my arms was until it wasn’t there. I’m willing to deal with a little pulling when I raise my arms for the trade-off of comfortable underarms when my arms are lowered. I’m going to make a bunch of Lark tee’s for the winter, and then look for another pattern to use when I’m warm enough not to need lots of layers.
My first attempt at the FBA left a bubble of fabric. It’s not too obvious with my arms lowered, but I made pattern corrections for the later versions of the tee.

This fabric stretched out really easily, so I experimented with stabilizing the neckline with watered down school glue. It worked fine, and washed out without any trouble. It made topstitching around the neck band easy.

Lark Tee #2 Long sleeves and V-neck:


This is the most comfortable long sleeved shirt I’ve ever had! I upcycled a couple of my old maternity t-shirts to make this tee. Unfortunately, even though I used ball point sewing machine needles, they punched holes in the old fabric, so this shirt will have a limited lifespan. This fabric is also a 1×1 rib knit.
The easing for the FBA is less noticeable on this version. I absolutely love the results of doing an FBA instead of just cutting a larger size. The shirt fits across the chest and shoulders, the hem does not pull up in front, and I still get a slim fit at the waist and hips. All of my RTW t-shirts are either too tight across the chest or huge all over.

After seeing all of the sway-back wrinkles in the pictures, I considered making more pattern adjustments, but in the end I decided I’m happy with the shirts as-is. I’d rather not add more fullness around the hips, I can’t see the wrinkles in the back anyway, and no one else will notice or care.
I used a twin needle for the hems and neckline topstitching. I used woolly nylon in the bobbin, with my tension left at the usual settings. My woolly nylon was wound a little too tight, but the hems came out OK. I’ve tried so many different things to get twin needle hems to work on knits. This time I serged the edge with a four-thread stitch, pressed up the hem, and used washable glue stick to hold it in place before stitching. So far, this combination has worked the best. Usually I end up with popped stitches after the garment is worn a few times.
The twin needle topstitching around the neckline was a disaster, though. It looked fine at first, but after going through the washer and dryer, it did this:

I picked out the topstitching, starched the neckline, and tried topstitching with single thread chain stitches on my vintage Singer Touch & Sew. Much better. (The picture below was taken after the starch was washed out.)

Lark Tee #3 Short sleeves and scoop neck:
I bought a knit dress at a thrift store because it had nice buttons. After taking off the buttons I kept the dress, since there was a fair amount of fabric in the skirt, and I can’t throw away fabric that might be useful! Well, I finally used it. The fabric is medium to heavy weight cotton jersey. I tested the stretch of this fabric, and it had 20% stretch, so I hoped it would be OK. It turned out to be too firm, though. For this pattern, you don’t need fabric that stretches a lot, but it needs to stretch to 20% easily. Think 1×1 rib knits (aka baby rib knits) and drapey jerseys. This shirt is pretty snug. It feels OK until I try to lift my arms. I have RTW shirts that are just as tight though, so I might wear it until I make something better. Anyway, at least I learned something and it didn’t cost me anything to make.

Lark Tee #4 Long sleeves and scoop neck:
I made this shirt out of lightweight cotton/lycra jersey with four way stretch. I think it will work nicely as an under layer.

One last note on sewing Larks: I wondered if I should stabilize the shoulder seams, since it is not mentioned in the instructions. After sewing a few of these, I’d recommend using 1/4″ clear elastic to the stabilize the shoulder seam only if your fabric has poor recovery (it doesn’t bounce back into shape after being stretched), but otherwise don’t add anything to the shoulder seam. The pattern is designed to stretch to fit across the shoulders, so you definitely don’t want to add a strip of selvage to the shoulder seam.
I have some lightweight wool blend jersey that I’m going to make into at least one Lark tee, maybe more if it doesn’t end up being too scratchy. After that I’ll have used up all of the decent sized pieces of knit fabric in my stash, so I’ve given myself permission to actually buy some more fabric! Larks will definitely be a staple in my wardrobe this cold season.
 GrowYourOwnClothes Etsy Shop

Thank you for this comprehensive review of the Lark! Particularly your findings re high sleeve cap.
LikeLike
Looks like you were very successful with this pattern. Good to know! I never thought about using school glue! Although I like putting stay tape in my shoulder seams and bias tape in my necklines so I can hang my tops up and not have them stretch out.
LikeLike
[…] in the bust area. I actually did this same thing on purpose as part of a full bust adjustment on my Lark tees, and it worked great. The ease at the lower front armhole is not noticeable on the finished […]
LikeLike