
 I use little circles that my pencil goes through to mark seam allowances along curved seams, and a while back I created a tutorial for making these seam allowance guides by hand.
Recently I dropped the little box that I keep them in and lost the 1/4″ circle. It occurred to me that it would be easier to draw a new circle in Inkscape and print it out rather than drawing a new one manually.
So I thought, why not make a whole sheet of circles, so I can print new circles whenever I need to without having to redraw them? And if I’m going that far, why not make a metric set, too, and post them on my blog? So here they are: Imperial (inches) seam allowance guides and metric seam allowance guides. There are many sizes commonly used for seam allowances, plus larger sizes that you can use to draft facings.
To use these circles, print them out, preferably on heavy paper if you have some. If you have some full sheet adhesive labels, you could print onto those to make things easier. Make sure to print using the highest quality print settings and no scaling (100% or actual size). Measure the border to make sure it matches the dimensions printed in the upper right corner of the sheet.
These circles are not thick enough to work well on their own, even when printed on heavy paper. Roughly cut around a circle, then use double sided tape to stick it onto a piece of a thin, flexible plastic lid (like an HDPE margarine tub lid). Craft glue or rubber cement might work instead of double sided tape, if it will stick to the plastic.
If you don’t have an appropriate plastic lid to use, you can adhere the circles to a piece of paperboard, such as a piece of a cereal box, instead, but they won’t be quite as durable. If they wear out, you can easily make new ones, though! I used paperboard for the large sizes, since I didn’t have a plastic lid large enough. I also used clear box sealing tape over the circle to protect it, but that is optional.
After gluing or taping the circle onto plastic or paperboard, carefully cut out the circle. Use an awl or large needle to punch a hole in the center just large enough to fit your pencil lead through. Mechanical pencils work best, since the tip will always be the same size.
To use the seam allowance guides, stick your pencil lead through the hole in the middle, then run the edge of the circle along the stitching line. When you get to a corner or straight section, it helps to use the guide along the edge of a ruler.

Seam Allowance Guides
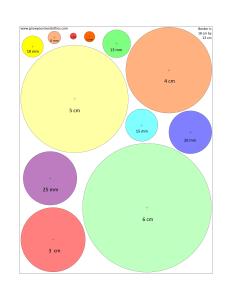
Metric seam allowance guides
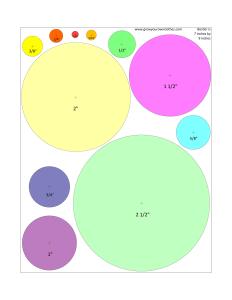
Imperial (inches) seam allowance guides
 GrowYourOwnClothes Etsy Shop

This is such a fabulous idea! I usually have 1cm seams and use a clear plastic ruler to mark them – the edge of the numbers exactly equals 1cm. The problem is that it doesn’t work for curves and your genius idea has solved my problem. Thank you!
LikeLike
PS I forgot to thank you for putting up the templates. Wonderful!
LikeLike
You’re welcome!
LikeLiked by 1 person
Thanks for this great idea! Will reblog and share to my chat group!
LikeLike
I hope you find these as useful as I do.
LikeLike
Thank you so much! I’ve been wanting something like this. I appreciate all the work that went into the templates you shared.. so thanks again!
LikeLike
You’re welcome. I hope they make adding seam allowances easier for you.
LikeLike
[…] https://growyourownclothes.com/2015/09/01/seam-allowance-mfantarking-templates/comment-page-1/#commen… […]
LikeLike
[…] Seam Allowance Marking Templates | so clever! […]
LikeLike
This is an absolutely brilliant idea. I normally use a Seam Allowance Guide on my scissors when I’m cutting out, because I don’t add seam allowances to my self-drafted patterns. I’m going to print out a set of these for myself, and I might start adding seam allowance to my patterns.
LikeLike
Thank you so much for sharing this tip. It shows that the cleverest ideas are often the simplest, this will be so useful. Very generous of you to give us access to your templates.
LikeLike
Oh my gosh!!! Thank you, thank you, for this! I am a brand-new sewist (at the tender age of 45 I decided that I need to learn to sew) and I have been dreading trying to mark curved seam allowances. You are a lifesaver!
LikeLike
Is it hard to cut the circles smoothly?
LikeLike
It’s not too bad. Use sharp scissors, and take your time.
LikeLike
I found the link for these on Tilly and the Buttons blog. This perfect! I need to add SA’s to a newly drafted bra pattern and *really* didn’t want to do the dot, dot, dot connect the dots method. Lol.
LikeLike
Thanks so much.I just thought about using this fitted around my machine needle when sewing around curves.
Will try it soon.
LikeLike
If that doesn’t work, you could try reducing your seam allowances on your pattern to be half the width of your presser foot. I’ve never liked 5/8″ seam allowances because they are so hard to sew accurately around curves.
LikeLike
That sounds like a good idea, can you please let us know how it works out for you.
LikeLike
Brilliant! Genius! Thanks so much:)
LikeLike
thank you for making and sharing!
LikeLike
Thank you so much for also posting this in metric! I’ll stick the smaller ones on an old plastic gift card. For those of you having trouble creating a hole: if cutting or drilling is not an option, try heating up an old metal (knitting)needle.
LikeLike
It is divine to have you genius designers (math heads) to show us the way.I have a Cricut and have whipped out a wonderful set of heavy card stock. Can’t wait to share with my CRICUT community.Ty so much!
LikeLike