
While I was researching my Singer 401A sewing machine, I discovered that there are vintage sewing machines made in the 1960’s and 1970’s that will sew a single thread chainstitch with the right attachments. I immediately decided I had to have one, since I don’t have a serger or cover stitch machine that sews chainstitches, and I hate picking out basting stitches.
 After doing some more research (which I will detail at the end of this post since I want to clear up some misinformation I found) I decided to buy a Singer 604E Touch & Sew. Unlike most of the 600 series Touch & Sews, this is a straight stitch only machine. I decided on this one because there is less to go wrong with a straight stitch machine and I wanted to leave it set up for chainstitching, so I wouldn’t be using the other stitches anyway.


Here are some ways you can use chain stitches, which quickly unravel when you pull on the thread at the end:
- Basting for trial fittings
- Marking a hem before you press it up
- Basting zipper openings closed
- Use anywhere you need to machine baste but will not be sewing directly over the basting stitches
- Attaching collars and trims that need to be removed for laundering
- Sewing hems that will need to be altered
- If your weight fluctuates, you can take in side seams, then easily let them out later
- Use single thread chain stitches as a stretch stitch on knits (2-thread chain stitches like you find on sergers and cover stitch machines are not stretchy)
I am having so much fun sewing basting stitches. Pulling out a seam in less than a second hasn’t lost its novelty yet. I’m like a kid playing with my new toy – sometimes I’ll sew a seam on a scrap of fabric just so I can pull it out!
P.S. I thought I’d throw in this basting tip – if you don’t have a chainstitch machine, try using wash-away basting thread for easy basting stitch removal.
The rest of this post is about the research I did on vintage chainstitch machines, which will probably only interest you if you are looking to buy one.
I very briefly considered getting a toy machine that chainstitches, but they usually don’t work, and for sure won’t work on thick fabric. Just go check out all the one star reviews on Amazon. I have memories of being frustrated with my toy sewing machine as a kid – I think maybe I got it to work once or twice for a few stitches. I looked at industrial chainstitch machines, and even simple vintage ones are at least as expensive as a cover stitch machine. Antique chainstitch machines are pretty, but they are expensive, may or may not work, and many of them use needles that are no longer manufactured.
As I was researching my Singer 401A, I read a lot of forum posts about vintage sewing machines, and I was excited to discover that there are some sewing machines made in the 1960’s and 1970’s that can chain stitch with a few simple attachments. Some of these machines are the Singer 600 series Touch and Sew machines (the 700 series Touch and Sews chainstitch too, but they all have plastic gears, so I would avoid those). The Singer 411G and 431G can chain stitch. Some Kenmore machines (many in the 158 series and some others) can also chain stitch with the right attachments. See this blog post and this thread for more info on Kenmores. Note that the Kenmore chainstitch attachments look completely different than the Singer chainstitching attachments.
I had a hard time doing research on these sewing machines. I found lots of conflicting information on blogs and forums, so I’m collecting what I learned here in one place, hopefully minus most of the mis-information other people have spread around the internet. I didn’t find as much information on Kenmore sewing machines, and I ended up buying a Singer, since the machines and attachments were less expensive and easier for me to find. The vintage Kenmores are good sewing machines, and they kept using metal gears even after Singer switched to plastic gears sometime in 1966, so if you can find one, don’t overlook a Kenmore as an option for chain stitching even though all of what I discuss below is about Singers. You might have trouble finding the right attachments to go with a particular Kenmore machine, so I’d suggest if you’re going to buy one, try to get one that comes with the chain stitch attachments.
Just to clarify, not all Singer sewing machines with model numbers in the 600’s are Touch & Sews, and not all Touch & Sews have model numbers in the 600’s. “Touch & Sew” machines have wind-in-place bobbins. The Touch & Sew machines I’m going to talk about are “600 series Touch & Sews” manufactured in the 1960’s. The 700 series Touch & Sews all have plastic gears, and as old as these machines are, if those gears haven’t broken yet, they will fail soon since the plastic is at the end of its expected lifespan. Singer has also re-used the name “Touch & Sew” for some modern sewing machines. Those are something completely different and I’m not discussing those at all.
All Singer 600 series Touch & Sew machines can chain stitch with the right attachments, despite what you might find on the internet leading you to believe otherwise.
The earliest models in the Touch & Sew series for sure had metal gears. These are the 600, 600E, 603, 603E, 604, and 604E. You sometimes find metal gears in later model numbers, like the 620 series models, but you’ll have to unscrew the bottom cover and look inside to find out if the gears are metal or plastic. I’m going to ignore any other Touch & Sew models, because . . . old plastic gears.
The only difference between the earliest Singer Touch & Sew models (600, 603, 604) and the later versions with “E” at the end of the model number (600E, 603E, 604E) is the location of the bobbin winder button. The very earliest 600’s were called Auto-Reel, before someone decided Touch & Sew was a catchier name. A “Singer 600 Auto-Reel” is exactly the same machine as a “Singer 600 Touch & Sew”.
Of the vintage Singer machines that can chain stitch, I would recommend choosing one with metal gears. These include (but are not limited to) model 600/600E (lots of built in stitches plus takes “top hat” special discs), 603/603E (will only make zig-zag or special stitches with a “top hat” special disc – no built in stitches), the 604/604E (straight stitch only), 411G (rare – built in stitches plus takes “top hat” special discs, and can be hooked up to a treadle base), or the 431G (rare – built in stitches plus takes “top hat” special discs, and has a free arm).
I wanted a machine to leave set up for chain stitching, so I chose the 604E, since as a straight stitch machine it has fewer parts to to break, it for sure has metal gears, and I happened to find one on ebay at a low price. I found a free Singer pdf manual for the 604, but not the 604E, so I also downloaded the 600E manual for the updated bobbin winding instructions. Here is a copy of the 600 series chain stitching guide. The Singer 24 manual has additional tips for sewing with single thread chain stitches.
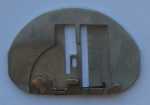
You need three attachments to chain stitch with any 600 series Touch & Sew sewing machine. They are the chain stitch throat plate (part #21913 for zig-zag models OR part #21915 for straight stitch machines), bobbin cover (part #21906), and thread guide (part #163455).
Here’s what the 600 series Touch & Sew chain stitch attachments look like. You might find them for sale mis-labeled or in with other attachments, so it helps to know what you’re looking for.
-
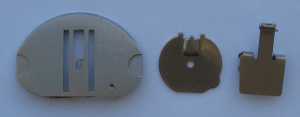
- Parts #21913, #21906, and #163455 front view
-

- Parts #21913, #21906, and #163455 back view
-
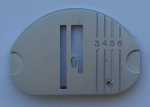
- Part #21915 front
-
- Part #21915 back
For the 411G or 431G, you will only need a chain stitch throat plate (part #503599 for the 411G; part #503601 for the 431G) to chain stitch. It looks similar to a mirror image of part #21913.
 GrowYourOwnClothes Etsy Shop

I use my 1963 #600 ( in chain stitch mode ) to sew in knits. To make a “safer” stitch, I turn around and make another row over the first.. Happy sewing !!!!
LikeLike
Thanks for the tip!
LikeLike
Hi Richard,
I have a 600E and the straight stitch is zig zaggy, It was perfect but after trying the fine stitch setting which just sewed in place, the straight stitch is no longer perfect but rather jagged looking. Also, the pattern stitch is not working although the gears shift to the different positions the stitches do not look like they are supposed to, Any suggestions?
LikeLike
In my experience, problems like this are usually caused by old oil gunking things up. Try taking the top off, heating the metal parts with a hairdryer, oiling the heck out of it, and running it for a while on a wide zig-zag setting. Repeat the oiling and running it on different stitch settings if necessary, and wipe up any old oil that flows out. Pay especial attention to parts that a spring attaches to. Chances are there is old sticky oil preventing these parts from moving completely to where the spring is trying to pull them to.
LikeLike
[…] sewed the test swatches into a little quilt. I quilted it together with chain stitches so it would be easy to take apart after washing, then I washed it on cold in my front loading […]
LikeLike
So glad to have found your post. I just got a Singer Touch & Sew model 639 (straight stitch only, also) at a rummage sale and wondered what the various accessories included were for. No owners’ manual was included. I believe the part you referred to as 21908 (the bobbin cover) is part 21906….at least for my model it is. Now, all I need to know is how to attach parts 21906 and 163455 and any special threading instructions so I can try the chainstitch. Can anyone give me directions?
LikeLike
Thanks for pointing out the different part number for the bobbin cover. I looked up pictures of part 21906 and it looks a little different than the part 21908 that I have. I don’t know if they are interchangeable or not. I didn’t show how to install and thread the attachments, since I linked to the the 600 series chain stitching guide. After clicking the link, look under the heading “Free Stuff for the 600 Series Machines – All PDF Files”, then click the button next to “Chain Stitch – Threading & Such.”
LikeLike
OK, after further research, I believe the part I have is 21906 after all. It’s really hard to read those tiny numbers. I’ve corrected the post to refer to the correct part number.
LikeLike
[…] starched the neckline, and tried topstitching with single thread chain stitches on my vintage Singer Touch & Sew. Much better. (The picture below was taken after the starch was washed […]
LikeLike
Now, where can I find the chainstitch parts for#431g
LikeLike
These are very hard to find. I’ve only seen them for sale on ebay along with the sewing machine, usually from Canada or Europe.
LikeLike
[…] 411G is that it chain stitches (if you have the chain stitch needle plate, part #503599). I have a Singer 604E that I got for chain stitching, but it doesn’t produce a very consistent stitch. The […]
LikeLike
If you buy a 401G from Germany, won’t it have the wrong voltage?
LikeLike
Yes. I am in the US and have a 411G from Canada so it had the right voltage.
LikeLike
One can use a 120-volt to 240-volt step-up transformer with the proper outlet.
LikeLike
I have a 603e original manual from the United States and while it points out inside the cover the feature of offering the chain stitch, there is no mention of how to do it or that it requires any additional parts.
LikeLike
I believe the instructions for chain stitching were published in a separate booklet. I had a link to chainstitching instructions I found online in this blog post, but the web site was changed. Here is a direct link to a pdf of the chain stitching instructions. I updated the link above also.
LikeLike
Hi Leila,
The new link is also dead. Do you happen to have a copy of the instructions?
LikeLike
I uploaded a copy of the chain stitching pdf here.
LikeLike
Thank you very kindly!
LikeLike