
Do you want to make professional looking print-at-home PDF patterns? How about doing it with free software?
There are many ways to create a tiled PDF pattern. Here’s how I do it in Inkscape, which is a free vector graphics program. I wrote another post on getting started with Inkscape, so check that out to see tips for getting started with Inkscape and work-arounds for some of the bugs I’ve run into.
If you want to see what my finished PDF patterns looks like using this method, download one of my free patterns.
I made an example .svg file that you can use to follow along with the steps below. Click the download button in Google Drive to save it to your computer (that upper bar auto-hides, so move your mouse cursor to the top of the screen to see it). Feel free to copy and paste from this file if you want to save yourself some work making borders, test squares, and alignment marks. It is set up for 8 1/2″ x 11″ paper, with a 7″ x 10″ pattern area.

Decide what size border you want on each sheet. I usually use 7″ x 10″. You may need to match a standard size if you are uploading your pattern somewhere – for example Burda style border size is 6.625” by 10”. Pick a size that will print well on both 8 1/2″ x 11″ paper and A4 paper. I recommend a maximum width of 7.25″ and a maximum height of 10″.
Note: I don’t suggest using strokes thicker than 0.5 px for any borders that are used as match lines, test squares, etc. I make my pattern lines 0.5 px, too, so that they can be cut accurately.
In Inkscape, draw a rectangle the size you chose for your border. Use a thin stroke and no fill. Turn on object snaps and make sure snap nodes or handles is selected. Duplicate the rectangle and create a grid big enough to fit all of your pattern pieces on.
Fit copies of your pattern pieces into the grid, and draw and label alignment marks. Make sure to add test squares so people can check that they printed to the correct scale. Make the test squares a minimum of 2″ x 2″ (5 cm x 5 cm), and make sure the stroke is 0.5 px or thinner. I’ve seen 1″ test squares drawn with a marker, and they are useless.

Now group all of your pattern pieces and the grid together so you can click on it as one object (select the objects, then press Ctrl-G).
In the page layout area, draw a rectangle the size of the paper (snap to the page border), then another one inside it that is 7″ by 10″. Make sure the inner rectangle is on top (select the rectangle, then use PageUp and PageDown keys to change which object is on top). It helps to temporarily set the fill for each rectangle to a different partially transparent color so you can see what’s going on.
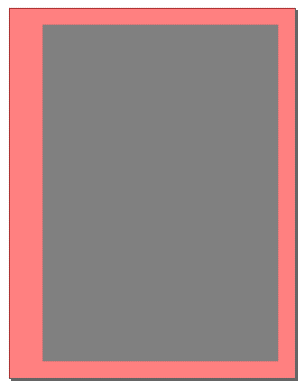
Select both rectangles, and from the menu, select Path > Difference. Now select the border, change the fill opacity to 100%, and change the fill color to white (don’t remove the fill – actually set it to the color “white”). I’ve left it pink in the picture below so you can see what shape it should be.

Create a new layer that is above all other layers, and put the border on this layer (select the border and press Shift-PageUp to change its layer).
If you want to add page numbers, make a text object on its own new layer that is above the border’s layer. You will have to manually update the text before exporting each sheet.
Now turn on object snaps, making sure snap to paths and snap to cusp nodes are selected. Select the grid and pattern grouped object, and snap the upper left corner of your pattern grid to the upper left corner of the inner rectangle on the page border. Edit the page number if necessary. See how the white border is masking off the pattern around the edges?

Now you are ready to export the first page to a PDF. From the menu, select File > Save a Copy. Change the file type to Portable Document Format (*.pdf), choose the folder to save in and a file name, and Save.
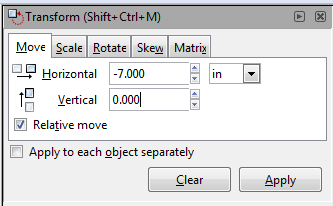
Move the grid over to the next sheet, update the page number if you are using them, and repeat to create the rest of the pages. I find that snapping to the page border is sometimes buggy, so if I’m having trouble dragging and snapping the grouped pattern pieces over for the next sheet, I use Object > Transform, Move to move the pattern to the left/right and up/down as needed. For example, if my border is 7″ by 10″, I would move it -7 inches horizontally to go to the sheet to the right or 10 inches vertically to go to the next row down.
Now you will probably want to combine the PDFs into a single file. I use the free software PDF Split And Merge Basic to combine PDF files, but there are a lot of other free options available too.
Update 12/3/2019:
I had a request for a video of making tiled pdfs. So, here it is.
 GrowYourOwnClothes Etsy Shop

Thanks for the tutorial. How do you get to the page layout view? I can only save an image of the whole page combination – it doesn’t want to separate out.
LikeLike
If you are not seeing your page layout, go to File > Document Properties, and on the Page tab, make sure “Show Page Border” is checked.
After you select File > Save a Copy, change the file type to Portable Document Format (*.pdf), choose the folder and file name, and click Save, you should get a pdf options window. Make sure that “Export area is drawing” is unchecked and “Export area is page” is checked.
LikeLike
Thank you for sharing this how to! I have been playing around with inkscape for a little while trying to work it all out, today I finally cracked it. Nice tiled pdf finished, it’s going to be much quicker than drawing and scanning. Thanks!
LikeLike
Thank you for this tutorial. I had downloaded a pants pattern and didn’t want to print and tape together 34 pages, so was able to use your instructions to print only 15 pages. I also discovered that my Brother printer says it prints at 100% scale, but is secretly scaling (about 0.59% in width over 8.5″ and 0.26% in length over 11″). It wasn’t so much that I could easily tell on the small test square, but the showed easily on the 8″x10.5″ border I used. It could be why my last skirt project was a little tight 😉
Also, I never managed to get the “snap to cusp nodes” working in Inkscape, but otherwise your tutorial worked brilliantly for me.
LikeLike
Thank you so much for this and the video. I’m totally new to Inkscape (and indeed any graphics software) and this was incredibly helpful and super easy to follow.
LikeLike
Thank you so much!! This was super useful.
LikeLike
[…] have the best tutorial on converting a file from an svg to a tiled pdf using inkscape. It’s here if you’re interested in doing something […]
LikeLike
Thank you for this process as it got me off and running with my site. I provide outdoor gear patterns (backpacks, fanny packs, etc) and used this process successfully until my most recent backpack pattern grew to cover two A0 size pages. Manually exporting those into 36 letter size pages just became too much. I ended up automating the whole process with a python script which I posted to my github (open source). With the script, one can export a high res png from inkscape and it will automatically tile a seamless pattern on letter size pages, adds a consistent page margin, converts all pages to PDF and then merges into a single PDF. It also can overlay a watermark on every page, which I use for copyright stamp as well as cut registration lines. My inkscape template includes the tiling registration so its unique per page. I’m investigating making this an inkscape plugin so one doesnt need to run a command line script.
If curious to try it for yourself, see github.com/myogpatterns/tiled-pattern-exporter
LikeLike
Ive been trying to prepare a file for laser cutting in two pieces and thought this might work but after seeing the youtube vid cannot figure out: do I need layers? did you do any masking or clip setting? My pdf just contains everything.
LikeLike
When you go to save as pdf, did you have “Use document’s page size” selected?
LikeLike
Thanks for your tutorial! The snapping thing was making me crazy too. I found a better work around: Edit > preferences > behavior > snapping Select: only snap to the node closest to the pointer. Weight 0.8
LikeLike
Thanks for the tip. That helps a lot. Sometimes I still have to zoom way in on the points I want to snap, but at least it snaps now.
LikeLike