
Amy at Cloth Habit wrote an awesome post about pattern drafting for the hobbyist with Adobe Illustrator. If Illustrator is out of your budget, you can try pattern drafting using Inkscape, which is free vector graphics software that can be used as a substitute for Illustrator. Most of this post will not make sense to you until you play around with Inkscape for a while. To get started in Inkscape I suggest you first go through some of the tutorials available in the Help menu. There are lots of tutorials and help available online too, including a very complete Guide to Inkscape. When you get started, first make sure you get familiar with
- The pen tool
- Edit paths by nodes, (especially join selected nodes and break path at selected nodes)
- Combine and break apart paths
- Object selection methods
- Object snaps
- The Transform commands
- Stroke
- Fill
- Rotating objects and moving object rotation centers
Since Inkscape is a free program, of course it does have some bugs and quirks you need to watch out for. For free software, however, it really is pretty powerful and capable. But save often!
Things to watch out for:
These tips were written for version 0.48. Later versions may have changes and bug fixes.
Don’t print directly from Inkscape; the scale will not come out right (as of version 0.48, anyway). Instead, save a copy your of your document as a PDF (from the menu, File > Save a copy, select PDF as the file type). This will save whatever is within your page layout area to a PDF. Now you can print the PDF from Adobe Acrobat Reader and it will come out fine.
Another printing issue you might need to watch out for, which is not related to Inkscape, is the print quality setting on your printer. My inkjet printer will not print to an accurate scale unless I set it to the highest quality print settings, so any time I print PDF sewing patterns, whether I’ve made them or not, I have to use the “presentation” print settings.
When you use the Scale command (from the menu, Object > Transform, then click the Scale tab), Inkscape scales the object based on what you see on the screen, so the width of the stroke will be included in the calculation when you scale an object to a specific size. For example, if you have a circle with a 1 mm thick stroke and scale it to 2 cm, then draw a line that is the length of the diameter of the circle by snapping from quadrant to quadrant, the line will be 1.9 cm long, not 2 cm. So what I do when I’m scaling an object is this: select the object, remove the stroke (if you don’t have any fill on your object it will temporarily disappear, but don’t worry, just make sure you don’t de-select your object), scale the object, then add the stroke back.

Other tips:
To measure the length of a line (path) you have to use the Measure Path extension. From the menu, Extensions > Visualize Path > Measure Path. This will actually print the length of your path as text in your drawing. It’s a little clunky, but it works.

Understand what is considered a single path. You can have a single path with multiple segments that don’t even touch each other (to make multiple paths into one, Path > Combine). If you select a node on a path and click Break path at selected nodes it is still a single path. In order to break it into two paths, you need to also break it apart (Path > Break Apart). However, if you have two paths and you use Join selected nodes to join the endpoints together you will now have one path.
To add seam allowances you will need to use the Outset command. Linked Offset and Dynamic Offset will not do what you want. First make sure that you have joined all the nodes together in your path – Outset may not do what you were expecting if you’ve only combined multiple segments. Here’s the weird part: you have to specify the inset and outset in pixels (abbreviated px), not inches or centimeters. (This was true as of version 0.48, but in later versions you can specify the inset and outset in inches/cm. See comments.) There are 90 pixels per inch, or 35.433 pixels per centimeter, so you’ll have to do some calculations. Let’s say you want to add a 5/8” seam allowance. From the menu, select File > Inkscape Preferences. Scroll down and select Steps. Change Inset/Outset by to 56.25 px (.625 inches * 90 px per inch = 56.25 px). Duplicate your path that is the stitching line for your pattern. The copy will now be selected. From the menu, select Path > Outset. The Inset and Outset commands treat every path as if it was a closed shape, so you may need to add segments to the ends of the copy of your original path (or close it) in order to get the outset command to do what you want. The resulting offset path will always be closed, so you may need to trim it.

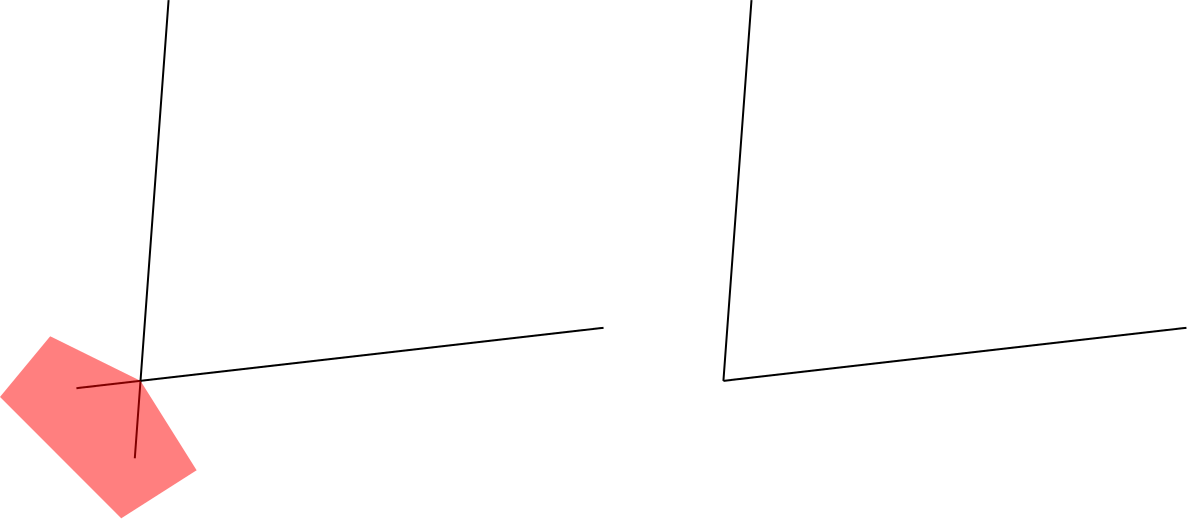
There is no true trim command like you would find in a drafting program. You have to get creative in order to accurately trim paths, and often it takes a few extra steps. Sometimes I will draw a temporary line, snapping one end to the intersection of where I want to trim my lines, then I add a node to the path I want to trim, snap the new node to the end of my temporary line, delete any extra nodes on the line I’m trimming, then delete my temporary line. Whew.

1-2. Draw a temporary path, snapping one endpoint to the point you want to trim to. 3. Add another node on one path near the point you are trimming to. Select the node, and snap it to the endpoint of the temporary path. 4. Select the extra nodes on the path to be trimmed and delete them. 5. Repeat steps 3-4 for any additional paths you are trimming. 6. Delete the temporary path.
Sometimes the Difference command works for trimming, but it’s buggy, so save first. Draw a closed shape around the portion of the path you want to trim. If you want to trim multiple paths, make duplicate copies of your closed shape before you use the Difference command, because you have to trim the paths one at a time, and the closed shape is deleted in the process. If the closed shape is not the last thing you drew, select it and press the Page Up key until it is above the line you want to trim (whichever object is on top is the one that will do the cutting). Select both the new closed path and the path you want to trim, then from the menu, Path > Difference. The Cut Path command will often work if Difference isn’t working. Then you can just delete the extra path created when the original path was broken into two. Sometimes Cut Path will (randomly and unexpectedly) do what the Difference command should have. If the wrong half of your path is being cut off, try reversing your path before you cut it (Path > Reverse).
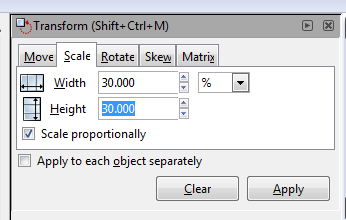
If you scan a paper pattern at 90 DPI and import it into Inkscape, it will be the right size. If you scan with a different resolution, you will need to scale the image after you import it. For example, a 300 DPI scan will need to be scaled 90/300*100% = 30%.
I find the easiest way to trace a scanned drawing is to simply use the pen tool to draw a path with straight line segments, placing a node in the center of each curve. Then go back and delete the extra nodes, which changes those path segments into curves. After that, select and move the handles on the nodes to change the shape of the curves. Add more nodes if you need to. It takes surprisingly few nodes to match a shape.

Here is a video demonstrating tracing a scanned pattern:
I’m willing to answer questions about Inkscape. Please be as clear as possible with any questions you have and include links to screen shots if possible.
 GrowYourOwnClothes Etsy Shop

I’m sure this will be so helpful to others! I tried Inkscape for awhile but I was so familiar with Illustrator that I kept on paying for it.
LikeLike
I can’t really justify the $$ for illustrator right now, so I’m pretty curious about Inkscape. Thanks for the tips!
I’m also curious, do you scan patterns at home, or take them somewhere with a larger format scanner? I have a few self-drafted patterns that I’ve been thinking I should digitize, mainly because I shudder to think that there’s only one paper copy of all that time and work! First on my list would be my pants patterns, which are way too big to fit in my scanner bed …
LikeLike
So far I’ve only used Inkscape for half-scale patterns and small things like pockets and zipper flies. Some of the half-scale patterns were too big to fit on my scanner, though, so I cut them apart, scanned them (with colored paper behind them so I could see the edges of the cut-out pattern), traced each piece in Inkscape, and re-assembled them. I found the important thing is to have vertical lines on each piece so I could get them rotated properly after I imported them. If you want to scan your large patterns at home, here’s what I would do (for an 8.5″ by 11″ scanner bed):
– Trace your pattern onto new paper (don’t cut it out). Make sure your lines are clearly visible, but thin (maybe use a pen).
– Starting 3.5″ from one edge, draw exactly parallel vertical lines 3.5″ apart across your pattern.
– Cut the pattern apart into 7″ wide strips (each will have a line going down the middle). Cut these strips into 10″ long pieces. The horizontal cuts aren’t as critical to get perfect.
– Scan the pieces, centered on the scanner bed.
– Import into Inkscape. Scale if necessary, depending on your scan resolution (you can select all of the images and scale them all at once).
– Rotate each piece until it is exactly vertical (use guide lines). To easily rotate the selected image small amounts, hold down the Alt key and press one of the square bracket keys: [ or ]
– Trace the pattern lines on each piece.
– Assemble the traced lines together.
All that is a fair amount of work for a large pattern, so it might be worth having it scanned at a copy shop. Large format scanners have rollers that pull your paper across the scanning sensors, so make sure your pattern is traced onto a rectangular piece of firm unwrinkled paper if you take it to be scanned. You’ll probably be OK if your paper is in good shape, but where I used to work we sometimes had scans come out with areas that were stretched or scrunched vertically, so it would be a good idea to draw a grid on your pattern before it is scanned so you can adjust it if some areas get stretched or shrunk.
Here’s another way to scan patterns you might want to look into. It sounds like the methods can be adapted to use free software if you don’t have Photoshop and Powerpoint: http://www.sewmamasew.com/2011/04/making-epatterns-part-two-eformat-your-pattern/
LikeLike
Thank you for taking the time to write this up! And for the excellent tips. I think I will try taking a pattern to the copy shop and see what it would cost to scan it. I wouldn’t have thought to have it on uncut, sturdy paper, but as soon as you said it, that made perfect sense. Thanks again!
LikeLike
[…] how I do it in Inkscape, which is a free vector graphics program. I wrote another post on getting started with Inkscape, so check that out to see tips for getting started with Inkscape and work-arounds for some of the […]
LikeLike
Incredibly helpful, thank you!
LikeLike
Great info — thanks! I downloaded the latest version of Inkscape (0.91). It allows you to set Inkscape Preferences > Steps > Inset/Outset in units such as inches and centimeters.
LikeLike
Thanks for the update.
LikeLike
I’ve been using Inkscape to draft patterns a bit, then viewing at 100% and tracing off the screen onto paper (you need to go into Inscape settings and adjust the ruler offset to make this work). I don’t have a printer at home, so this works for me, but if I wanted to break a pattern into multiple pages to make the usual sort of multi-page, tape-together PDF, how would I do that? I think Illustrator has a scalpel tool that could be quite useful for this, but Inkscape doesn’t. Clipping masks and many duplicate sets of objects?
LikeLike
I wrote a post on how I make tiled sheets here. I’m sure there are many other ways that would work, too.
LikeLike
Cool, thanks! The other thing that’s great in Inkscape is doing a full bust adjustment virtually, without having to cut up a paper pattern.
LikeLike
Hi! Thank you for the useful post, I’m learning loads from this.
I’ve just tried to add SA to a simple A-line skirt, but for some reason the Outset hasn’t copied the curve of the waistline (but it has picked up the hem curve). Can you suggest how come? I’ve tried adding nodes to give it more reference points but it does not seem to make a difference.
LikeLike
Sometimes when I have a problem like that it is because the endpoints of the path are not joined. Other times, though, the offset fails to work correctly for no apparent reason. In that case, I make a copy of the path, break it apart to isolate the problem area (such as the curved segment you are having problems with), then I extend the edges and add segments to the problem area of path so it is a different closed shape. I can then offset this new path and trim the resulting paths to get what I want. You can try making the new closed path extend out past the other side of the curved path segment so you can use inset instead of offset – sometimes one works when the other doesn’t. I don’t know if all that makes sense without pictures. Inkscape can be a bit of a pain sometimes, but the price is right.
LikeLike
Hi Leila,
thank you very much for your answer. I haven’t been able to figure out why is not working (inset doesn’t seem to work either) but I have managed to work around it. It’s good though to be aware of the limitations. As you say, the price is perfect. I haven’t yet tried your instructions to print a pdf file from the pattern, but it does look more complicated than in Illustrator. So far, my review is that it’s ok and it would work well to digitalize patterns that have already been drafted on paper. Oddly, I found blazier curves are much easier to draw here than in Illustrator.
Thanks again for sharing with us all!
G
LikeLike
This is great, thank you. You made my life easier in several respects. So I would like to give back a little: there is a much easier way to deal with the problem of Inkscape scaling your outline line. On the tools panel above, there are four square buttons with icons suggesting something to do with corners. If you uncheck the first of them, the scaling problem will stop and your lines will remain the same width as you scale.
LikeLike
I’m glad it helped. A lot of the info is now out of date, though. I’m using version 0.91 now. I tried 0.92, but had to go back to 0.91 because the inset and outset tools are completely messed up in 0.92, and I use outset all of the time for seam allowances.
If you are referring to the button that says “When scaling objects, scale the stroke width by the same proportion,” this only affects whether the stroke is changed in width when you scale an object. Regardless of whether that option is checked or not, an object is scaled in size based on the outer edge of the stroke, which is not what I want for drafting patterns. I still have to remove the stroke before scaling.
LikeLike
Thank you for this article. Since you seem to be actively answering questions several years after writing the article, I thought I’d jump in. Can you suggest a way to walk a pattern to check alignment, i.e. from the armhole, down the side seams to the bottom? I saw a video for Illustrator showing a rotate button to click which allows you to rotate one object (pattern piece) until the lines begin to separate, set a new point, continue to rotate until the line again separates, an so on, until you reach the end of the seam. I can’t find a tool to do this in Inkscape. Any ideas? Thanks in advance!
LikeLike
Here’s what I do to walk a seam. Let’s call the two pattern pieces A and B. Select all of the objects that are part of pattern piece B, duplicate them, group them, and change the stroke color to something that contrasts with piece A. Then move the copy of piece B until the beginning of the seam you are checking is aligned with the corresponding seam on piece A.
With the copy of piece B selected, click on it again to bring up the rotation options. Drag the + symbol for piece B (rotation center symbol – its default location is at the center of the object) to the beginning of the seam.
Rotate B to align the seams from the start point to however far up they match up. You can click and drag on the arrows on the corners of the selected object to rotate, use the [ and ] keys to rotate by whatever angle steps you have set (In Preferences, Steps, I set “Rotation snaps every” to 0.5 or 1 degree before I walk a seam) or Alt + [ and Alt + ] for fine rotation.
Move the rotation center symbol up to where the seam lines start to diverge, rotate the copy of B again, and repeat until you get to the end of the seam. Once you are done walking the seam and have noted the difference in length, you can delete the copy of piece B.
I hope that made sense. It’s so much easier to demonstrate in person!
LikeLike
Hi, it is about 5years since you did this. Are you still making patterns on Inkscape or is there a better programme for it.
LikeLike
Thank you so much Leila! This is exactly what I was looking for. Your instructions are great. I can’t figure out the keystrokes to rotate, (I must be missing something), however the rotation arrows work. Thank you for your quick response!
LikeLike